crwdns2915892:0crwdne2915892:0
This page will guide you how to replace the speaker on your Astro A40 TR Speakers headset. Please make sure device is powered off and be wary of any exposed wires. (Time estimate to replace speaker and reassemble: around 12 minutes - experience levels vary)
crwdns2942213:0crwdne2942213:0
-
-
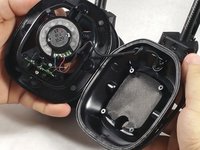
To access the speakers you need to disassemble the earpiece. First remove the foam ear piece by simply pinching the padding and pulling lightly until the magnets disengage.
-
-
-
Remove the dust cover located on the speaker. Use the corner of the spudger to peel underneath the cover until you can lift it by hand. The cover is held onto the device with adhesive and should be removed slowly.
-
-
-
-
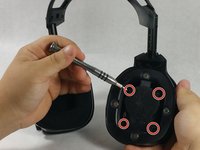
Take off the front cover by removing the four screws located in a square formation on the surface of the device. Use the J00 Philips driver listed in the device page.
-
-
-
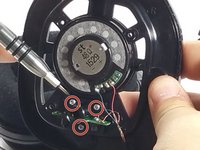
Locate the three small screws under the speaker. Use the J00 Philips Driver to remove them.
-
-
-
If your issue is asking for the complete replacement of the speaker or the motherboard, un-solder the old components and replace with new speaker by re-soldering.
-


To reassemble your device, follow these instructions in reverse order.
To reassemble your device, follow these instructions in reverse order.
crwdns2935221:0crwdne2935221:0
crwdns2935229:02crwdne2935229:0
crwdns2915084:0crwdne2915084:0

UMass Dartmouth, Team 6-5, Martin Fall 2016 crwdns2935289:0UMass Dartmouth, Team 6-5, Martin Fall 2016crwdne2935289:0
UMASSD-MARTIN-F16S6G5
crwdns2931471:03crwdne2931471:0
crwdns2935297:010crwdne2935297:0
crwdns2947412:02crwdne2947412:0
I’ve found potential replacement speakers here. They look fairly similar to the ones in the A40s, but the resistance value marked on the speakers in the guide vs on the listing is different.
Buyer caution must be taken before actually making the plunge, as sound quality might be different. The listing is from Ali Express after all.
Great so far but how do you actually remove the speaker/driver from the plastic casing without destroying the plastic parts, since it seems to be bonded or glued-in?