crwdns2915892:0crwdne2915892:0
In this guide we will take you through replacing a faulty microphone jack of your Astro A40 TR.
If you want to be able to communicate with fellow gamers but your microphone is starting to intermittently lose sound or completely stopped working, then it may be time to replace your microphone jack. A microphone jack enables sound to transmit into the computer or other device.
In order to completely replace the speaker, step 5 contains instructions on how to solder and desolder connections.
Before you begin, make sure you have the proper tools needed.
crwdns2942213:0crwdne2942213:0
-
-
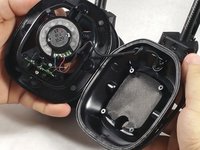
To access the speakers you need to disassemble the earpiece. First remove the foam ear piece by simply pinching the padding and pulling lightly until the magnets disengage.
-
-
-
Remove the dust cover located on the speaker. Use the corner of the spudger to peel underneath the cover until you can lift it by hand. The cover is held onto the device with adhesive and should be removed slowly.
-
-
-
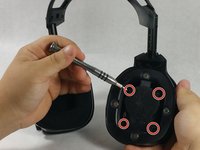
Take off the front cover by removing the four screws located in a square formation on the surface of the device. Use the J00 Philips driver listed in the device page.
-
-
-
-
Locate the three small screws under the speaker. Use the J00 Philips Driver to remove them.
-
-
-
If your issue is asking for the complete replacement of the speaker or the motherboard, un-solder the old components and replace with new speaker by re-soldering.
-
-
-
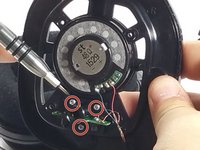
Remove the three screws in the photo with the J00 driver bit, and pull the headphone jack away from the assembly.
-
-
-
Un-solder the two wires circled, at this point the entire assembly can be removed from the speaker and the remainder of the device.
-


To reassemble your device, follow these instructions in reverse order.
crwdns2935221:0crwdne2935221:0
crwdns2935227:0crwdne2935227:0
crwdns2935287:0crwdne2935287:0

UMass Dartmouth, Team 6-5, Martin Fall 2016 crwdns2935289:0UMass Dartmouth, Team 6-5, Martin Fall 2016crwdne2935289:0
UMASSD-MARTIN-F16S6G5
crwdns2931471:03crwdne2931471:0
crwdns2935297:010crwdne2935297:0