crwdns2915892:0crwdne2915892:0
Using this guide will help you repair the microUSB port in your Archos 101 G9 tablet.
A micro USB port is a miniaturized version of the Universal Serial Bus (USB) interface developed for connecting compact and mobile devices such as smartphones, MP3 players, GPS devices, photo printers, and digital cameras. Micro USB connectors exist or have existed in three forms: micro A, micro B, and micro C. When you get to Step 4 of the guide, it is okay to remove the ribbon cable, but it will make your life easier if you try not to remove the ribbon cable that is attached to the plastic piece.
crwdns2942213:0crwdne2942213:0
-
-
Place an iFixit opening tool in the crease where the display assembly and back of the device meet.
-
Slide the tool firmly through the crease on one side of the device, twisting as you go to create separation.
-
When you reach the corner, carefully pry the two halves of the device apart.
-
Repeat for the remaining three sides and corners.
-
-
-
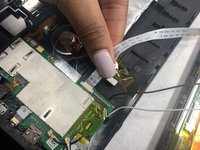
Gently remove both ribbon cables from their sockets on the motherboard.
-
-
-
Remove the white and black coaxial cables with gold tips from the motherboard.
-
-
-
Remove the display assembly from the back panel.
-
-
-
-
Remove the 2 mm screw that holds the motherboard in place using a Phillips #0 screwdriver.
-
-
-
Carefully remove the ribbon cable from its socket on the motherboard.
-
-
-
Remove the tape covering all of the solder connections on the motherboard.
-
-
-
Desolder all six of the connections that were underneath the tape.
-
-
-
Remove the motherboard from the tablet.
-
-
-
Locate the microUSB port at the bottom of the motherboard.
-
Remove the rubber piece next to the microUSB port.
-
-
-
Remove the plastic piece behind the microUSB port by hand.
-
-
-
Desolder the four solder points around the microUSB port.
-


To reassemble your device, follow these instructions in reverse order.
To reassemble your device, follow these instructions in reverse order.

crwdns2915084:0crwdne2915084:0

UMass Dartmouth, Team 4-1, Gulbrandsen Fall 2021 crwdns2935289:0UMass Dartmouth, Team 4-1, Gulbrandsen Fall 2021crwdne2935289:0
UMASSD-GULBRANDSEN-F21S4G1
crwdns2931471:03crwdne2931471:0
crwdns2935297:06crwdne2935297:0