crwdns2915892:0crwdne2915892:0
This is a replacement guide for the Apple iSight webcam privacy lens. It will demonstrate step-by-step how to disassemble the webcam in order to access the privacy lens.
crwdns2942213:0crwdne2942213:0
-
-
Remove two 3.55 mm screws that hold the body to the ball and socket joint using the PH000 screwhead.
-
-
crwdns2935267:0crwdne2935267:0Tweezers$4.99
-
Insert the tweezers into the crevice of the ball and socket joint, and prop up the tabs to remove the white ring from the body.
-
-
-
Press the Apple logo through to pull apart the body frame from the body of the webcam.
-
-
-
Remove the end cap with the Apple logo by simply pulling it off.
-
-
-
-
Unscrew the 3 (3.55 mm) screws surrounding the black casing near the camera-lens.
-
-
crwdns2935267:0crwdne2935267:0Tweezers$4.99
-
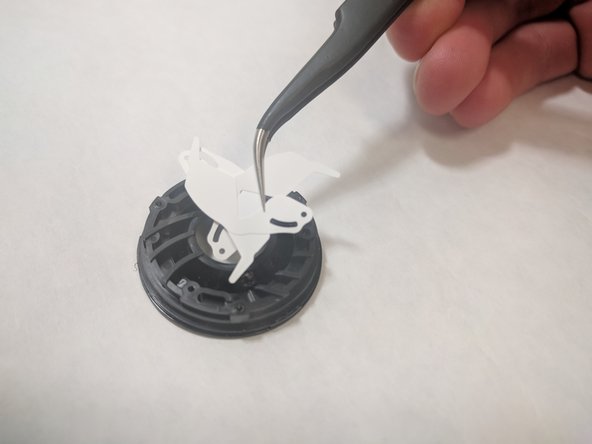
Using tweezers, remove the netting that surrounds the black casing.
-
-
-
Pry open the top of the black casing and pull it off.
-
-
-
Unscrew 2 (4.41 mm) screws seen in the picture that surround the attachment of the lens to the main body.
-
-
-
,Pull the loose circuit strip from its connection using tweezers.
-
Do this for the side connection as well. This enables the entire camera lens section to come off.
-
Pull the camera lens section off the main body.
-
-
-
Unscrew the final (4.41 mm) screw that connects the lens circuitry to the aperture.
-
Then pull off the circuitry top section.
-
-
-
Pull off the top piece of the lens aperture.
-
Finally, remove the privacy lens using tweezers.
-


To reassemble your device, follow these instructions in reverse order.
To reassemble your device, follow these instructions in reverse order.
crwdns2935221:0crwdne2935221:0
crwdns2935229:04crwdne2935229:0
crwdns2915084:0crwdne2915084:0

IUPUI, Team S5-G1, Baechle Spring 2018 crwdns2935289:0IUPUI, Team S5-G1, Baechle Spring 2018crwdne2935289:0
IUPUI-BAECHLE-S18S5G1
crwdns2931471:03crwdne2931471:0
crwdns2935297:03crwdne2935297:0