crwdns2933423:0crwdne2933423:0

Apple Thunderbolt Display Speaker Replacement

crwdns2942213:0crwdne2942213:0

  1. Apple Thunderbolt Display Speaker Replacement, LCD: crwdns2935265:01crwdnd2935265:01crwdnd2935265:03crwdne2935265:0 Apple Thunderbolt Display Speaker Replacement, LCD: crwdns2935265:01crwdnd2935265:02crwdnd2935265:03crwdne2935265:0 Apple Thunderbolt Display Speaker Replacement, LCD: crwdns2935265:01crwdnd2935265:03crwdnd2935265:03crwdne2935265:0
    • Lay down the display with screen side up.

    • Since the display is able to be tilted up and down, we found it useful to prop up the screen up with a styrofoam block in between the screen and the base.

    • Place the two suction cups on both sides of the top of the screen and make sure to lock them in place.

    • The glass screen is connected to the rest of the display by small magnets. Lift slowly and the screen will come right off.

  2. Apple Thunderbolt Display Speaker Replacement: crwdns2935265:02crwdnd2935265:01crwdnd2935265:02crwdne2935265:0 Apple Thunderbolt Display Speaker Replacement: crwdns2935265:02crwdnd2935265:02crwdnd2935265:02crwdne2935265:0
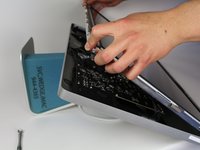
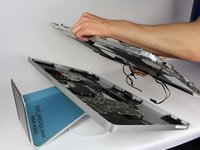
    • Unscrew the 12 screws around the side edges and the top of the LCD with the TR 10 Screwdriver.

  3. Apple Thunderbolt Display Speaker Replacement: crwdns2935265:03crwdnd2935265:01crwdnd2935265:02crwdne2935265:0 Apple Thunderbolt Display Speaker Replacement: crwdns2935265:03crwdnd2935265:02crwdnd2935265:02crwdne2935265:0
    • Slowly lift the LCD out from its placement and tilt it upwards.

    • It can be very helpful to have an extra set of hands to hold the LCD up while you work with the cables underneath.

    • There are four wires that connect the LCD to the rest of the components. Make sure not to pull hard and break any of the wires.

  4. Apple Thunderbolt Display Speaker Replacement: crwdns2935265:04crwdnd2935265:01crwdnd2935265:03crwdne2935265:0 Apple Thunderbolt Display Speaker Replacement: crwdns2935265:04crwdnd2935265:02crwdnd2935265:03crwdne2935265:0 Apple Thunderbolt Display Speaker Replacement: crwdns2935265:04crwdnd2935265:03crwdnd2935265:03crwdne2935265:0
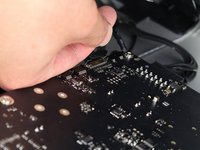
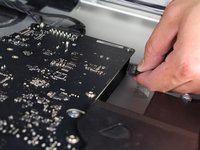
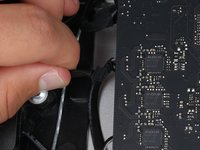
    • For the first of the four wires (furthest away from the wire that is held in by a screw), grab onto the connector and pull slowly.

  5. Apple Thunderbolt Display Speaker Replacement: crwdns2935265:05crwdnd2935265:01crwdnd2935265:03crwdne2935265:0 Apple Thunderbolt Display Speaker Replacement: crwdns2935265:05crwdnd2935265:02crwdnd2935265:03crwdne2935265:0 Apple Thunderbolt Display Speaker Replacement: crwdns2935265:05crwdnd2935265:03crwdnd2935265:03crwdne2935265:0
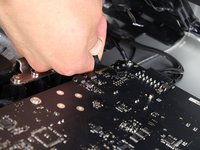
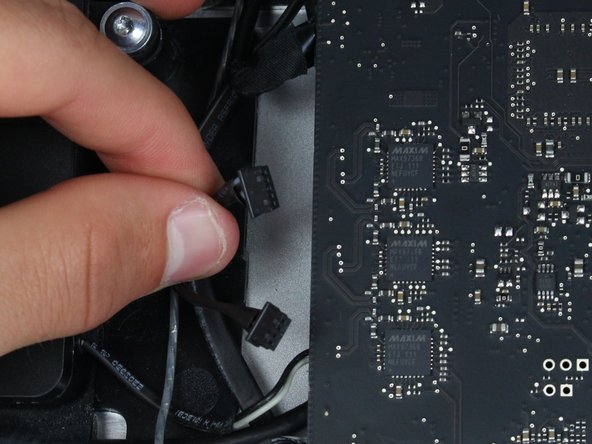
    • For the next connector, which is right next to the previous wire, there is a piece of tape attached to a metal bar.

    • Flip the metal bar over using the tape as a handle.

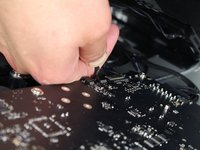
    • Next, grab onto the connector and slowly pull it from the socket in the logic board.

  6. Apple Thunderbolt Display Speaker Replacement: crwdns2935265:06crwdnd2935265:01crwdnd2935265:03crwdne2935265:0 Apple Thunderbolt Display Speaker Replacement: crwdns2935265:06crwdnd2935265:02crwdnd2935265:03crwdne2935265:0 Apple Thunderbolt Display Speaker Replacement: crwdns2935265:06crwdnd2935265:03crwdnd2935265:03crwdne2935265:0
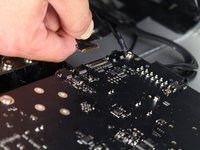
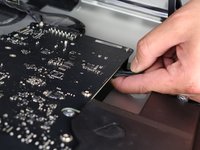
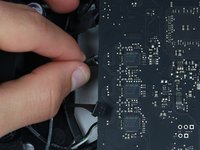
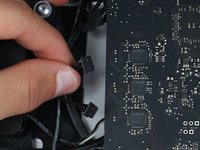
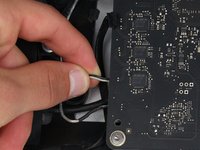
    • For the connector on the other side of the logic board, grab the connector from underneath and carefully pull it from the board.

  7. Apple Thunderbolt Display Speaker Replacement: crwdns2935265:07crwdnd2935265:01crwdnd2935265:01crwdne2935265:0
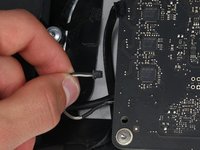
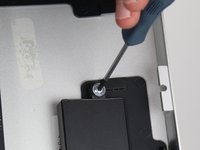
    • For the last wire connecting to the LCD, use your T 10 Screwdriver to remove the screw.

  8. Apple Thunderbolt Display Speaker Replacement: crwdns2935265:08crwdnd2935265:01crwdnd2935265:02crwdne2935265:0 Apple Thunderbolt Display Speaker Replacement: crwdns2935265:08crwdnd2935265:02crwdnd2935265:02crwdne2935265:0
    • The LCD has now been fully disconnected from the casing and can be repaired/replaced!

    • its best to set the LCD on a bed or on a thick towel to avoid damage to the LCD

  9. Apple Thunderbolt Display Speaker Replacement, Speaker: crwdns2935265:09crwdnd2935265:01crwdnd2935265:02crwdne2935265:0 Apple Thunderbolt Display Speaker Replacement, Speaker: crwdns2935265:09crwdnd2935265:02crwdnd2935265:02crwdne2935265:0
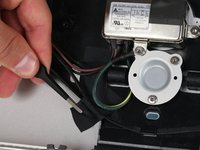
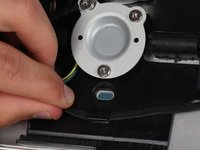
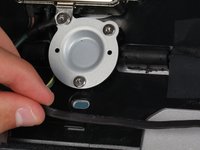
    • To the left of the middle speaker (the large black component in the middle of the device), there will be a couple of wires.

    • Use the tweezers to remove the piece of tape to free the wires.

    • Next, to the right of that piece of tape is black electrical tape that needs to be removed.

    • Use the tweezers to remove the piece of black tape.

    • Don't worry if you rip any tape as you can add a new piece when putting the speakers back.

  10. Apple Thunderbolt Display Speaker Replacement: crwdns2935265:010crwdnd2935265:01crwdnd2935265:01crwdne2935265:0
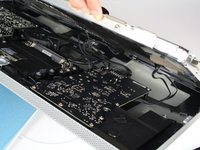
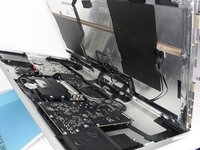
    • To the right of the middle speaker is the logic board. Here is where the three speakers in the display are connected and need to be removed.

  11. Apple Thunderbolt Display Speaker Replacement: crwdns2935265:011crwdnd2935265:01crwdnd2935265:02crwdne2935265:0 Apple Thunderbolt Display Speaker Replacement: crwdns2935265:011crwdnd2935265:02crwdnd2935265:02crwdne2935265:0
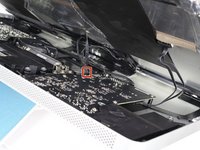
    • To remove the right speaker, disconnect the middle of the three wires.

    • Pull carefully on the connector to release the wires from the socket in the logic board.

  12. Apple Thunderbolt Display Speaker Replacement: crwdns2935265:012crwdnd2935265:01crwdnd2935265:02crwdne2935265:0 Apple Thunderbolt Display Speaker Replacement: crwdns2935265:012crwdnd2935265:02crwdnd2935265:02crwdne2935265:0
    • To remove the left speaker, locate the topmost connector of the three.

    • Carefully pull on the connector to release it from its socket in the logic board.

  13. Apple Thunderbolt Display Speaker Replacement: crwdns2935265:013crwdnd2935265:01crwdnd2935265:02crwdne2935265:0 Apple Thunderbolt Display Speaker Replacement: crwdns2935265:013crwdnd2935265:02crwdnd2935265:02crwdne2935265:0
    • The bottom of the three connectors goes to the middle speaker and has both a black and white wire.

    • Carefully pull on the connector to release the wires from the socket in the logic board.

  14. Apple Thunderbolt Display Speaker Replacement: crwdns2935265:014crwdnd2935265:01crwdnd2935265:03crwdne2935265:0 Apple Thunderbolt Display Speaker Replacement: crwdns2935265:014crwdnd2935265:02crwdnd2935265:03crwdne2935265:0 Apple Thunderbolt Display Speaker Replacement: crwdns2935265:014crwdnd2935265:03crwdnd2935265:03crwdne2935265:0
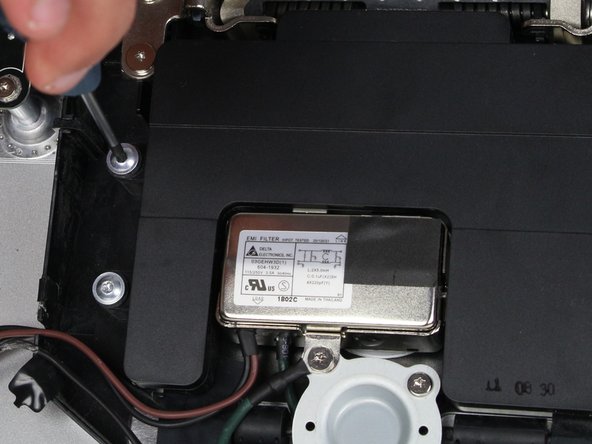
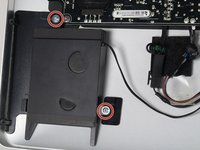
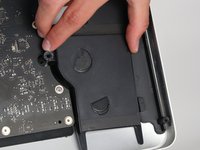
    • To remove the middle speaker, four screws must be removed.

    • Use the TR 10 screwdriver to remove the four screws and lift the speaker from its spot.

  15. Apple Thunderbolt Display Speaker Replacement: crwdns2935265:015crwdnd2935265:01crwdnd2935265:01crwdne2935265:0
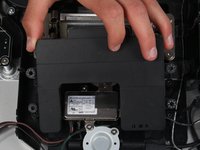
    • The middle speaker is now free and can be repaired/replaced!

  16. Apple Thunderbolt Display Speaker Replacement: crwdns2935265:016crwdnd2935265:01crwdnd2935265:02crwdne2935265:0 Apple Thunderbolt Display Speaker Replacement: crwdns2935265:016crwdnd2935265:02crwdnd2935265:02crwdne2935265:0
    • The left speaker is held in place by two screws.

    • Use the TR 10 screwdriver to free the left speaker.

    • Even though the speaker is free, the wire connecting to the logic board is not completely free, so don't try and pull the speaker away from the device yet.

  17. Apple Thunderbolt Display Speaker Replacement: crwdns2935265:017crwdnd2935265:01crwdnd2935265:03crwdne2935265:0 Apple Thunderbolt Display Speaker Replacement: crwdns2935265:017crwdnd2935265:02crwdnd2935265:03crwdne2935265:0 Apple Thunderbolt Display Speaker Replacement: crwdns2935265:017crwdnd2935265:03crwdnd2935265:03crwdne2935265:0
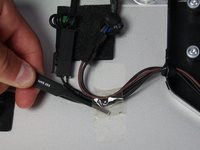
    • Follow the wire coming from the left speaker and see that it is held in place by some black tape.

    • Use tweezers to remove the tape from the wire.

    • Continue following the wire and unhook it from the two built in hooks in the casing.

  18. Apple Thunderbolt Display Speaker Replacement: crwdns2935265:018crwdnd2935265:01crwdnd2935265:01crwdne2935265:0
    • When lifting the speaker from the device, tilt it sideways to pull the speaker out from the tab on the lower right.

    • The speaker can now be replaced!

  19. Apple Thunderbolt Display Speaker Replacement: crwdns2935265:019crwdnd2935265:01crwdnd2935265:02crwdne2935265:0 Apple Thunderbolt Display Speaker Replacement: crwdns2935265:019crwdnd2935265:02crwdnd2935265:02crwdne2935265:0
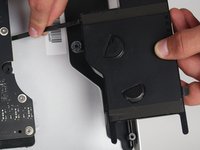
    • The right speaker is held in place by two screws (one at the top and one to the left).

    • Use the TR 10 screwdriver to remove the screws.

  20. Apple Thunderbolt Display Speaker Replacement: crwdns2935265:020crwdnd2935265:01crwdnd2935265:02crwdne2935265:0 Apple Thunderbolt Display Speaker Replacement: crwdns2935265:020crwdnd2935265:02crwdnd2935265:02crwdne2935265:0
    • The right speaker is also held in place by two tabs (one to the bottom right and bottom left).

    • Carefully pull the speaker upwards and out, and all three speakers can be repaired!

crwdns2915888:0crwdne2915888:0

To reassemble your device, follow these instructions in reverse order.

crwdns2935229:07crwdne2935229:0

Calvin Laverty

crwdns2935283:004/14/15crwdne2935283:0

2,240 crwdns2915208:0crwdne2915208:0

crwdns2935297:04crwdne2935297:0

crwdns2915084:0crwdne2915084:0

Cal Poly, Team 5-11, Maness Spring 2015 crwdns2935289:0Cal Poly, Team 5-11, Maness Spring 2015crwdne2935289:0

CPSU-MANESS-S15S5G11

crwdns2931471:04crwdne2931471:0

crwdns2935297:019crwdne2935297:0

crwdns2917034:0crwdne2917034:0

Bonjour ,

J'ai un soucis sur mon écran Apple Display Thunderbolt 27" 2011 ( relié a un macbook pro retina 15" de 2015 en parfait état de fonctionnement )
L'affichage et le son se coupaient tout seul sans aucune intervention de ma part , j'ai dans l'ordre procédé à ces changement :

Changement de cable Thunderbolt/Magsafe > Problème identique

Remplacement de la carte mere ( gestion affichage/son/ports USB...) > Resolution de la coupure de l'affichage mais le SON se coupe et bascule automatiquement sur le MBPR sans possibilité de reselectionner l'Apple Display

Je ne sais pas si cela est lié mais j'ai remarqué que dans les réglages son , lorsque les HP sont fonctionnels , cela m'indique que AUDIO MONITEUR est en USB ?...

J'hesite maintenant à remplacer la carte d'alimentation 250W ou bien d'isoler chaque HP pour voir si l'un d'eux serait en cause mais je doute qu'un HP puisse mettre en défaut la sortie audio ..

Des pistes ?

Merci d'avance pour vos idées

Jonathan FERRANTE - crwdns2934203:0crwdne2934203:0

crwdns2917038:0crwdne2917038:0

crwdns2936625:0crwdne2936625:0:

crwdns2936751:024crwdne2936751:0 0

crwdns2936753:07crwdne2936753:0 5

crwdns2936753:030crwdne2936753:0 37

crwdns2942667:0crwdne2942667:0 3,307