crwdns2915892:0crwdne2915892:0
Replacing the ADC cable. This cable provides connection to the computer, along with supplying power to the display.
crwdns2942213:0crwdne2942213:0
-
-
Lay the display facing down with the stand away from you.
-
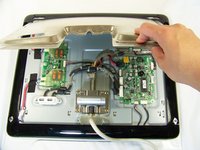
Remove the three size 2.0 hex screws on the swing arm and remove the swing arm as well as the plastic shield under it.
-
-
-
Remove the size 2.5 hex screws from each corner that connects the panels to the display and remove them.
-
-
-
Rotate the display so the legs of the display are now facing you
-
Grip the top of the clear panel and lift it upwards, and pull the ADC cable through the hole.
-
-
-
Remove the grey back panel by lifting the bottom and pulling the ADC cable through the hole.
-
-
-
The next layer will be a shiny metal panel, which might have some stickers. Make sure to remove these stickers.
-
-
-
-
Now locate and remove the lone Phillips screw holding the EMI shield to the display
-
-
-
Now that the screw has been removed, slide the panel towards your body and lift it out.
-
-
-
To remove the USB port, remove these four screws holding down the port and metal brackets.
-
-
-
Remove the cable from the logic board that is connecting the USB port.
-
-
-
Remove these four screws holding down the base of the swing arm to the display and remove it
-
-
-
Remove the four screws holding down the ADC cable to the display
-
-
-
Remove the three connections that connects the ADC assembly to the logic board and screen
-
-
-
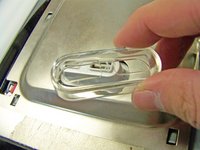
Remove and replace the ADC cable assembly.
-


To reassemble your device, follow these instructions in reverse order.
crwdns2935221:0crwdne2935221:0
crwdns2935229:03crwdne2935229:0
crwdns2935287:0crwdne2935287:0

Cal Poly, Team 3-20, Maness Winter 2010 crwdns2935289:0Cal Poly, Team 3-20, Maness Winter 2010crwdne2935289:0
CPSU-MANESS-W10S3G20
crwdns2931471:04crwdne2931471:0
crwdns2935297:023crwdne2935297:0
crwdns2947410:01crwdne2947410:0
What are the two red wires and two black wires ?