crwdns2915892:0crwdne2915892:0
If your Anki Cozmo robot keeps turning off or the screen does not come on, follow this guide. This guide is to assist users replacing the battery in an Anki Cozmo robot, so it can come back to life. The battery, located inside Cozmo’s base, allows it to survive. Without a functioning battery, nothing else will work. Before beginning, make sure to power off your Anki Cozmo robot and disconnect it from the Anki Cozmo app.
WARNING: when using hands to remove any component, be careful not to cut yourself or rip your fingernail.
crwdns2942213:0crwdne2942213:0
-
-
Remove the two black rubber treads from the wheels using your hands to pull them off.
-
-
-
Remove the white hubcap from each of the four wheels using the metal spudger to pry them off.
Note: The hubcaps are the same color of your Cozmo. My Cozmo is black to gray, but the one from the creator shows a white Cozmo.
-
-
-
Remove the 7.5 mm screw in the middle of each of the four red wheels using a JIS #1 screwdriver.
-
-
-
Remove the red hubcaps from each of the four wheels using your hands and fingers to pull them off.
-
-
-
Remove the 5.5 mm screw on the right side of the front gold bumper using a JIS #1 screwdriver.
-
-
-
Remove the 5.5 mm screw on the left side of the front gold bumper using a JIS #1 screwdriver.
-
-
-
Remove the front gold bumper using your hands and fingers to pull it off.
-
-
-
Remove the two 5.5 mm screws that lay deep on the right side of the gold body using a JIS #0 screwdriver.
-
-
-
-
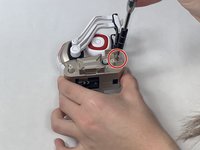
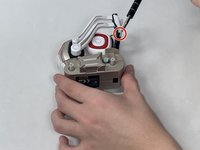
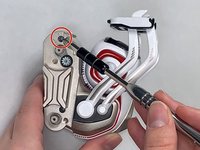
Pry off the two white arms from the right side of the body and the two white arms from the left side of the body using two metal spudgers.
-
Pry off the arms by digging the tips of each spudger in between the arm and the body and pushing up away from the body.
Steps 9 and 10 contain errors that will lead to broken parts of the robot.
The upper arms (thin) must be pry off on both sides with metal spudgers. Then remove the white axis that connects them (what is called a spring here).
And then you need to manually rotate the lower arms to the upper position (while slightly pulling them) until the latches are aligned with the corresponding slots in the case and the arms separate from the body. No force required.
If you remove them with metal spudgers, you will leave marks on the case and break one or more of the latches.
YES this is the good method to avoid broken arm :
The upper arms (thin) must be pry off on both sides with metal spudgers. Then remove the white axis that connects them (what is called a spring here).
And then you need to manually rotate the lower arms to the upper position (while slightly pulling them) until the latches are aligned with the corresponding slots in the case and the arms separate from the body. No force required.
Madcat -
Do note that to release the upper arms you can see the latch holding the arm in place when looking in between where the axis for the lower arm is. There you can push it in gently to release the latch using a small flathead screwdriver. This way removing the white axis is a lot easier.
-
-
-
Remove the long white spring that is attached to the right short arm from the center of the body using your hands and fingers to pull it out.
Steps 9 and 10 contain errors that will lead to broken parts of the robot.
The upper arms (thin) must be pry off on both sides with metal spudgers. Then remove the white axis that connects them (what is called a spring here).
And then you need to manually rotate the lower arms to the upper position (while slightly pulling them) until the latches are aligned with the corresponding slots in the case and the arms separate from the body. No force required.
If you remove them with metal spudgers, you will leave marks on the case and break one or more of the latches.
-
-
-
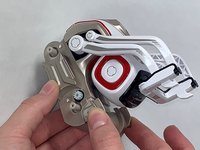
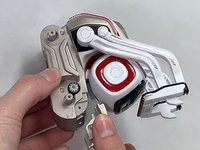
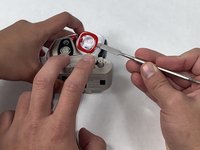
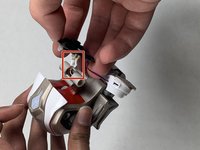
Pop off the two red square fascia from both sides of the white head using the metal spudger to pop them off.
-
-
-
Remove the two 5.5 mm screws from the right side of the white head using a JIS #0 screwdriver.
-
-
-
Remove the right side of the white head using your hands and fingers to pull it off.
-
-
-
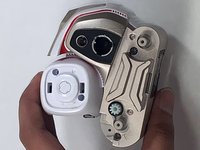
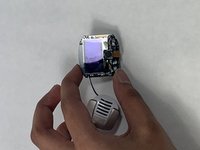
Pop out the black cover screen from the left side of the head using your hands and fingers to pull it out.
-
-
-
Remove the left side of the white head, along with the two short white springs that are attached to it, using your hands and fingers to pull them off.
-
-
-
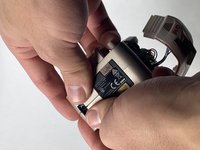
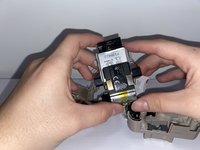
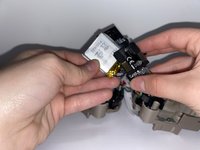
Unplug the black LED camera screen and the white and gold speaker from the small white plug in the center of the body using your hands and fingers to pull it off.
-
-
-
Remove the two 5.5 mm screws from the red trim that was behind the white head using a JIS #1 screwdriver.
-
-
-
Remove the red trim that was behind the white head using your hands and fingers to pull it off.
-
-
-
Pop off the white and gold back trim that is connected to the LED panel using your hands and fingers to pull it off.
-
-
-
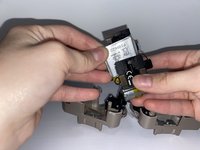
Remove the 7.5 mm screw from the gold bar in the center of the body using a JIS #1 screwdriver.
-
-
-
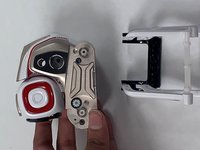
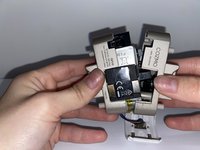
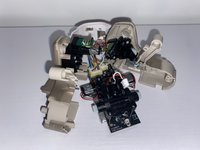
Pry apart the two halves of the gold body using your hands and fingers to pull them apart from each other.
-
-
-
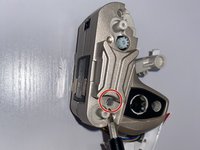
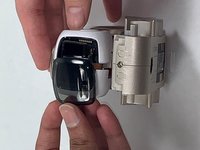
Unplug and remove the silver battery from the bottom of the charging panel using your hands and fingers to pull it out.
The battery is soldered into place, not plugged in. Perhaps this author confused this with Step 17 where they unnecessarily desoldered the speaker?
Max is a 750mAh akku after soldering old and new red and black cable.
Attention: to power on you need to put cozmo to usb basestation. All 3 green led then working.
(Or let us know to have a startup hint without prop. base) ;)
-


To reassemble your device, follow these instructions in reverse order.
To reassemble your device, follow these instructions in reverse order.
crwdns2935221:0crwdne2935221:0
crwdns2935229:016crwdne2935229:0

crwdns2915084:0crwdne2915084:0

UMass Dartmouth, Team 4-8, Gulbrandsen Fall 2021 crwdns2935289:0UMass Dartmouth, Team 4-8, Gulbrandsen Fall 2021crwdne2935289:0
UMASSD-GULBRANDSEN-F21S4G8
crwdns2931471:03crwdne2931471:0
crwdns2935297:07crwdne2935297:0
crwdns2947412:015crwdne2947412:0
To detach the battery, don’t forget to remove the solder from the two points where the battery connects. (For Cozmo Collectors edition w/ press-able backpack button)
The soldering steps are wrong. Don't desolder the speaker, but do desolder the battery.
Step 9 should be operated while the arm is at his maximum height.
Yes, excellent tip!
ticom3 -
Step 9 is the hardest from far ! And you'll easily get hurt by your tools. Moreover, reassembling cozmo will certainly deteriorate it. You should operate the big part of the arm (the lower) while the arm is at his maximum height. To do so, disassemble the white part of the fork by prying it down. Then remove the 2 screws of the upper arms, and remove these arms. Eventually, the big arm is easy to remove (or to reassemble).
Is it necessary to disconnect the screen? I am having trouble getting the little white connector pulled off and am wondering if I can just leave it connected
Its possible to carefully allow it to hang also.
This guide doesn't even mention soldering. Is it possible to replace the battery without soldering?
no its not posseboul
sorry for the bad english
I’m pretty sure I messed mine up. It turns on and everything is good after the battery replacement. But, now when I put it on the charger, the charger and the robot continuously flash and I don’t think it is charging. I may have messed something up on the soldering. Anyone have these symptoms after replacing the battery?
By the way, these instructions for disassembling and reassembling with the notes are spot on.
If battery is soldered on correctly should the Cozmo be able to power on before being reassembled?
Hum, the arm may take a wrong "zero" position in memory at startup, but it's not sure. This is a good question. If you make the test, give us a feedback please. Merry Christmas !
You do not need JIS screwdrivers. I have used Phillips head screwdrivers on Cozmo before. Also, for step 8, (at least for non button Cozmo’s) be careful. The non button’s back screws will strip more easily.
I cut the cables of the old battery and attached a 620mah Battery Type 503040, 3,7Volt, Bye soldering. The 503040 is almost to big to fit in. You have to compress/bend the contacts one the Battery to fit but worked well.
You do not need a JIS screwdriver, Philips works, I tried with Philips.