crwdns2933423:0crwdne2933423:0

Anker 2.4G Wireless Mouse Sensor Replacement

crwdns2942213:0crwdne2942213:0

  1. Anker 2.4G Wireless Mouse Sensor Replacement, Sensor: crwdns2935265:01crwdnd2935265:01crwdnd2935265:01crwdne2935265:0
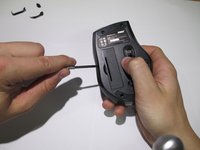
    • Using a spudger, carefully pry off the stickers to reveal the location of four screws.

  2. Anker 2.4G Wireless Mouse Sensor Replacement: crwdns2935265:02crwdnd2935265:01crwdnd2935265:01crwdne2935265:0
    • Using your Phillips screwdriver, remove the four screws.

  3. Anker 2.4G Wireless Mouse Sensor Replacement: crwdns2935265:03crwdnd2935265:01crwdnd2935265:02crwdne2935265:0 Anker 2.4G Wireless Mouse Sensor Replacement: crwdns2935265:03crwdnd2935265:02crwdnd2935265:02crwdne2935265:0
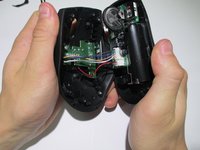
    • Using a spudger, carefully pry apart the upper and lower housing of the mouse.

    • Make sure you are not using too much pressure, as you could warp the plastic.

  4. Anker 2.4G Wireless Mouse Sensor Replacement: crwdns2935265:04crwdnd2935265:01crwdnd2935265:01crwdne2935265:0
    • Disconnect the wires from the white crimping headers.

    • Pull as far up on the wire as possible, but be careful to avoid ripping the wires.

  5. Anker 2.4G Wireless Mouse Sensor Replacement: crwdns2935265:05crwdnd2935265:01crwdnd2935265:01crwdne2935265:0
    • Remove the scroll wheel from the motherboard by pulling it to the left.

    • This may take some force to remove. Make sure to pull it parallel to the board, instead of perpendicularly.

  6. Anker 2.4G Wireless Mouse Sensor Replacement: crwdns2935265:06crwdnd2935265:01crwdnd2935265:01crwdne2935265:0
    crwdns2935267:0crwdne2935267:0
    Anti-Static Wrist Strap
    $7.95
    crwdns2942207:0crwdne2942207:0
    • Gently lift the motherboard away from the plastic housing.

    • Use an iFixit grounding strap or another antistatic measure to prevent sensitive components from electrostatic discharge during this step.

  7. Anker 2.4G Wireless Mouse Sensor Replacement: crwdns2935265:07crwdnd2935265:01crwdnd2935265:01crwdne2935265:0
    • Desolder the six wires holding the I.C. in place to complete the sensor change.

    • Replace the broken sensor with the new sensor and solder back in place.

    • Make sure none of your solder connections are bridged as this can cause serious damage to your mouse.

crwdns2915888:0crwdne2915888:0

To reassemble your device, follow these instructions in reverse order.

crwdns2935229:02crwdne2935229:0

Ryan

crwdns2935283:001/23/14crwdne2935283:0

140 crwdns2915208:0crwdne2915208:0

crwdns2935295:0crwdne2935295:0

crwdns2915084:0crwdne2915084:0

Cal Poly, Team 1-39, Maness Winter 2014 crwdns2935289:0Cal Poly, Team 1-39, Maness Winter 2014crwdne2935289:0

CPSU-MANESS-W14S1G39

crwdns2931471:04crwdne2931471:0

crwdns2935297:016crwdne2935297:0

crwdns2944067:00crwdne2944067:0

crwdns2917038:0crwdne2917038:0

crwdns2936625:0crwdne2936625:0:

crwdns2936751:024crwdne2936751:0 1

crwdns2936753:07crwdne2936753:0 6

crwdns2936753:030crwdne2936753:0 14

crwdns2942667:0crwdne2942667:0 7,501