crwdns2933423:0crwdne2933423:0

AmazonBasics B00Q3KFX8U Power Cable Replacement

crwdns2942213:0crwdne2942213:0

  1. AmazonBasics B00Q3KFX8U Power Cable Replacement, Drive Gear: crwdns2935265:01crwdnd2935265:01crwdnd2935265:01crwdne2935265:0
    • Remove the shredder assembly from the paper scrap bin.

  2. AmazonBasics B00Q3KFX8U Power Cable Replacement: crwdns2935265:02crwdnd2935265:01crwdnd2935265:01crwdne2935265:0
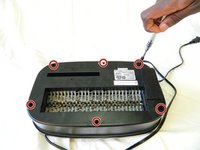
    • Remove the two 10mm PH1 screws holding the small black panel in place.

  3. AmazonBasics B00Q3KFX8U Power Cable Replacement: crwdns2935265:03crwdnd2935265:01crwdnd2935265:02crwdne2935265:0 AmazonBasics B00Q3KFX8U Power Cable Replacement: crwdns2935265:03crwdnd2935265:02crwdnd2935265:02crwdne2935265:0
    • Remove the six 14mm PH1 screws holding the bottom cover in place.

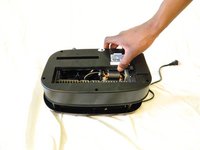
    • Remove the cover by lifting straight upwards.

    • One of the screws will be hidden beneath a warranty sticker. Simply push the head of the screwdriver through the sticker to access the screw.

  4. AmazonBasics B00Q3KFX8U Power Cable Replacement: crwdns2935265:04crwdnd2935265:01crwdnd2935265:01crwdne2935265:0
    • Remove the blade/motor assembly from the top cover by lifting straight upwards. Do not disconnect any wiring just yet.

    • The blades are sharp. Coming into contact with them may result in injury.

  5. AmazonBasics B00Q3KFX8U Power Cable Replacement: crwdns2935265:05crwdnd2935265:01crwdnd2935265:02crwdne2935265:0 AmazonBasics B00Q3KFX8U Power Cable Replacement: crwdns2935265:05crwdnd2935265:02crwdnd2935265:02crwdne2935265:0
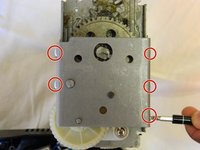
    • Remove the five 8mm PH2 screws from the bracket holding the gears in place.

  6. AmazonBasics B00Q3KFX8U Power Cable Replacement: crwdns2935265:06crwdnd2935265:01crwdnd2935265:01crwdne2935265:0
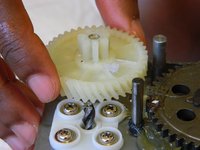
    • Use a metal spudger to pry the bracket from the main shredder assembly.

    • If the bracket is attached too tightly for the spudger, carefully use a metal screwdriver to pry it loose.

  7. AmazonBasics B00Q3KFX8U Power Cable Replacement: crwdns2935265:07crwdnd2935265:01crwdnd2935265:02crwdne2935265:0 AmazonBasics B00Q3KFX8U Power Cable Replacement: crwdns2935265:07crwdnd2935265:02crwdnd2935265:02crwdne2935265:0
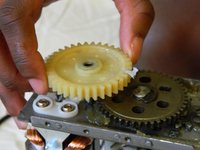
    • Remove the two plastic drive gears from the shredder assembly by lifting straight upwards.

  8. AmazonBasics B00Q3KFX8U Power Cable Replacement, Motor: crwdns2935265:08crwdnd2935265:01crwdnd2935265:01crwdne2935265:0
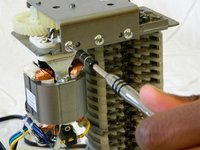
    • Remove the four 18mm PH2 screws holding the motor to the main shredder assembly.

  9. AmazonBasics B00Q3KFX8U Power Cable Replacement: crwdns2935265:09crwdnd2935265:01crwdnd2935265:01crwdne2935265:0
    • Disconnect the motor from the motherboard by either clipping the wires, or using a soldering iron to disconnect the wires directly at the board.

    • To reattach the motor, solder the wires back together, or to the motherboard depending on how you removed them.

  10. AmazonBasics B00Q3KFX8U Power Cable Replacement, Power Cable: crwdns2935265:010crwdnd2935265:01crwdnd2935265:01crwdne2935265:0
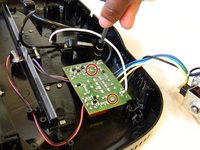
    • Remove the two 8mm PH1 screws holding the IR sensor wire in place. This will give you more room to work with later on.

  11. AmazonBasics B00Q3KFX8U Power Cable Replacement: crwdns2935265:011crwdnd2935265:01crwdnd2935265:02crwdne2935265:0 AmazonBasics B00Q3KFX8U Power Cable Replacement: crwdns2935265:011crwdnd2935265:02crwdnd2935265:02crwdne2935265:0
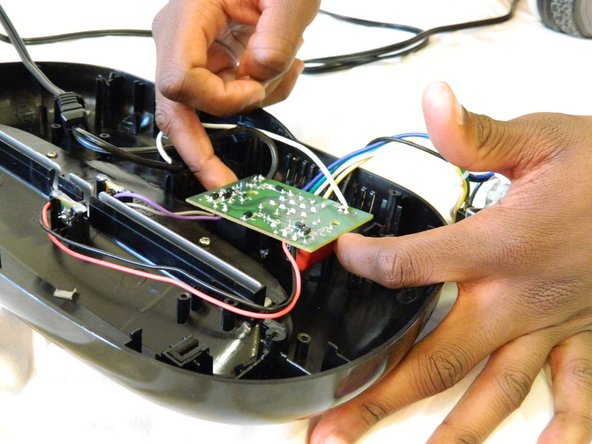
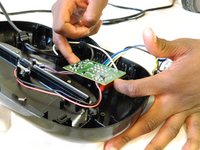
    • Remove the two 10mm PH1 screws holding the motherboard in place.

    • Remove the motherboard by lifting straight upwards from the top cover.

  12. AmazonBasics B00Q3KFX8U Power Cable Replacement: crwdns2935265:012crwdnd2935265:01crwdnd2935265:01crwdne2935265:0
    • To disconnect the power wire, remove the black and white wires on the far edges of the motherboard.

    • To reassemble, solder the wires back to the motherboard in the same location as they previously were.

    • When reassembling, be sure to replace the wires in the correct locations. Reversing the wires will short circuit the motherboard and may damage the device or injure yourself.

crwdns2915888:0crwdne2915888:0

To reassemble your device, follow these instructions in reverse order.

William Foley

crwdns2935283:003/25/16crwdne2935283:0

548 crwdns2915208:0crwdne2915208:0

crwdns2935297:04crwdne2935297:0

crwdns2915084:0crwdne2915084:0

UMass Dartmouth, Team 1-3, Miles Spring 2016 crwdns2935289:0UMass Dartmouth, Team 1-3, Miles Spring 2016crwdne2935289:0

UMASSD-MILES-S16S1G3

crwdns2931471:02crwdne2931471:0

crwdns2935297:04crwdne2935297:0

crwdns2944067:00crwdne2944067:0

crwdns2917038:0crwdne2917038:0

crwdns2936625:0crwdne2936625:0:

crwdns2936751:024crwdne2936751:0 0

crwdns2936753:07crwdne2936753:0 0

crwdns2936753:030crwdne2936753:0 21

crwdns2942667:0crwdne2942667:0 480