crwdns2915892:0crwdne2915892:0
Most replacement guides will require you to open up the Alexa to access components, so following this guide will let you access the internal components quickly and safely.
crwdns2942213:0crwdne2942213:0
-
-
-
Using your hands, gently remove the taped-in rubber foot from device.
 crwdns2952109:0crwdne2952109:0
-
-
-
Carefully peel off the bottom pad to expose the fastening screws.
-
Remove three silver 1.4 T5 Torx screws on the top row.
-
Remove one green 1mm T5 Torx screw in the middle.
-
Remove a black 1.5mm T5 screw.
-
Remove three green 1mm T5 screws from the bottom row.
-
-
-
-
After the screws are removed, grip the front panel and remove, using a plastic opening tool if necessary. This will expose the inside of the device.
-
-
crwdns2935267:0crwdne2935267:0Tweezers$4.99
-
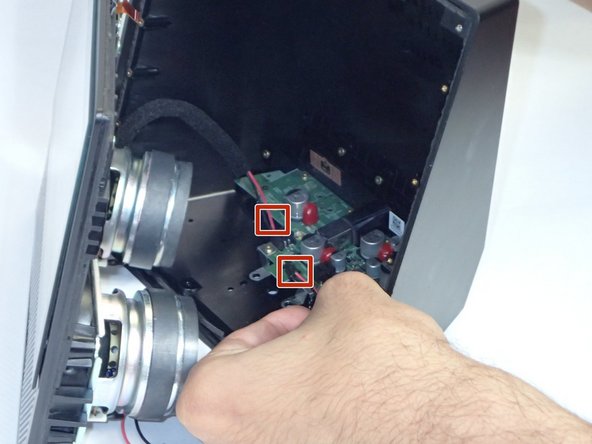
Use tweezers or your hands to carefully disconnect the red wires connecting the speakers to the power supply board.
-
Repeat this step for the other speaker, and lay the front section flat with the facing down.
-
-



To reassemble your device, follow these instructions in reverse order.

crwdns2935287:0crwdne2935287:0

University of South Florida St. Petersburg, Team S1-G3, Stowe Fall 2018 crwdns2935289:0University of South Florida St. Petersburg, Team S1-G3, Stowe Fall 2018crwdne2935289:0
USFSP-STOWE-F18S1G3
crwdns2931471:04crwdne2931471:0
crwdns2935297:072crwdne2935297:0
crwdns2947412:02crwdne2947412:0
this particular guide originally only had the prerequisite guide portion, so the steps to replace the top buttons were repeated across every single guide we had. I adjusted the prerequisite guide to include the separation of the two halves and moved the top button replacement guide to its own page. As this is still a private guide, it won’t be published unless we approve it.
Justin Williams - crwdns2934203:0crwdne2934203:0 crwdns2950251:0crwdne2950251:0
This article has been flagged as the prerequisite guide for a few of our articles, so I ended up altering it to be such. However, the ones that are not linked to this one, I added a few steps.
Justin Williams - crwdns2934203:0crwdne2934203:0 crwdns2950251:0crwdne2950251:0
