crwdns2915892:0crwdne2915892:0
If necessary, removing the CPU PCB allows for a complete reset of your Amazon Echo's memory. It is easy to remove and is the first step in disassembling the rest of the device.
After removing a few screws and the ribbon cable, a new CPU PCB can be inserted. Removing it only requires a spudger for the backing and a thin prying tool for disconnecting the ribbon cable.
crwdns2942213:0crwdne2942213:0
-
-
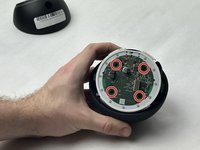
Using a spudger, remove the rubber footing around the base of the Echo Dot. This will reveal the four T8 1.25 cm Torx screws.
-
-
-
-
Once removed, the Echo Dot is now able to be split in two.
-
-
-
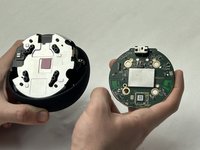
Remove the CPU PCB by removing the 4 T6 0.75cm Torx screws.
-
Once removed, unclip the plastic retainer on the CPU PCB and slide the ribbon cable out. This will reveal the speaker’s metal housing.
-


To reassemble your device, follow these instructions in reverse order.

crwdns2935287:0crwdne2935287:0

UMass Dartmouth, Team 3-4, Konn Fall 2023 crwdns2935289:0UMass Dartmouth, Team 3-4, Konn Fall 2023crwdne2935289:0
UMASSD-KONN-F23S3G4
crwdns2931471:04crwdne2931471:0
crwdns2935297:07crwdne2935297:0