crwdns2933423:0crwdne2933423:0

Altec Lansing VersA Smart Motherboard Replacement

crwdns2942213:0crwdne2942213:0

  1. Altec Lansing VersA Smart Motherboard Replacement, External Panels: crwdns2935265:01crwdnd2935265:01crwdnd2935265:01crwdne2935265:0
    • Remove external rubber cover.

  2. Altec Lansing VersA Smart Motherboard Replacement: crwdns2935265:02crwdnd2935265:01crwdnd2935265:02crwdne2935265:0 Altec Lansing VersA Smart Motherboard Replacement: crwdns2935265:02crwdnd2935265:02crwdnd2935265:02crwdne2935265:0
    • Use blue plastic opening tool to remove the external speaker face by placing it in the slight opening at the bottom.

    • Use a lever motion, push the tool down, lifting the speaker face.

    • Use fingers to grip and remove speaker face.

    • Repeat on reverse side to remove the second speaker face.

  3. Altec Lansing VersA Smart Motherboard Replacement: crwdns2935265:03crwdnd2935265:01crwdnd2935265:02crwdne2935265:0 Altec Lansing VersA Smart Motherboard Replacement: crwdns2935265:03crwdnd2935265:02crwdnd2935265:02crwdne2935265:0
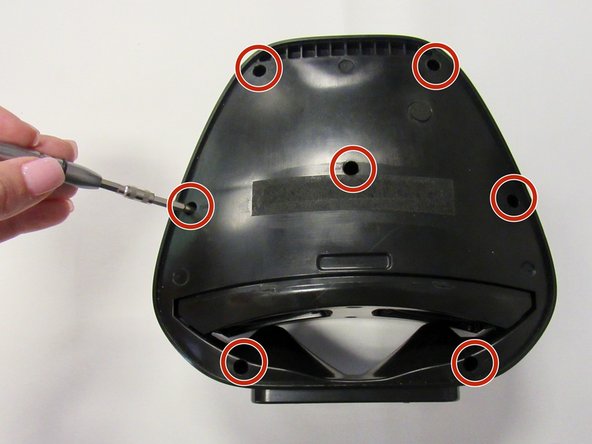
    • Orient speaker so volume buttons are facing away from you, and Bluetooth and power buttons are on the left-hand side.

    • Remove the seven 14mm screws using the Phillips #1 screwdriver.

  4. Altec Lansing VersA Smart Motherboard Replacement: crwdns2935265:04crwdnd2935265:01crwdnd2935265:01crwdne2935265:0
    • Reorient speaker so Bluetooth and power buttons are now on the right-hand side.

    • Separate the two panels along the crease.

    • Blue plastic opening tool may be needed to separate panels.

    • Remove the panel with no buttons to expose internal area of the device.

    • Motherboard and all internal components are under this panel.

  5. Altec Lansing VersA Smart Motherboard Replacement, Motherboard: crwdns2935265:05crwdnd2935265:01crwdnd2935265:01crwdne2935265:0
    • Remove the five wiring attachments (for the volume board, bluetooth board, speakers, and microUSB) from their connection to the motherboard by pulling slightly.

  6. Altec Lansing VersA Smart Motherboard Replacement: crwdns2935265:06crwdnd2935265:01crwdnd2935265:02crwdne2935265:0 Altec Lansing VersA Smart Motherboard Replacement: crwdns2935265:06crwdnd2935265:02crwdnd2935265:02crwdne2935265:0
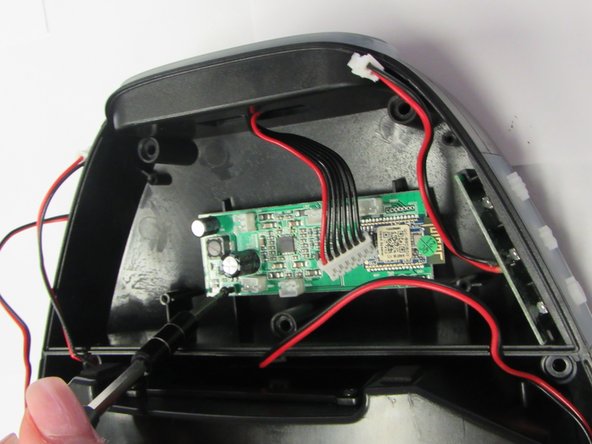
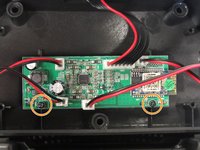
    • Remove the two 9mm screws holding the motherboard in place using the Torx T5 screwdriver.

  7. Altec Lansing VersA Smart Motherboard Replacement: crwdns2935265:07crwdnd2935265:01crwdnd2935265:01crwdne2935265:0
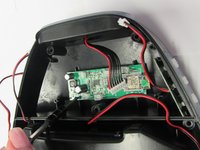
    • Remove the motherboard.

crwdns2915888:0crwdne2915888:0

To reassemble your device, follow these instructions in reverse order.

crwdns2935227:0crwdne2935227:0

Kendra Pennington

crwdns2935283:009/10/18crwdne2935283:0

118 crwdns2915208:0crwdne2915208:0

crwdns2935295:0crwdne2935295:0

crwdns2915084:0crwdne2915084:0

University of Alabama, Team S1-G3, Bedsole Fall 2018 crwdns2935289:0University of Alabama, Team S1-G3, Bedsole Fall 2018crwdne2935289:0

UA-BEDSOLE-F18S1G3

crwdns2931471:03crwdne2931471:0

crwdns2935297:06crwdne2935297:0

crwdns2917034:0crwdne2917034:0

Where can you buy replacement PCBS for ALTEC products?

Kelly Raile - crwdns2934203:0crwdne2934203:0

crwdns2917038:0crwdne2917038:0

crwdns2936625:0crwdne2936625:0:

crwdns2936751:024crwdne2936751:0 0

crwdns2936753:07crwdne2936753:0 1

crwdns2936753:030crwdne2936753:0 8

crwdns2942667:0crwdne2942667:0 327