crwdns2915892:0crwdne2915892:0
If your Alienware X51 disc drive is damaged or broken, it's crucial to replace it promptly to ensure uninterrupted performance. The replacement process should be straightforward, allowing you to resume using your Alienware X51 quickly. The disc drive is essential for reading and accessing discs, and when malfunctioning, it can lead to various symptoms such as difficulty reading discs or complete failure to function. Refer to our troubleshooting guide for detailed assistance in diagnosing and addressing these issues effectively.
crwdns2942213:0crwdne2942213:0
-
-
Place the PC so the name "Alienware" is on top and facing you.
-
Slide the front panel towards you and lift up.
-
-
-
Fully disconnect the panel by unplugging the lighting cord going into the PC's internal system.
-
Remove the front panel from the rest of the device.
-
-
-
-
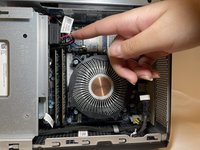
Disconnect the optical-drive data and power cable.
-
-
-
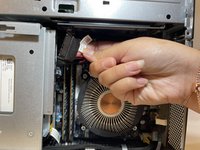
Remove the one 1.0 mm screw using a Phillips #1 screwdriver.
-
Remove the disc drive from the PC.
-


To reassemble your device, follow these instructions in reverse order.
crwdns2935221:0crwdne2935221:0
crwdns2935227:0crwdne2935227:0

crwdns2935287:0crwdne2935287:0

Eastern Washington University, Team 1-2, Carnegie Fall 2023 crwdns2935289:0Eastern Washington University, Team 1-2, Carnegie Fall 2023crwdne2935289:0
EWU-CARNEGIE-F23S1G2
crwdns2931471:04crwdne2931471:0
crwdns2935297:07crwdne2935297:0