crwdns2933423:0crwdne2933423:0

Alienware M17-R1 Screen Lock Assembly Replacement

crwdns2942213:0crwdne2942213:0

  1. Alienware M17-R1 Screen Lock Assembly Replacement, Screen Lock Assembly: crwdns2935265:01crwdnd2935265:01crwdnd2935265:01crwdne2935265:0
    • Open the screen until it is flat.

    • Ensure that the surface you are working on can support both the screen and the base of the laptop.

  2. Alienware M17-R1 Screen Lock Assembly Replacement: crwdns2935265:02crwdnd2935265:01crwdnd2935265:02crwdne2935265:0 Alienware M17-R1 Screen Lock Assembly Replacement: crwdns2935265:02crwdnd2935265:02crwdnd2935265:02crwdne2935265:0
    • Remove the eight 7 mm screws around the edge of the screen using a Phillips #1 screwdriver.

    • Support the screen from the bottom to make it easier to remove the screws.

  3. Alienware M17-R1 Screen Lock Assembly Replacement: crwdns2935265:03crwdnd2935265:01crwdnd2935265:02crwdne2935265:0 Alienware M17-R1 Screen Lock Assembly Replacement: crwdns2935265:03crwdnd2935265:02crwdnd2935265:02crwdne2935265:0
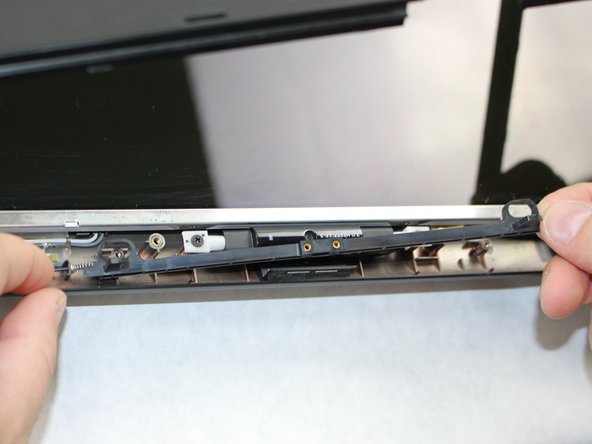
    • Insert the plastic opening tool and gently slide it around the edge of the screen to lift the face of the screen away from its base.

    • Be careful not to break the face of the screen when lifting it.

  4. Alienware M17-R1 Screen Lock Assembly Replacement: crwdns2935265:04crwdnd2935265:01crwdnd2935265:03crwdne2935265:0 Alienware M17-R1 Screen Lock Assembly Replacement: crwdns2935265:04crwdnd2935265:02crwdnd2935265:03crwdne2935265:0 Alienware M17-R1 Screen Lock Assembly Replacement: crwdns2935265:04crwdnd2935265:03crwdnd2935265:03crwdne2935265:0
    • Remove the two 3 mm Phillips #1 screws using a Phillips #1 screwdriver.

    • Pull the assembly grip away to remove it.

    • Remove the two 5 mm screws using a Phillips #1 screwdriver.

  5. Alienware M17-R1 Screen Lock Assembly Replacement: crwdns2935265:05crwdnd2935265:01crwdnd2935265:02crwdne2935265:0 Alienware M17-R1 Screen Lock Assembly Replacement: crwdns2935265:05crwdnd2935265:02crwdnd2935265:02crwdne2935265:0
    • Push in the assembly towards the spring.

    • Gently lift the slider from the side opposite to the spring and pull the slider away from the spring.

    • The spring is loosely secured to the slider and may fall off and become lost when removing the slider.

  6. Alienware M17-R1 Screen Lock Assembly Replacement: crwdns2935265:06crwdnd2935265:01crwdnd2935265:02crwdne2935265:0 Alienware M17-R1 Screen Lock Assembly Replacement: crwdns2935265:06crwdnd2935265:02crwdnd2935265:02crwdne2935265:0
    • If the spring is defective, slide it off the end of the assembly and replace it.

crwdns2915888:0crwdne2915888:0

To reassemble your device, follow these instructions in reverse order.

William Davis

crwdns2935283:010/09/18crwdne2935283:0

323 crwdns2915208:0crwdne2915208:0

crwdns2935297:02crwdne2935297:0

crwdns2915084:0crwdne2915084:0

Sam Houston State, Team S15-G2, Blackburne Fall 2018 crwdns2935289:0Sam Houston State, Team S15-G2, Blackburne Fall 2018crwdne2935289:0

SHSU-BLACKBURNE-F18S15G2

crwdns2931471:04crwdne2931471:0

crwdns2935297:05crwdne2935297:0

crwdns2947412:00crwdne2947412:0

crwdns2917038:0crwdne2917038:0

crwdns2936625:0crwdne2936625:0:

crwdns2936751:024crwdne2936751:0 0

crwdns2936753:07crwdne2936753:0 0

crwdns2936753:030crwdne2936753:0 6

crwdns2942667:0crwdne2942667:0 456