crwdns2933423:0crwdne2933423:0

Alienware M15x Hard-Drive Replacement

crwdns2942213:0crwdne2942213:0

  1. Alienware M15x Hard-Drive Replacement, Turn the Computer: crwdns2935265:01crwdnd2935265:01crwdnd2935265:01crwdne2935265:0
    • WARNING: Before working inside your computer, read the safety information that shipped with your computer.

    • Turn the computer over.

  2. Alienware M15x Hard-Drive Replacement, Sliding the Battery: crwdns2935265:02crwdnd2935265:01crwdnd2935265:01crwdne2935265:0
    • Slide the battery latch to the unlock position as shown.

  3. Alienware M15x Hard-Drive Replacement, Removing the Battery Pack: crwdns2935265:03crwdnd2935265:01crwdnd2935265:01crwdne2935265:0
    • After the Battery Pack pops up, remove the Battery Pack.

  4. Alienware M15x Hard-Drive Replacement, Aligning the Battery Pack Tabs: crwdns2935265:04crwdnd2935265:01crwdnd2935265:01crwdne2935265:0
    • Align the battery pack tabs with the slots in the battery bay.

  5. Alienware M15x Hard-Drive Replacement, Pushing the Battery Pack: crwdns2935265:05crwdnd2935265:01crwdnd2935265:01crwdne2935265:0
    • Push the NEW battery pack into the battery bay until the battery pack clicks into place.

  6. Alienware M15x Hard-Drive Replacement, Loosen the Screws: crwdns2935265:06crwdnd2935265:01crwdnd2935265:01crwdne2935265:0
    • WARNING: Before working inside your computer, read the safety information that shipped with your computer.

    • WARNING: If you remove the hard drive from the computer when the drive is hot, do not touch the metal housing of the hard drive.

    • Loosen the four captive screws that secure the hard-drive assembly.

  7. Alienware M15x Hard-Drive Replacement, Lifting the Hard-Drive Assembly: crwdns2935265:07crwdnd2935265:01crwdnd2935265:01crwdne2935265:0
    • Using the pull-tab, lift the hard-drive assembly out of the hard-drive bay.

  8. Alienware M15x Hard-Drive Replacement, Remove the Screws: crwdns2935265:08crwdnd2935265:01crwdnd2935265:01crwdne2935265:0
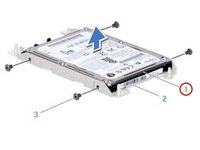
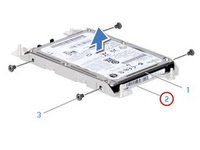
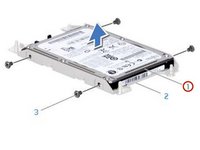
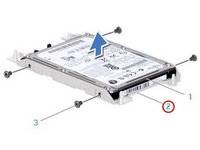
    • Remove the four screws that secure the hard drive to the hard-drive bracket.

  9. Alienware M15x Hard-Drive Replacement, Lifting the Hard Drive: crwdns2935265:09crwdnd2935265:01crwdnd2935265:02crwdne2935265:0 Alienware M15x Hard-Drive Replacement, Lifting the Hard Drive: crwdns2935265:09crwdnd2935265:02crwdnd2935265:02crwdne2935265:0
    • Lift the hard drive out of the hard-drive bracket.

  10. Alienware M15x Hard-Drive Replacement, Disconnect the Interposer: crwdns2935265:010crwdnd2935265:01crwdnd2935265:02crwdne2935265:0 Alienware M15x Hard-Drive Replacement, Disconnect the Interposer: crwdns2935265:010crwdnd2935265:02crwdnd2935265:02crwdne2935265:0
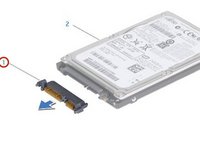
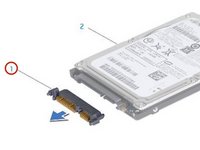
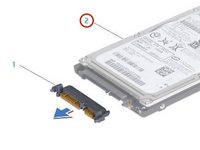
    • Disconnect the interposer from the hard drive.

  11. Alienware M15x Hard-Drive Replacement, Connecting the Interposer: crwdns2935265:011crwdnd2935265:01crwdnd2935265:02crwdne2935265:0 Alienware M15x Hard-Drive Replacement, Connecting the Interposer: crwdns2935265:011crwdnd2935265:02crwdnd2935265:02crwdne2935265:0
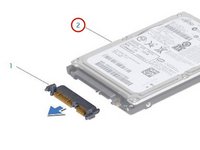
    • Connect the interposer to the NEW hard drive.

  12. Alienware M15x Hard-Drive Replacement, Placing the Hard-Drive in the Bracket: crwdns2935265:012crwdnd2935265:01crwdnd2935265:02crwdne2935265:0 Alienware M15x Hard-Drive Replacement, Placing the Hard-Drive in the Bracket: crwdns2935265:012crwdnd2935265:02crwdnd2935265:02crwdne2935265:0
    • Place the hard drive in the hard-drive bracket.

  13. Alienware M15x Hard-Drive Replacement, Replace the Four Screws: crwdns2935265:013crwdnd2935265:01crwdnd2935265:01crwdne2935265:0
    • Replace the four screws that secure the hard drive to the hard-drive bracket.

  14. Alienware M15x Hard-Drive Replacement, Placing the Hard-Drive Assembly: crwdns2935265:014crwdnd2935265:01crwdnd2935265:01crwdne2935265:0
    • Place the hard-drive assembly in the hard-drive bay.

  15. Alienware M15x Hard-Drive Replacement, Aligning and Tightening the Screws: crwdns2935265:015crwdnd2935265:01crwdnd2935265:01crwdne2935265:0
    • Align and tighten the four captive screws that secure the hard-drive assembly to the hard-drive bay.

crwdns2915888:0crwdne2915888:0

To reassemble your device, follow these instructions in reverse order.

Terrence15

crwdns2935283:012/18/17crwdne2935283:0

79,091 crwdns2915208:0crwdne2915208:0

crwdns2935297:0441crwdne2935297:0

crwdns2915084:0crwdne2915084:0

RampUP America, Inc. crwdns2935289:0RampUP America, Inc.crwdne2935289:0

Community

crwdns2931471:042crwdne2931471:0

crwdns2935297:01,985crwdne2935297:0

crwdns2944067:00crwdne2944067:0

crwdns2917038:0crwdne2917038:0

crwdns2936625:0crwdne2936625:0:

crwdns2936751:024crwdne2936751:0 0

crwdns2936753:07crwdne2936753:0 1

crwdns2936753:030crwdne2936753:0 2

crwdns2942667:0crwdne2942667:0 482