crwdns2933423:0crwdne2933423:0

AcuRite 02032 Wind Cup Assembly Opening

crwdns2862623:0crwdne2862623:0
crwdns2942641:0crwdne2942641:0

crwdns2942213:0crwdne2942213:0

  1. AcuRite 02032 Wind Cup Assembly Opening, Battery: crwdns2935265:01crwdnd2935265:01crwdnd2935265:03crwdne2935265:0 AcuRite 02032 Wind Cup Assembly Opening, Battery: crwdns2935265:01crwdnd2935265:02crwdnd2935265:03crwdne2935265:0 AcuRite 02032 Wind Cup Assembly Opening, Battery: crwdns2935265:01crwdnd2935265:03crwdnd2935265:03crwdne2935265:0
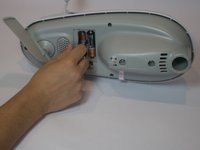
    • Remove the battery compartment lid by lifting upward.

  2. AcuRite 02032 Wind Cup Assembly Opening: crwdns2935265:02crwdnd2935265:01crwdnd2935265:01crwdne2935265:0
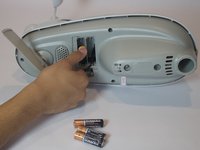
    • Pull the ribbon to eject the 2 X AA alkaline batteries.

  3. AcuRite 02032 Wind Cup Assembly Opening: crwdns2935265:03crwdnd2935265:01crwdnd2935265:03crwdne2935265:0 AcuRite 02032 Wind Cup Assembly Opening: crwdns2935265:03crwdnd2935265:02crwdnd2935265:03crwdne2935265:0 AcuRite 02032 Wind Cup Assembly Opening: crwdns2935265:03crwdnd2935265:03crwdnd2935265:03crwdne2935265:0
    • Once the batteries are removed, it is safe to proceed.

  4. AcuRite 02032 Wind Cup Assembly Opening, Base: crwdns2935265:04crwdnd2935265:01crwdnd2935265:01crwdne2935265:0
    • Remove the four 0.8cm screws that attach the bottom panel to the device

    • An extended driver is needed to reach 3 of these screws. If you are using the 64 - bit driver kit you can extend the driver by inserting the driver PH1, (Phillips size 1) into the size 4 hexagonal adapter.

  5. AcuRite 02032 Wind Cup Assembly Opening: crwdns2935265:05crwdnd2935265:01crwdnd2935265:02crwdne2935265:0 AcuRite 02032 Wind Cup Assembly Opening: crwdns2935265:05crwdnd2935265:02crwdnd2935265:02crwdne2935265:0
    • Gently lift the top section of the weather center away from the base. With all the screws removed it should lift off easily.

  6. AcuRite 02032 Wind Cup Assembly Opening, Wind Cup Assembly Opening: crwdns2935265:06crwdnd2935265:01crwdnd2935265:01crwdne2935265:0
    • Remove the four 0.8cm screws inside the case located near the fan using the J1 screw bit.

  7. AcuRite 02032 Wind Cup Assembly Opening: crwdns2935265:07crwdnd2935265:01crwdnd2935265:01crwdne2935265:0
    • Remove the three 0.8cm screws inside of the solar panel housing.

  8. AcuRite 02032 Wind Cup Assembly Opening: crwdns2935265:08crwdnd2935265:01crwdnd2935265:02crwdne2935265:0 AcuRite 02032 Wind Cup Assembly Opening: crwdns2935265:08crwdnd2935265:02crwdnd2935265:02crwdne2935265:0
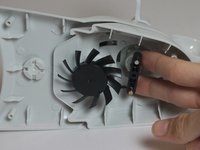
    • Gently twist and pull the black magnetic axle until it comes off. Hold the wind cups still in order to remove the axle easily.

    • Do not apply too much force to the axle or the wind cups. Light twisting or wobbling it side to side should loosen it enough for the axle to come off easily.

  9. AcuRite 02032 Wind Cup Assembly Opening: crwdns2935265:09crwdnd2935265:01crwdnd2935265:01crwdne2935265:0
    • Carefully slide apart the two parts of the solar panel housing.

crwdns2915888:0crwdne2915888:0

To reassemble your device, follow these instructions in reverse order.

Henry Lwin

crwdns2935283:009/15/16crwdne2935283:0

180 crwdns2915208:0crwdne2915208:0

crwdns2935295:0crwdne2935295:0

crwdns2915084:0crwdne2915084:0

CSU Fullerton, Team 1-4, Bruce Fall 2016 crwdns2935289:0CSU Fullerton, Team 1-4, Bruce Fall 2016crwdne2935289:0

CSUF-BRUCE-F16S1G4

crwdns2931471:05crwdne2931471:0

crwdns2935297:07crwdne2935297:0

crwdns2947412:00crwdne2947412:0

crwdns2917038:0crwdne2917038:0

crwdns2936625:0crwdne2936625:0:

crwdns2936751:024crwdne2936751:0 0

crwdns2936753:07crwdne2936753:0 2

crwdns2936753:030crwdne2936753:0 2

crwdns2942667:0crwdne2942667:0 98