crwdns2933423:0crwdne2933423:0

Acer Nitro 5 AN515-53-55G9 Battery Replacement

crwdns2942213:0crwdne2942213:0

  1. Acer Nitro 5 AN515-53-55G9 Battery Replacement, Battery: crwdns2935265:01crwdnd2935265:01crwdnd2935265:03crwdne2935265:0 Acer Nitro 5 AN515-53-55G9 Battery Replacement, Battery: crwdns2935265:01crwdnd2935265:02crwdnd2935265:03crwdne2935265:0 Acer Nitro 5 AN515-53-55G9 Battery Replacement, Battery: crwdns2935265:01crwdnd2935265:03crwdnd2935265:03crwdne2935265:0
    • Make sure laptop is off and unplugged before beginning replacement.

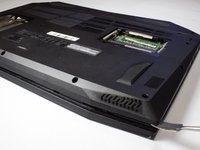
    • Flip the laptop upside down so that the bottom is facing up.

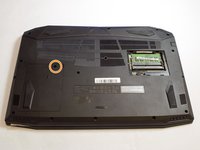
    • Identify the RAM tray on the bottom of the laptop.

  2. Acer Nitro 5 AN515-53-55G9 Battery Replacement: crwdns2935265:02crwdnd2935265:01crwdnd2935265:03crwdne2935265:0 Acer Nitro 5 AN515-53-55G9 Battery Replacement: crwdns2935265:02crwdnd2935265:02crwdnd2935265:03crwdne2935265:0 Acer Nitro 5 AN515-53-55G9 Battery Replacement: crwdns2935265:02crwdnd2935265:03crwdnd2935265:03crwdne2935265:0
    • Use the Phillips #0 screwdriver to remove the 9mm screw in the bottom left corner of the RAM tray covering.

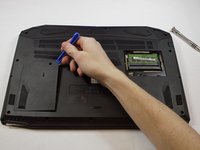
    • Remove the RAM tray cover by prying up with a spudger.

  3. Acer Nitro 5 AN515-53-55G9 Battery Replacement: crwdns2935265:03crwdnd2935265:01crwdnd2935265:03crwdne2935265:0 Acer Nitro 5 AN515-53-55G9 Battery Replacement: crwdns2935265:03crwdnd2935265:02crwdnd2935265:03crwdne2935265:0 Acer Nitro 5 AN515-53-55G9 Battery Replacement: crwdns2935265:03crwdnd2935265:03crwdnd2935265:03crwdne2935265:0
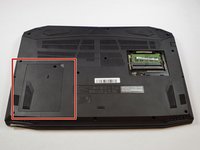
    • Identify the Hard Drive tray to the left side of the laptop.

    • Remove screw with a #0 Philips screwdriver.

    • Lift up the Slot covering using a spunger.

  4. Acer Nitro 5 AN515-53-55G9 Battery Replacement: crwdns2935265:04crwdnd2935265:01crwdnd2935265:01crwdne2935265:0
    • Use the Phillips #0 screwdriver to remove the 9mm screws holding the back cover in place.

    • Remove the screws from the hard drive and remove it from the device.

  5. Acer Nitro 5 AN515-53-55G9 Battery Replacement: crwdns2935265:05crwdnd2935265:01crwdnd2935265:03crwdne2935265:0 Acer Nitro 5 AN515-53-55G9 Battery Replacement: crwdns2935265:05crwdnd2935265:02crwdnd2935265:03crwdne2935265:0 Acer Nitro 5 AN515-53-55G9 Battery Replacement: crwdns2935265:05crwdnd2935265:03crwdnd2935265:03crwdne2935265:0
    • Be sure you removed the hard drive. when you open the back shell and hard drive is built in this may cause damage to cable and other components.

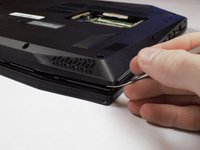
    • Carefully remove the back shell from the device working your way around all the edges.

    • Do not forcefully try to separate the shell as you may cause harm to the shell.

  6. Acer Nitro 5 AN515-53-55G9 Battery Replacement: crwdns2935265:06crwdnd2935265:01crwdnd2935265:02crwdne2935265:0 Acer Nitro 5 AN515-53-55G9 Battery Replacement: crwdns2935265:06crwdnd2935265:02crwdnd2935265:02crwdne2935265:0
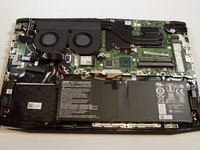
    • Removing the back shell of the computer and it will look like this.

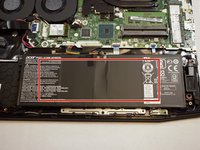
    • The battery for the device is located at the bottom middle of the laptop at this orientation.

  7. Acer Nitro 5 AN515-53-55G9 Battery Replacement: crwdns2935265:07crwdnd2935265:01crwdnd2935265:03crwdne2935265:0 Acer Nitro 5 AN515-53-55G9 Battery Replacement: crwdns2935265:07crwdnd2935265:02crwdnd2935265:03crwdne2935265:0 Acer Nitro 5 AN515-53-55G9 Battery Replacement: crwdns2935265:07crwdnd2935265:03crwdnd2935265:03crwdne2935265:0
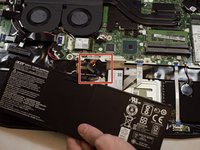
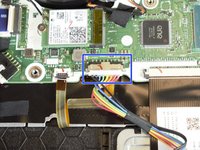
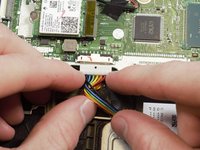
    • Locate the connector of the battery to the motherboard.

    • Using your fingers, slide out the connector.

  8. Acer Nitro 5 AN515-53-55G9 Battery Replacement: crwdns2935265:08crwdnd2935265:01crwdnd2935265:01crwdne2935265:0
    • Remove battery from device.

crwdns2915888:0crwdne2915888:0

To reassemble your device, follow these instructions in reverse order.

crwdns2935229:011crwdne2935229:0

Gary Ellison

crwdns2935283:002/05/19crwdne2935283:0

546 crwdns2915208:0crwdne2915208:0

crwdns2935295:0crwdne2935295:0

crwdns2915084:0crwdne2915084:0

Appalachian State University, Team S2-G2, Menagarishvili Spring 2019 crwdns2935289:0Appalachian State University, Team S2-G2, Menagarishvili Spring 2019crwdne2935289:0

APSU-MENAGARISHVILI-S19S2G2

crwdns2931471:03crwdne2931471:0

crwdns2935297:09crwdne2935297:0

crwdns2944067:02crwdne2944067:0

For future articles, you might consider adding a section describing how to “initialize” the replacement battery pack to maximize life.

Either that, or at least mention initialization plays a part in maximizing battery life and point to another article that provides reliable information.

Thanks for the article.

jmagecko - crwdns2934203:0crwdne2934203:0

And how do you put it back in? Cause it’s a pain in the ass to put back in easy to take out pain in the &&^&^$^ ass to put back in

Mally02 - crwdns2934203:0crwdne2934203:0

crwdns2917038:0crwdne2917038:0

crwdns2936625:0crwdne2936625:0:

crwdns2936751:024crwdne2936751:0 13

crwdns2936753:07crwdne2936753:0 78

crwdns2936753:030crwdne2936753:0 315

crwdns2942667:0crwdne2942667:0 37,549