crwdns2933423:0crwdne2933423:0

Acer Iconia A110 On/Off Switch Replacement

crwdns2942213:0crwdne2942213:0

  1. Acer Iconia A110 On/Off Switch Replacement, Battery: crwdns2935265:01crwdnd2935265:01crwdnd2935265:02crwdne2935265:0 Acer Iconia A110 On/Off Switch Replacement, Battery: crwdns2935265:01crwdnd2935265:02crwdnd2935265:02crwdne2935265:0
    • Before taking apart your tablet, make sure the device is powered off.

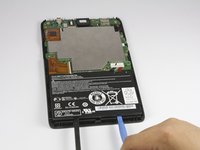
    • Pry open the right side of case with the plastic opening tool. If necessary, keep a tool lodged into the side to keep the case from closing.

    • During this process, the volume button and/or power button may fall out.

  2. Acer Iconia A110 On/Off Switch Replacement: crwdns2935265:02crwdnd2935265:01crwdnd2935265:03crwdne2935265:0 Acer Iconia A110 On/Off Switch Replacement: crwdns2935265:02crwdnd2935265:02crwdnd2935265:03crwdne2935265:0 Acer Iconia A110 On/Off Switch Replacement: crwdns2935265:02crwdnd2935265:03crwdnd2935265:03crwdne2935265:0
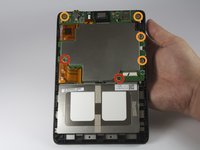
    • Pry open the left side of the case with a plastic opening tool. The backside of the tablet should now separate completely from the front.

  3. Acer Iconia A110 On/Off Switch Replacement: crwdns2935265:03crwdnd2935265:01crwdnd2935265:03crwdne2935265:0 Acer Iconia A110 On/Off Switch Replacement: crwdns2935265:03crwdnd2935265:02crwdnd2935265:03crwdne2935265:0 Acer Iconia A110 On/Off Switch Replacement: crwdns2935265:03crwdnd2935265:03crwdnd2935265:03crwdne2935265:0
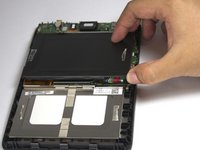
    • Using the plastic opening tool and spudger, carefully pry up the battery from the case.

    • You should hear the adhesive ripping as you do this.

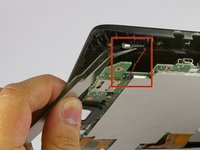
    • Once the battery is no longer adhered to the case, detach the dongle that connects the battery to the motherboard.

  4. Acer Iconia A110 On/Off Switch Replacement, Speaker: crwdns2935265:04crwdnd2935265:01crwdnd2935265:02crwdne2935265:0 Acer Iconia A110 On/Off Switch Replacement, Speaker: crwdns2935265:04crwdnd2935265:02crwdnd2935265:02crwdne2935265:0
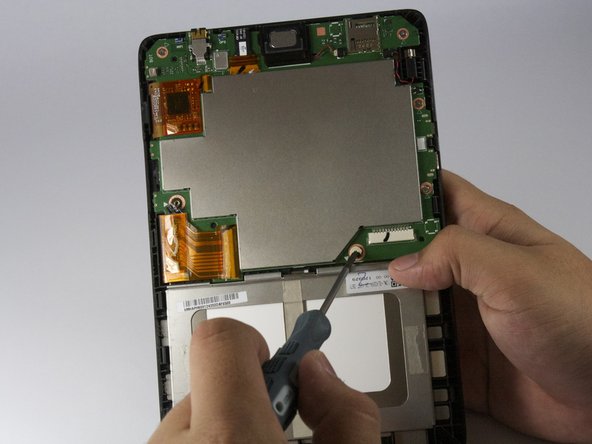
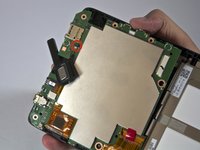
    • With the Phillips #00 screwdriver, remove the following screws securing the motherboard to the back panel:

    • Two 2.0 mm screws (with the bigger head)

    • Four 2.5 mm screws (with the smaller head)

  5. Acer Iconia A110 On/Off Switch Replacement: crwdns2935265:05crwdnd2935265:01crwdnd2935265:02crwdne2935265:0 Acer Iconia A110 On/Off Switch Replacement: crwdns2935265:05crwdnd2935265:02crwdnd2935265:02crwdne2935265:0
    crwdns2935267:0crwdne2935267:0
    Tweezers
    $4.99
    crwdns2942207:0crwdne2942207:0
    • On the top right side of the motherboard, is the vibration motor. With tweezers, carefully pull the vibration motor out from underneath the motherboard.

    • The vibration motor is still connected to the motherboard by a small wire connection, so be careful not to rip the wire out.

    • With your fingers, carefully disconnect the cable securing the vibration motor to the motherboard. Set aside.

  6. Acer Iconia A110 On/Off Switch Replacement: crwdns2935265:06crwdnd2935265:01crwdnd2935265:02crwdne2935265:0 Acer Iconia A110 On/Off Switch Replacement: crwdns2935265:06crwdnd2935265:02crwdnd2935265:02crwdne2935265:0
    • The speaker located on the top of the motherboard should easily slide out. Take note that there is still a wire connected, so do so carefully.

    • With your fingers, slowly pull out the wire connecting the speaker to the motherboard.

  7. Acer Iconia A110 On/Off Switch Replacement, Motherboard: crwdns2935265:07crwdnd2935265:01crwdnd2935265:03crwdne2935265:0 Acer Iconia A110 On/Off Switch Replacement, Motherboard: crwdns2935265:07crwdnd2935265:02crwdnd2935265:03crwdne2935265:0 Acer Iconia A110 On/Off Switch Replacement, Motherboard: crwdns2935265:07crwdnd2935265:03crwdnd2935265:03crwdne2935265:0
    crwdns2935267:0crwdne2935267:0
    Tweezers
    $4.99
    crwdns2942207:0crwdne2942207:0
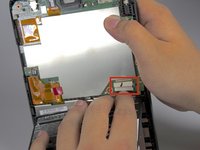
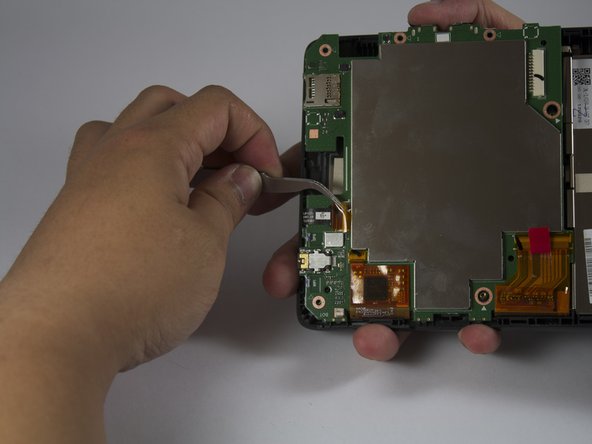
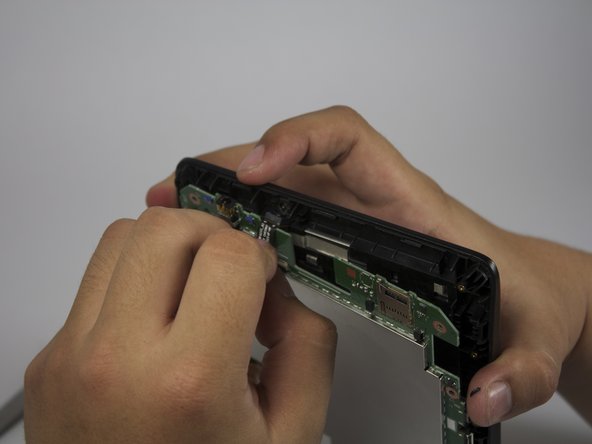
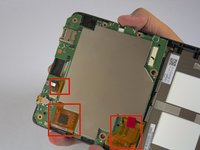
    • The next step is to pull out the ribbon cables connected to the motherboard.

    • Each ribbon cable has a sticker covering it; peel it off with tweezers.

    • Use tweezers to pull out the ribbon cable.

    • Make sure to pull the ribbon cable horizontally, not vertically to avoid tearing the ribbon

  8. Acer Iconia A110 On/Off Switch Replacement: crwdns2935265:08crwdnd2935265:01crwdnd2935265:03crwdne2935265:0 Acer Iconia A110 On/Off Switch Replacement: crwdns2935265:08crwdnd2935265:02crwdnd2935265:03crwdne2935265:0 Acer Iconia A110 On/Off Switch Replacement: crwdns2935265:08crwdnd2935265:03crwdnd2935265:03crwdne2935265:0
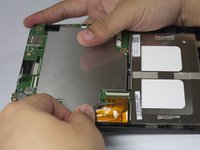
    • After all ribbon cables are disconnected,move them out of the way, and the motherboard should fall out easily.

  9. Acer Iconia A110 On/Off Switch Replacement, On/Off Switch: crwdns2935265:09crwdnd2935265:01crwdnd2935265:03crwdne2935265:0 Acer Iconia A110 On/Off Switch Replacement, On/Off Switch: crwdns2935265:09crwdnd2935265:02crwdnd2935265:03crwdne2935265:0 Acer Iconia A110 On/Off Switch Replacement, On/Off Switch: crwdns2935265:09crwdnd2935265:03crwdnd2935265:03crwdne2935265:0
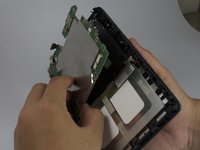
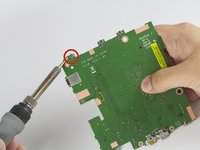
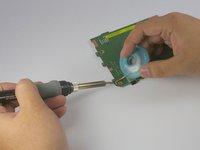
    • After the motherboard is removed, the buttons are visible on the side.

    • If you do not have soldering experience, STOP HERE. View this link for an ifixit soldering guide.

    • Use a soldering iron and a soldering wick to desolder the button. This could be tough due to the lead free solder used in the manufacturing process.

crwdns2915888:0crwdne2915888:0

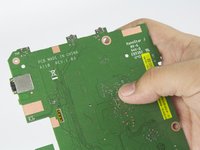
To reassemble your device, follow these instructions in reverse order.

crwdns2935229:05crwdne2935229:0

Andrea

crwdns2935283:004/14/14crwdne2935283:0

757 crwdns2915208:0crwdne2915208:0

crwdns2935297:05crwdne2935297:0

crwdns2915084:0crwdne2915084:0

Cal Poly, Team 3-42, Maness Spring 2014 crwdns2935289:0Cal Poly, Team 3-42, Maness Spring 2014crwdne2935289:0

CPSU-MANESS-S14S3G42

crwdns2931471:04crwdne2931471:0

crwdns2935297:05crwdne2935297:0

crwdns2944067:00crwdne2944067:0

crwdns2917038:0crwdne2917038:0

crwdns2936625:0crwdne2936625:0:

crwdns2936751:024crwdne2936751:0 1

crwdns2936753:07crwdne2936753:0 1

crwdns2936753:030crwdne2936753:0 14

crwdns2942667:0crwdne2942667:0 3,064