crwdns2915892:0crwdne2915892:0
This repair guide is designed to instruct you on how to replace the wireless adapter in your Chromebook. All you will need for this replacement is a Phillips #0 screwdriver and a plastic spudger. Remember to completely power down your Chromebook before working on it, and handle the internal components of you Chromebook with care as they are fragile.
crwdns2942213:0crwdne2942213:0
-
-
Turn device over so the bottom panel is facing you.
-
-
-
Remove the eight 4mm Phillips #0 screws.
-
Remove the two 6mm Phillips #0 screws.
-
-
-
-
Insert a plastic opening tool into the crack between the bottom panel and the side of the computer.
-
Gently pry the panel off the computer by continuously pulling up and on the panel and moving the plastic opening tool around the crack until the panel comes off.
-
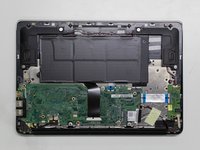
Remove the bottom panel and set it aside.
-
-
-
Remove the 4mm Phillips #0 screw securing the wireless adapter to the main circuit board.
-
-
-
Unplug the Wireless adapter from the main circuit board by giving the adapter light pressure and sliding it out of its port.
-
-
-
Detach the two cables from the Adapter by pulling directly up on them, and then remove the adapter.
-


To reassemble your device, follow these instructions in reverse order.
To reassemble your device, follow these instructions in reverse order.
crwdns2935221:0crwdne2935221:0
crwdns2935229:03crwdne2935229:0
crwdns2915084:0crwdne2915084:0

Cal Poly, Team S17-G3, Banghart Spring 2017 crwdns2935289:0Cal Poly, Team S17-G3, Banghart Spring 2017crwdne2935289:0
CPSU-BANGHART-S17S17G3
crwdns2931471:05crwdne2931471:0
crwdns2935297:010crwdne2935297:0