crwdns2933423:0crwdne2933423:0

Acer Chromebook CB3-111-C8UB Audio Jack Replacement

crwdns2942213:0crwdne2942213:0

  1. Acer Chromebook CB3-111-C8UB Audio Jack Replacement, Back Panel Removal: crwdns2935265:01crwdnd2935265:01crwdnd2935265:02crwdne2935265:0 Acer Chromebook CB3-111-C8UB Audio Jack Replacement, Back Panel Removal: crwdns2935265:01crwdnd2935265:02crwdnd2935265:02crwdne2935265:0
    • Position the laptop upside down with the hinges on the side furthest away from you.

    • Remove the eight 8mm screws with a phillips #1 screwdriver,

    • Remove the four 4.5mm screws with a phillips #1 screwdriver,

  2. Acer Chromebook CB3-111-C8UB Audio Jack Replacement: crwdns2935265:02crwdnd2935265:01crwdnd2935265:03crwdne2935265:0 Acer Chromebook CB3-111-C8UB Audio Jack Replacement: crwdns2935265:02crwdnd2935265:02crwdnd2935265:03crwdne2935265:0 Acer Chromebook CB3-111-C8UB Audio Jack Replacement: crwdns2935265:02crwdnd2935265:03crwdnd2935265:03crwdne2935265:0
    • There is a wire connecting the two pieces of the laptop, from the inside, on the left, be careful not to damage it.

    • Use the plastic opening tool to pry open then remove the plastic base from the rest of the laptop. Start from the right side and work towards the left.

    • Set the plastic base beside the laptop by opening it as if you were opening a book.

  3. Acer Chromebook CB3-111-C8UB Audio Jack Replacement: crwdns2935265:03crwdnd2935265:01crwdnd2935265:02crwdne2935265:0 Acer Chromebook CB3-111-C8UB Audio Jack Replacement: crwdns2935265:03crwdnd2935265:02crwdnd2935265:02crwdne2935265:0
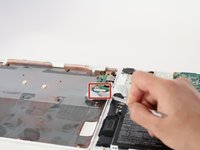
    • Flip up the small white ZIF connector by using a fingernail or metal spudger.

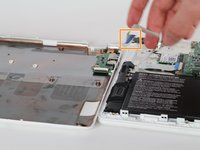
    • Pull the blue tab to remove the ribbon cable.

    • The ribbon cable is adhered to the plastic so it will take a little bit of force to remove it.

  4. Acer Chromebook CB3-111-C8UB Audio Jack Replacement, Audio Jack: crwdns2935265:04crwdnd2935265:01crwdnd2935265:02crwdne2935265:0 Acer Chromebook CB3-111-C8UB Audio Jack Replacement, Audio Jack: crwdns2935265:04crwdnd2935265:02crwdnd2935265:02crwdne2935265:0
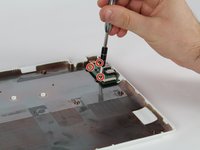
    • Remove the three 4.5mm screws using a phillips #1 screwdriver.

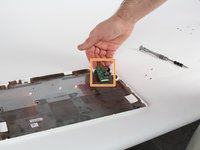
    • Now remove the chip.

crwdns2915888:0crwdne2915888:0

To reassemble your device, follow these instructions in reverse order.

Ryan Locatelli

crwdns2935283:001/27/17crwdne2935283:0

161 crwdns2915208:0crwdne2915208:0

crwdns2935295:0crwdne2935295:0

crwdns2915084:0crwdne2915084:0

Cal Poly, Team 22-7, Maness Winter 2017 crwdns2935289:0Cal Poly, Team 22-7, Maness Winter 2017crwdne2935289:0

CPSU-MANESS-W17S22G7

crwdns2931471:04crwdne2931471:0

crwdns2935297:012crwdne2935297:0

crwdns2944067:00crwdne2944067:0

crwdns2917038:0crwdne2917038:0

crwdns2936625:0crwdne2936625:0:

crwdns2936751:024crwdne2936751:0 1

crwdns2936753:07crwdne2936753:0 3

crwdns2936753:030crwdne2936753:0 6

crwdns2942667:0crwdne2942667:0 881