crwdns2915892:0crwdne2915892:0
This guide will demonstrate the process of replacing the motherboard for the Acer Chromebook CB0311-1H-C1MX. The motherboard connects all of the device’s internal components and allows them to communicate with one another. If the device is experiencing issues with memory, power, and overall functioning, replacing the motherboard might resolve these issues.
Make sure to assess all possible causes of issues regarding memory, power, and functioning before replacing the motherboard.
crwdns2942213:0crwdne2942213:0
-
-
Using a JIS #1 screwdriver, remove eleven 6.6 mm screws from the back cover.
-
-
-
Beginning at the hinges, use an iFixit Opening Tool to pry open the back case.
-
Continue using the iFixit Opening Tool around the entire edge of the case.
-
-
-
Using a JIS #1 screwdriver, remove all four 4.8 mm screws holding the battery in place.
-
-
-
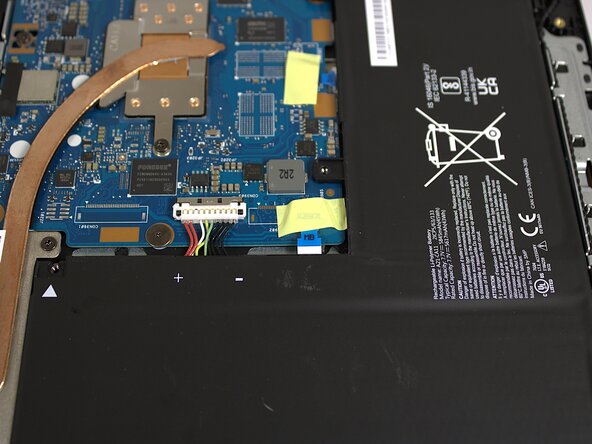
Gently push on either side of the silver connector so that it no longer covers the battery cable.
-
Disconnect the battery cable by pulling it straight out.
-
-
-
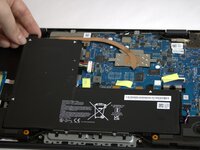
Lift and remove the battery from the laptop.
-
-
-
Remove all four 4.7 mm screws from the heat sink with the JIS #1 screwdriver.
-
-
-
-
This is the location of the palmrest cable detailed in Step 10 of this guide.
-
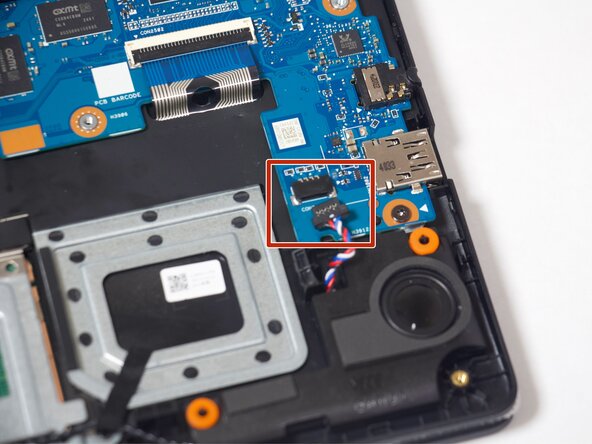
This is the location of the speaker cable detailed in Step 11.
-
This is the location of the Wi-Fi cables detailed in Step 12.
-
This is the location of the touchpad cable detailed in Step 13.
-
This is the location of the daughterboard cable detailed in Step 14.
-
This is the location of the LCD cable detailed in Step 15.
-
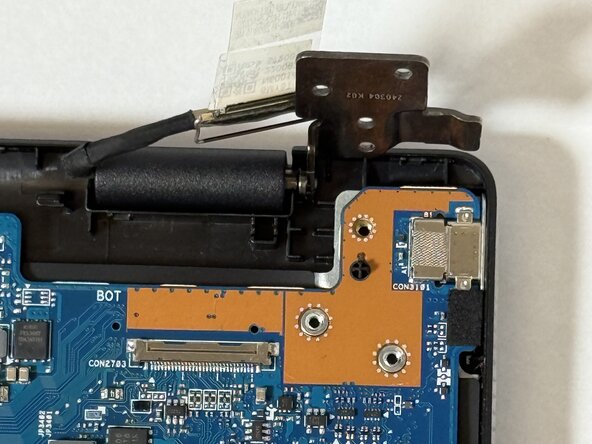
This is the location of the hinge detailed in Step 16.
-
-
-
Using the JIS #1 screwdriver, unscrew all five 4.7 mm screws.
-
Using the JIS #000 screwdriver, unscrew the one 2.4 mm screw.
-
-
-
Lift the black tab that secures the palmrest cable in place.
-
Disconnect the palmrest cable by pulling it straight out.
-
-
-
Disconnect the speaker cable by pulling it straight out.
-
-
-
Disconnect the black and white Wi-Fi cables by popping them off their pegs.
-
-
-
Lift the black tab that secures the touchpad cable in place.
-
Disconnect the touchpad cable by pulling it straight out.
-
-
-
Lift the black tab that secures the daughterboard cable in place.
-
Disconnect the daughterboard cable by pulling it straight out.
-
-
-
Lift the metal bar that secures the LCD cable in place.
-
Disconnect the LCD cable by pulling it straight out.
-
-
-
Using the iFixit opening pick, pry up the hinge holding the motherboard in place.
-


To reassemble your device, follow these instructions in reverse order.
To reassemble your device, follow these instructions in reverse order.
crwdns2935221:0crwdne2935221:0
crwdns2935229:02crwdne2935229:0
crwdns2915084:0crwdne2915084:0

Colorado Mesa University, Team 1-1, Kinney Spring 2025 crwdns2935289:0Colorado Mesa University, Team 1-1, Kinney Spring 2025crwdne2935289:0
CMU-KINNEY-S25S1G1
crwdns2931471:04crwdne2931471:0
crwdns2935297:07crwdne2935297:0