crwdns2933423:0crwdne2933423:0

Acer Chromebook C740 LCD Screen Replacement

crwdns2942213:0crwdne2942213:0

  1. Acer Chromebook C740 LCD Screen Replacement, LCD Screen: crwdns2935265:01crwdnd2935265:01crwdnd2935265:01crwdne2935265:0
    • Power down the Chromebook and disconnect the power adapter.

  2. Acer Chromebook C740 LCD Screen Replacement: crwdns2935265:02crwdnd2935265:01crwdnd2935265:02crwdne2935265:0 Acer Chromebook C740 LCD Screen Replacement: crwdns2935265:02crwdnd2935265:02crwdnd2935265:02crwdne2935265:0
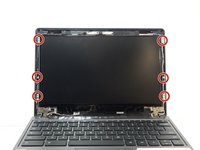
    • With the Chromebook open and face up, pry the black screen frame with your fingers.

    • Move slowly around the display to evenly remove it.

    • Clicking sounds indicate the panel is seperating from the overall display.

  3. Acer Chromebook C740 LCD Screen Replacement: crwdns2935265:03crwdnd2935265:01crwdnd2935265:01crwdne2935265:0
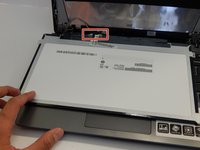
    • Once the frame is separated from the display, angle the display assembly back .

    • Lift up the portions of the frame covering the front two hinges with the spudger.

  4. Acer Chromebook C740 LCD Screen Replacement: crwdns2935265:04crwdnd2935265:01crwdnd2935265:01crwdne2935265:0
    • Remove the frame from the screen assembly by pulling the frame towards you.

    • Some adjustment of the display assembly may be needed so that the frame is not stuck near the hinges.

  5. Acer Chromebook C740 LCD Screen Replacement: crwdns2935265:05crwdnd2935265:01crwdnd2935265:02crwdne2935265:0 Acer Chromebook C740 LCD Screen Replacement: crwdns2935265:05crwdnd2935265:02crwdnd2935265:02crwdne2935265:0
    • Remove the six 3.35mm screws with a Phillips #0 Screwdriver.

  6. Acer Chromebook C740 LCD Screen Replacement: crwdns2935265:06crwdnd2935265:01crwdnd2935265:03crwdne2935265:0 Acer Chromebook C740 LCD Screen Replacement: crwdns2935265:06crwdnd2935265:02crwdnd2935265:03crwdne2935265:0 Acer Chromebook C740 LCD Screen Replacement: crwdns2935265:06crwdnd2935265:03crwdnd2935265:03crwdne2935265:0
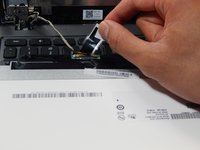
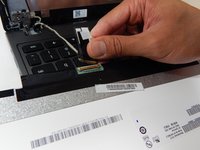
    • Place the LCD screen face down on the keyboard.

    • Remove the tape holding the black connector in place.

    • Unplug the connector with your hands.

crwdns2915888:0crwdne2915888:0

To reassemble your device, follow these instructions in reverse order.

crwdns2935229:07crwdne2935229:0

Grace Bassett

crwdns2935283:004/26/17crwdne2935283:0

217 crwdns2915208:0crwdne2915208:0

crwdns2935295:0crwdne2935295:0

crwdns2915084:0crwdne2915084:0

Cal Poly, Team S22-G2, Livingston Spring 2017 crwdns2935289:0Cal Poly, Team S22-G2, Livingston Spring 2017crwdne2935289:0

CPSU-LIVINGSTON-S17S22G2

crwdns2931471:04crwdne2931471:0

crwdns2935297:012crwdne2935297:0

crwdns2917034:0crwdne2917034:0

You actually don’t need to unscrew the middle screws, and you don’t need to buy a new bezel.

Keith Hudson - crwdns2934203:0crwdne2934203:0

crwdns2917038:0crwdne2917038:0

crwdns2936625:0crwdne2936625:0:

crwdns2936751:024crwdne2936751:0 0

crwdns2936753:07crwdne2936753:0 2

crwdns2936753:030crwdne2936753:0 21

crwdns2942667:0crwdne2942667:0 3,307