crwdns2915892:0crwdne2915892:0
This guide instructs the reader how to disassemble, extract, replace, and reassemble the LCD monitor for an Acer Chomebook C720-2848.
crwdns2942213:0crwdne2942213:0
-
-
Insert a metal spudger around the inner side of the screens plastic perimeter.
-
Move along the perimeter while leveraging to pop the faceplate out like so.
-
-
-
Remove the faceplate's bottom hinges that connect to the body of the device with the metal spudger. This will free the plastic perimeter, which may now be removed.
-
-
-
-
Use a Phillips #0 screwdriver to remove the 6 screws in these circled locations.
-
-
-
Reposition so the screen will lay flat on the keyboard of the laptop.
-
-
-
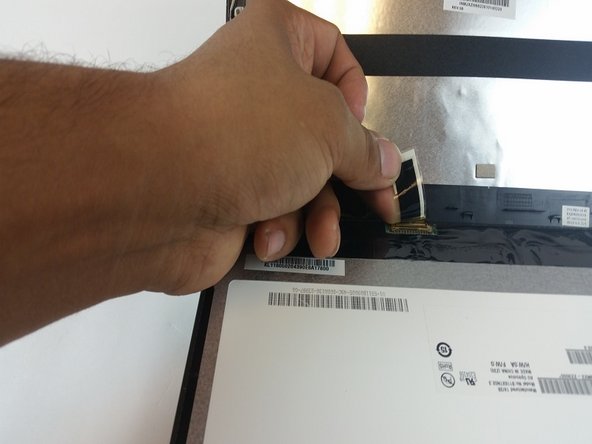
Locate the bar code adhesion strip at the base of the screen, and then peel it back carefully. Once peeled back the plug-in will come free.
-


To reassemble your device, follow these instructions in reverse order.
To reassemble your device, follow these instructions in reverse order.
crwdns2935221:0crwdne2935221:0
crwdns2935229:04crwdne2935229:0
crwdns2915084:0crwdne2915084:0

USF Tampa, Team S9-G3, Remmell Fall 2017 crwdns2935289:0USF Tampa, Team S9-G3, Remmell Fall 2017crwdne2935289:0
USFT-REMMELL-F17S9G3
crwdns2931471:04crwdne2931471:0
crwdns2935297:09crwdne2935297:0
crwdns2947410:01crwdne2947410:0
In step 2, "the faceplate's bottom hinges" are plastic hinge covers that are (or, at least, were) part of the bezel. You may be able to take the bezel off while they're still attached, or you may have to break the flexing points so that they come off separately. Either way, it doesn't seem to cause a problem.
Thanks, Cory.
Lance ==)--------------