crwdns2915892:0crwdne2915892:0
How to disassemble Acer Aspire - V5-572, V5-572G and remove the Main board.
crwdns2942213:0crwdne2942213:0
crwdns2936621:0crwdne2936621:0
-
-
Remove the seventeen Philips #0 screws.
-
-
-
If there is a plastic storage tray in the laptop, remove it.
-
-
-
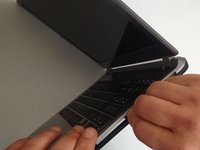
Starting from the SD Memory Card hole, start prying between the top and bottom cases.
-
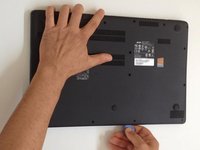
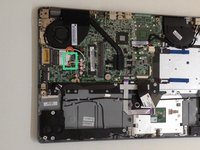
Remove the bottom case.
Love the tutorial man...but this is the most moronic thing I've ever seen...you can take batery out of laptop 15 years old in a flash, while here you have to disassemble the whole %#*@ laptop...only idiots can come up with something like that
I have to agree that this is extremely complicated and intense.
There is no way your average user should be doing this and the average user should be able to replace the battery!!
Like everything in the computer world, hardware or software, ease of use is no longer even a consideration!!
Technical Support Bots are the rule and they rarely are up to date with the pages on the website!!
Sucks!!
-
-
-
Pull the battery connector away from the hard drive to disconnect it.
-
-
-
-
Remove the single Phillips 0 screw securing the battery.
-
-
-
Remove the battery
-
-
-
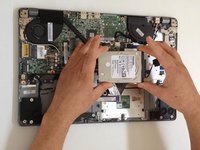
Disconnect the SATA Cable from the Mother Board.
-
Take out the HDD and remove the SATA cable from it.
-
Now you can change / upgrade your HDD.
-
-
-
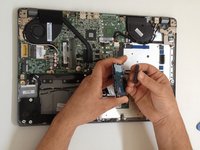
Remove 1x screw and disconnect the two antenna coaxial cables.
-
Remove the Wi-Fi card from the slot.
-
-
-
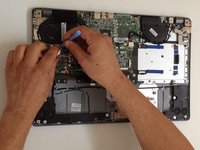
Disconnect the Fan cable.
-
Remove the three screws from the CPU cooler and one from the Fan module.
-
-
-
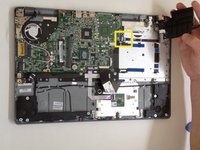
Disconnect one by one:
-
LCD Display flex cable
-
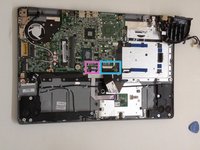
DC Jack cable
-
USB Board flex cable
-
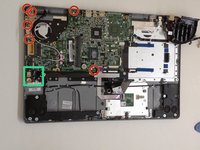
Touch pad flex cable
-
Keyboard flex cable
Ich hatte Probleme beim Entfernen des “USB Board flex cable”. Man muss vorsichtig den weissen “Schließer” in Richtung Kabel etwas öffnen. Nicht ganz herausziehen (obwohl das sehr leicht passiert). Das Kabel muss sich leicht herausziehen lassen. Beim Zusammenbau dann umgekehrt: Zuerst das Kabel einstecken, dann vorsichtig den Schließer wieder eindrücken.
-
-
-
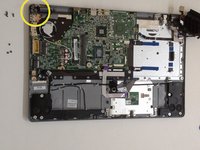
Disconnect the Loudspeakers and the Microphone cables.
-
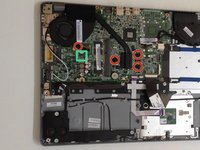
Remove 6x Phillips screws, 3x from the Main board and 3x from the hinge.
-
Open a little the laptop to open the hinge.
-
By hand, open the hinge to the end.
-
-
-
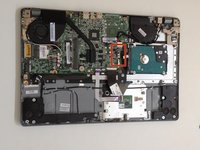
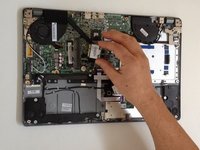
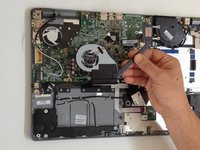
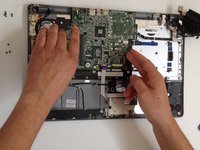
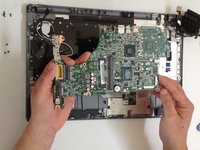
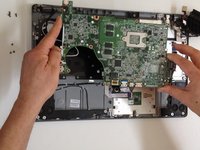
Carefully remove the the Main board.
-


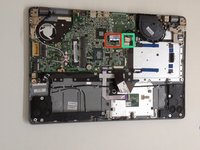


To reassemble your device, follow these instructions in reverse order.
To reassemble your device, follow these instructions in reverse order.
crwdns2935221:0crwdne2935221:0
crwdns2935227:0crwdne2935227:0

crwdns2915084:0crwdne2915084:0

Master Techs crwdns2935289:0Master Techscrwdne2935289:0
Community
crwdns2931471:0326crwdne2931471:0
crwdns2935297:01,399crwdne2935297:0
crwdns2947410:01crwdne2947410:0
where did you find your motherboard replacement? Or whats model is it? I need to replace my mb but cant find any online for sale.