crwdns2915892:0crwdne2915892:0
Acer Aspire - V5-572, V5-572G
Follow this guide if you want to change / upgrade your HDD (Hard Disk Drive) or install SSD (Solid State Drive).
crwdns2942213:0crwdne2942213:0
crwdns2936621:0crwdne2936621:0
-
-
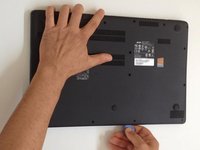
Remove the seventeen Philips #0 screws.
-
-
-
If there is a plastic storage tray in the laptop, remove it.
-
-
-
-
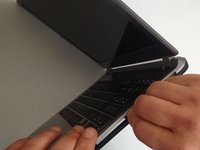
Starting from the SD Memory Card hole, start prying between the top and bottom cases.
-
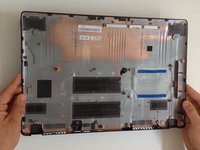
Remove the bottom case.
-
-
-
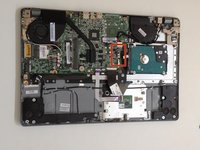
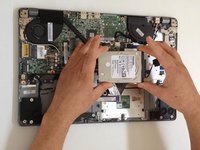
Pull the battery connector away from the hard drive to disconnect it.
-
-
-
Disconnect the SATA Cable from the Mother Board.
-
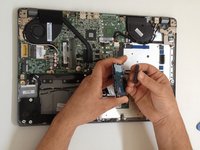
Take out the HDD and remove the SATA cable from it.
-
Now you can change / upgrade your HDD.
-


To reassemble your device, follow these instructions in reverse order.
To reassemble your device, follow these instructions in reverse order.
crwdns2935221:0crwdne2935221:0
crwdns2935229:03crwdne2935229:0

crwdns2915084:0crwdne2915084:0

Master Techs crwdns2935289:0Master Techscrwdne2935289:0
Community
crwdns2931471:0328crwdne2931471:0
crwdns2935297:01,438crwdne2935297:0
crwdns2947412:07crwdne2947412:0
Thank you very much for the tutorial, it was a 12 minute job ☺️And extremely pleased with the new ssd its incredible
Best Regards
Thank you so much for the extremely easy tutorial and it definitely only took 2 minutes longer (12 minutes)
Your site is invaluable, Keep up the great work and all that you do,
5 star rating for you guys..
Kindest Regards
@Styx
So the original hdd came in with the win 7 and it was later upgraded to win 10 for free. If i change it to ssd would i be able to get on it my original copy of win 7 and will it upgrade to win 10?
ashmir, you just clone your HDD with a free software such as Macrium Reflect and don’t need to worry about installing everything from zero!!!
Thank you for the tutorial.
But need a clarification. If i have a faulty hard disc it starts up but it freezes after 20 minutes.
Is it still possible to clone it.
Also if i change the hard drive do I need to install any software or the bios all over again.
Your inputs will be appreciated.