crwdns2915892:0crwdne2915892:0
If the screen on your Acer Aspire V5-232-2629 laptop is cracked or completely black, the screen will likely require replacement. This 11-step guide will give you detailed instructions for replacing the screen.
A properly functioning laptop screen should have a high-resolution display and be free of cracks or any other visible damage.
Before replacing the screen, it is important to first power off and unplug your laptop. While on step 9, be careful not to damage the cables which run between the tape and the screen.
No special skills are needed to replace the screen.
crwdns2942213:0crwdne2942213:0
-
-
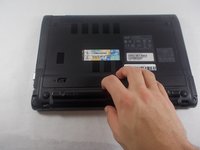
Carefully turn your Acer Aspire V5-131-2629 upside down, so that the battery cell is visible and nearest to you.
-
-
-
Identify the small, oval slide switch on the left hand side of the laptop, directly above the battery.
-
-
-
Insert an opening tool into the hole on the right side of the oval switch. Use the opening tool to slide the switch to the right.
-
-
-
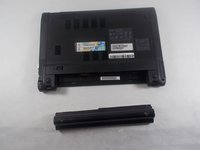
With the switch engaged to the right, firmly pull the battery out and towards yourself, parallel to your work surface.
-
-
-
-
Remove the single Phillips #0 screw from the cover on the underside of the laptop.
-
-
-
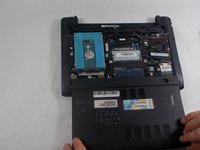
Remove the cover by sliding it outwards and remove it from the device.
-
-
-
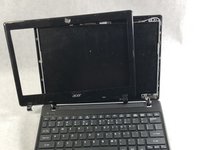
Remove the screen bezel by lifting up the inside rim of the bezel and popping the edge out in steady upwards and outwards motions.
-
Complete this motion around the entire circumference of the bezel.
-
-
-
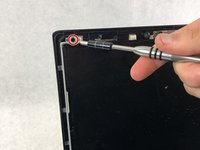
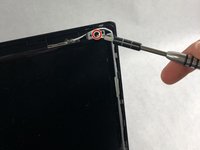
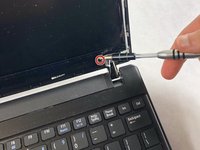
Remove the four Phillips screws from each of the mounting tabs in the corners of the screen.
-
-
-
Peel back the adhesive tape that runs the length of the bottom of the screen.
-
-
-
Using the mounting tabs at the top corners of the screen, gently lift the screen up and out and lay it flat on the keyboard.
-
-
-
Remove the adhesive tape covering the gold-colored connector on the top left corner of the screen.
-


To reassemble your device, follow these instructions in reverse order.
To reassemble your device, follow these instructions in reverse order.
crwdns2915084:0crwdne2915084:0

UMass Dartmouth, Team S1-G3, O'Connell Fall 2019 crwdns2935289:0UMass Dartmouth, Team S1-G3, O'Connell Fall 2019crwdne2935289:0
UMASSD-O'CONNELL-F19S1G3
crwdns2931471:03crwdne2931471:0
crwdns2935297:012crwdne2935297:0