crwdns2915892:0crwdne2915892:0
The CPU is not a common failure component, but may fail due to a failed cooling fan that caused it to overheat.
This guide provides simple steps to replace the CPU on the Acer Aspire TimelineX 4830T-6682 using minimal tools that can be acquired locally, or through iFixit. Please make sure and follow the prerequisite procedures.
crwdns2942213:0crwdne2942213:0
-
-
Remove the single screw with a Phillips #0 screwdriver.
-
Use a plastic opening tool on the upper part of the panel to remove it and access the RAM.
-
-
-
After the panel has been removed, locate the RAM. It should be on the lower right.
-
There are pins around the RAM that need to be pulled back. After the pins are removed, pull the RAM chip towards you to remove it.
-
-
-
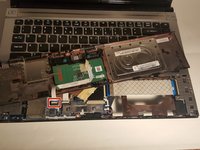
Remove the eleven screws that hold that back panel to the laptop using a J0 Phillips screwdriver bit.
-
-
crwdns2935267:0crwdne2935267:0Tweezers$3.99
-
Place the laptop in the upright position, the lower front touchpad panel should be easily detatched at this point.
-
Remove the lower front touchpad panel by using an angled tweezers to disconnect the only wired tape connected to the motherboard.
-
-
-
-
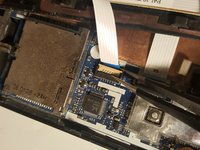
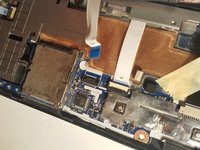
Next, disconnect the 4 wired tapes of the keyboard from the motherboard just like we did with the lower front touchpad panel.
At this step 3 additianal screws have to be removed on the lower left, middle and right side (which are also visible on the image but not marked) before the keyboard cover can be removed!
-
-
-
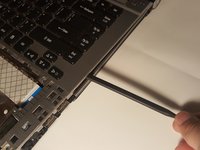
Finally, using an opening tool, gently pry along the edge of the keyboard to separate it from the laptop.
-
-
-
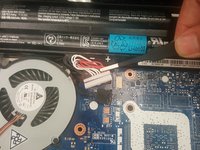
The battery will be on the side closest to the screen.
-
Gently lift it out. It will still be attached by white, red, and black wires.
-
-
-
Pull the white plug, it should easily detach.
-
Remove the battery from the device.
There are 3 screws holding the keyboard that need to be removed. One at the small ribbon on the left; one at the large ribbon on the right and one in the centre of these two. This step is not shown in the teardown. Failure to do this will damage the keyboard
-
-
-
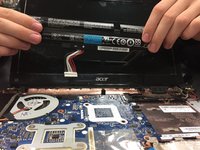
Turn the CPU screw counterclockwise 180 degrees with a Flathead 2.5mm screwdriver
I want to know what type is the cmos battery on this laptop. It is not the usual CR2032 coz it is smaller but icant find any information at all in the net.
-
-
-
Remove the CPU vertically from the socket being careful not to bend the CPU pins
-


To reassemble your device, follow these instructions in reverse order.
To reassemble your device, follow these instructions in reverse order.
crwdns2935221:0crwdne2935221:0
crwdns2935227:0crwdne2935227:0
crwdns2947412:03crwdne2947412:0
Followed instructions computer now dosnt turn on
Hello Ian,
If you would like me to help troubleshoot your computer, please provide more details by answering the following questions?
Was the computer booting before following the CPU replacement instructions?
What troubleshooting was completed to determine the CPU had to be replaced?
Was the CPU replacement part verified as working before installation?
Is the computer powering up to any screen, showing partial boot?
This was gr8! What would we do without ifixit?! Thanks!
pendarvis brooklyn - crwdns2934203:0crwdne2934203:0