crwdns2915892:0crwdne2915892:0
The hard drive is the storage location for the laptop's memory and processing, the data compartment. This guide offers step by step instructions to replace the hard drive.
crwdns2942213:0crwdne2942213:0
-
-
Turn laptop so under side is facing up.
-
Locate the hard drive door and unscrew the 5 screws using PH0 mm Phillips Head.
-
-
-
-
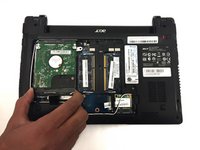
Pry open hard drive cover using the Spudger tool.
-
-
-
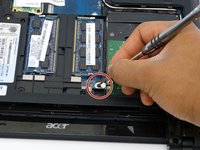
Remove screw attached to the hard drive using the PH0 mm Phillips Head.
-
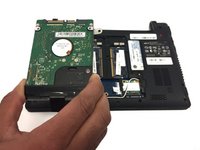
The hard drive can now be removed from the device.
-


To reassemble your device, follow these instructions in reverse order.
To reassemble your device, follow these instructions in reverse order.
crwdns2935221:0crwdne2935221:0
crwdns2935227:0crwdne2935227:0
crwdns2915084:0crwdne2915084:0

Idaho State University, Team S4-G6, Watkins Fall 2017 crwdns2935289:0Idaho State University, Team S4-G6, Watkins Fall 2017crwdne2935289:0
ISU-WATKINS-F17S4G6
crwdns2931471:04crwdne2931471:0
crwdns2935297:05crwdne2935297:0
crwdns2947410:01crwdne2947410:0
Note that in the last step, you've removed the screw that link the drive holder to the frame. You can unscrew this holder from the drive and use it for your next drive if you want a perfect fit. Though that's probably unnecessary for a SSD (might be a good idea for a HDD, on the other hand).