crwdns2915892:0crwdne2915892:0
Changing the Battery in an Acer Aspire R7 is a straightforward process if you find your computer has lost its ability to hold a charge.
The Aspire laptop battery enables the computer to work without having a power cord. It is a hardware component that is not externally accessible and requires a small amount of disassembly to replace.
The 4-cell replacement battery instructions are listed below in quick simple steps. Before using this guide make sure that the battery can no longer function in one of two ways, use a multimeter to test battery strength or check the settings on the laptop if possible.
If the battery is swollen be careful and proceed with caution and take appropriate precautions.
crwdns2942213:0crwdne2942213:0
-
-
Shut down the laptop and disconnect the power cord.
-
Turn the laptop over.
-
-
-
Remove six 6mm T7 screws.
-
Remove four 4mm T7 screws.
-
Remove two 10mm T7 screws
-
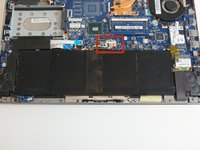
Use the blue plastic opening tool to carefully remove both rubber pads which cover the four remaining screws.
-
Remove the remaining two10mm T7 screws.
Step 2 is missing the 1 (10mm T-7 ) screw that is under a rubber pad in the bottom middle of the laptop. The picture shows this pad and screw already missing. Note the silver color instead of the black color of the rest of the bottom of the laptop.
-
-
-
-
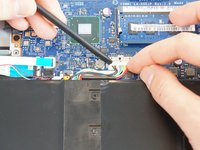
Locate the battery ribbon connector
-
Remove the ribbon cable attaching the battery to the motherboard by carefully pulling it outwards
-
-
-
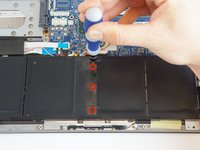
Remove the three 4.5mm #00 Phillips screws attaching the battery to the motherboard
-
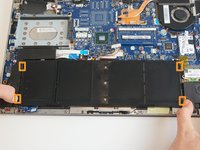
Push the 4 retaining clips away from the battery
-
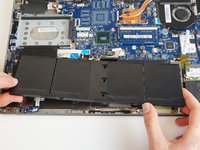
Carefully lift the battery from the motherboard
-


To reassemble your device, follow these instructions in reverse order.
To reassemble your device, follow these instructions in reverse order.
crwdns2935221:0crwdne2935221:0
crwdns2935229:012crwdne2935229:0
crwdns2915084:0crwdne2915084:0

USF Tampa, Team 3-4, Hickman Winter 2015 crwdns2935289:0USF Tampa, Team 3-4, Hickman Winter 2015crwdne2935289:0
USFT-HICKMAN-W15S3G4
crwdns2931471:04crwdne2931471:0
crwdns2935297:07crwdne2935297:0
crwdns2947412:06crwdne2947412:0
great instructions
What is the battery reference for replacement ?
which battery model do I purchase for replacing on an Acer Aspire R?
hey how do you want då sel it for
super tuto
Thanks
P.S : A have add a short comment on step 2.
Bests regards
thank you for your help.
Use the blue plastic opening tool to carefully remove the rubber pad which covers the one remaining screw.
Picture shows the rubber pad removed but srew to be removed is not indicated
Anthymoine - crwdns2934203:0crwdne2934203:0