crwdns2915892:0crwdne2915892:0
The hard drive is one of the more crucial components on a computer. There are a variety of different reasons one would want to replace a hard drive including upgrading the size and replacing a malfunctioning component. You should read through the entire guide before performing the repair and should have all necessary tools readily available. You should also find a safe location to store the various screws taken out of the computer to ensure that they do not get mixed up or lost.
crwdns2942213:0crwdne2942213:0
-
-
Start by removing the battery found on the back of the device.
-
-
-
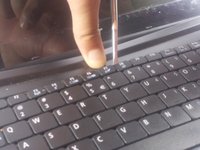
Using plastic opening tools press down the 6 clips located around the keyboard.
-
-
-
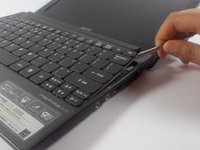
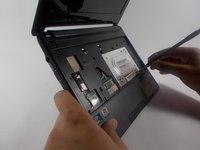
Using a plastic opening tool or spudger move the keyboard out of position.
-
-
-
-
Using a spudger gently push the tab on the port forward then pull out the cable.
please don’t disconnect the keyboard for this job and even for HDD replacement..
it’s useless and you will complicate the life to yourself.
-
-
-
Unscrew seven 1.2 mm Phillips #1 screws from the back of the device
This step is not necessary. The screws do not have to be removed for RAM replacement.
-
-
-
Unscrew eight more 1.2 mm Phillips #1 screws from the front of the computer.
Here too many screws are removed. Only the 4 denoted with a circled "1" have to be removed.
just remove the 4 screws that are marked as “Door” or something similar since i don’t remember .. not all those need to be removed
-
-
-
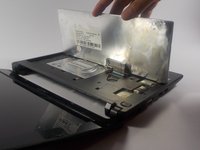
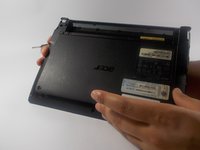
Using a spudger carefully push though the hole to dislodge the panel on the back of the device then remove the panel by hand.
-
-
-
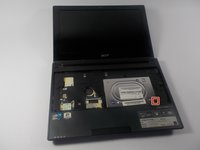
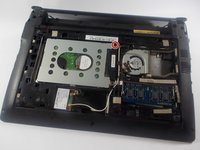
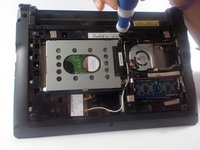
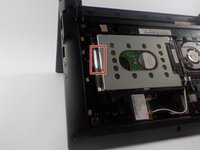
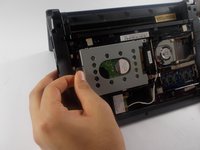
Remove the single 1.2 mm Phillips #1 screw from the Hard Drive.
-
-
-
Using the tab on the side of the Hard Drive, pull out the Hard Drive.
Thanks excellent advice, worked like a charm.
On step 2 i suggest start from an upper corner and work around the keyboard.
-


To reassemble your device, follow these instructions in reverse order.
To reassemble your device, follow these instructions in reverse order.
crwdns2935221:0crwdne2935221:0
crwdns2935229:015crwdne2935229:0
crwdns2915084:0crwdne2915084:0

UMass Dartmouth, Team 16-8, Bhusal Spring 2016 crwdns2935289:0UMass Dartmouth, Team 16-8, Bhusal Spring 2016crwdne2935289:0
UMASSD-BHUSAL-S16S16G8
crwdns2931471:02crwdne2931471:0
crwdns2935297:010crwdne2935297:0
crwdns2947412:04crwdne2947412:0
It is not at all necessary to remove all those screws! Only the 4 marked DOOR under the keyboard are required to pop off the back cover and access the HDD.
Thank you very much, i thought, must to unscrew all the screws like to disassembly all the mini. I THINK is not nessesary neither, the keyboard
Gabo -
The keyboard ribbon was a pain but it worked out in the end.
Bonjour il n est pas nécessaire d ôter le clavier pour atteindre le disque dur et la carte mémoire par contre il y a un tout petit boulon à ôter en plus de la vis pour enlever le disque dur