crwdns2915892:0crwdne2915892:0
The hard drive is the location where all the information on the device is stored. A damaged or corrupted hard drive will cause the device to fail to boot past POST. If you have followed the steps in the Troubleshooting Guide and found that you need to replace a damaged or corrupted hard drive, this step-by-step guide will lead you through the process of removing the battery, back-plate, and hard drive.
crwdns2942213:0crwdne2942213:0
-
-
Ensure the device is powered off by holding down the power button on the top left-hand side.
-
On a flat, level surface, flip the device over so that the back-plate is accessible.
-
-
-
Using a spudger or any fine-pointed tool, push the release slide away from the center of the device.
-
Simultaneously pull the battery out and away from the device.
-
-
-
-
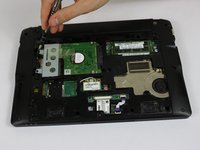
Using the JIS J1 Screwdriver Bit and Driver, remove the center screw (7.0 mm) from the back-plate.
-
Using your hands, slide the back-plate away from the center of the device and remove.
-
-
-
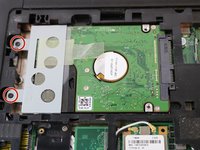
Using the JIS J1 Screwdriver Bit and Driver, remove the two screws (9.0 mm) from the outward side of the hard drive.
-
-
-
Using your hand, slide the hard drive away from the center of the device until it disconnects from the motherboard.
-
Carefully lift the outward side of the hard drive and place the drive on a clean, non-magnetic surface.
-


To reassemble your device, follow these instructions in reverse order.
To reassemble your device, follow these instructions in reverse order.
crwdns2935221:0crwdne2935221:0
crwdns2935229:02crwdne2935229:0
crwdns2915084:0crwdne2915084:0

USF Tampa, Team 8-3, Eyestone Spring 2017 crwdns2935289:0USF Tampa, Team 8-3, Eyestone Spring 2017crwdne2935289:0
USFT-EYESTONE-S17S8G3
crwdns2931471:04crwdne2931471:0
crwdns2935297:016crwdne2935297:0