crwdns2933423:0crwdne2933423:0

Acer Aspire ES1-512-C80E Disk Drive Replacement

crwdns2942213:0crwdne2942213:0

  1. Acer Aspire ES1-512-C80E Disk Drive Replacement, Back Cover: crwdns2935265:01crwdnd2935265:01crwdnd2935265:01crwdne2935265:0
    • Place the device upside down on a flat surface.

    • Using a Phillips #00 screwdriver, remove all nineteen 1.2mm screws that secure the bottom cover of the device.

  2. Acer Aspire ES1-512-C80E Disk Drive Replacement: crwdns2935265:02crwdnd2935265:01crwdnd2935265:03crwdne2935265:0 Acer Aspire ES1-512-C80E Disk Drive Replacement: crwdns2935265:02crwdnd2935265:02crwdnd2935265:03crwdne2935265:0 Acer Aspire ES1-512-C80E Disk Drive Replacement: crwdns2935265:02crwdnd2935265:03crwdnd2935265:03crwdne2935265:0
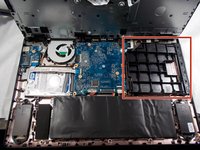
    • Pry around the edges with a spudger to remove the back cover.

    • The two hinges on the back require additional force to be popped open.

  3. Acer Aspire ES1-512-C80E Disk Drive Replacement, Keyboard: crwdns2935265:03crwdnd2935265:01crwdnd2935265:03crwdne2935265:0 Acer Aspire ES1-512-C80E Disk Drive Replacement, Keyboard: crwdns2935265:03crwdnd2935265:02crwdnd2935265:03crwdne2935265:0 Acer Aspire ES1-512-C80E Disk Drive Replacement, Keyboard: crwdns2935265:03crwdnd2935265:03crwdnd2935265:03crwdne2935265:0
    • The keyboard is the silver piece located by itself on the upper half of the laptop.

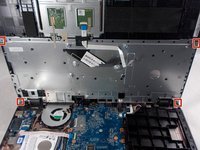
    • Using a Phillips #00 screwdriver, remove the four 1.2mm screws from the keyboard.

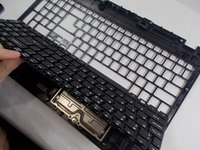
    • Using a spudger, go around the edges and pry off the keyboard.

    • All black clips will have to be removed before the keyboard can be removed.

  4. Acer Aspire ES1-512-C80E Disk Drive Replacement: crwdns2935265:04crwdnd2935265:01crwdnd2935265:03crwdne2935265:0 Acer Aspire ES1-512-C80E Disk Drive Replacement: crwdns2935265:04crwdnd2935265:02crwdnd2935265:03crwdne2935265:0 Acer Aspire ES1-512-C80E Disk Drive Replacement: crwdns2935265:04crwdnd2935265:03crwdnd2935265:03crwdne2935265:0
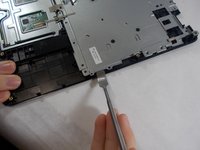
    • Remove the ribbon cable connection from the keyboard.

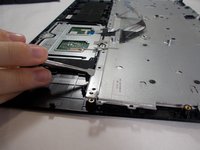
    • Peel back the two pieces of tape to separate the keyboard.

    • Remove the keyboard from under the plastic covering.

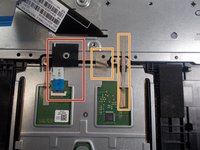
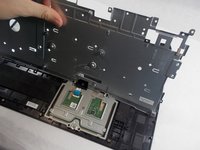
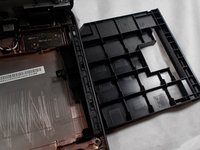
    • Remove the silver plate back cover of the keyboard from the bottom base.

  5. Acer Aspire ES1-512-C80E Disk Drive Replacement: crwdns2935265:05crwdnd2935265:01crwdnd2935265:02crwdne2935265:0 Acer Aspire ES1-512-C80E Disk Drive Replacement: crwdns2935265:05crwdnd2935265:02crwdnd2935265:02crwdne2935265:0
    • Remove the large silver plate from the keyboard.

    • You can not remove the silver backing with the attached wire from the back of the keyboard.

  6. Acer Aspire ES1-512-C80E Disk Drive Replacement: crwdns2935265:06crwdnd2935265:01crwdnd2935265:01crwdne2935265:0
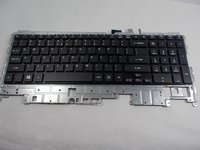
    • The keyboard is removed and ready to be replaced.

  7. Acer Aspire ES1-512-C80E Disk Drive Replacement, Disk Drive: crwdns2935265:07crwdnd2935265:01crwdnd2935265:03crwdne2935265:0 Acer Aspire ES1-512-C80E Disk Drive Replacement, Disk Drive: crwdns2935265:07crwdnd2935265:02crwdnd2935265:03crwdne2935265:0 Acer Aspire ES1-512-C80E Disk Drive Replacement, Disk Drive: crwdns2935265:07crwdnd2935265:03crwdnd2935265:03crwdne2935265:0
    • Push the disk drive out of the side slot.

crwdns2915888:0crwdne2915888:0

To reassemble your device, follow the steps in reverse order.

crwdns2935227:0crwdne2935227:0

Peter Bulman

crwdns2935283:010/31/19crwdne2935283:0

231 crwdns2915208:0crwdne2915208:0

crwdns2935295:0crwdne2935295:0

crwdns2915084:0crwdne2915084:0

UMass Dartmouth, Team S2-G8, Barthe Fall 2019 crwdns2935289:0UMass Dartmouth, Team S2-G8, Barthe Fall 2019crwdne2935289:0

UMASSD-BARTHE-F19S2G8

crwdns2931471:03crwdne2931471:0

crwdns2935297:07crwdne2935297:0

crwdns2944067:00crwdne2944067:0

crwdns2917038:0crwdne2917038:0

crwdns2936625:0crwdne2936625:0:

crwdns2936751:024crwdne2936751:0 0

crwdns2936753:07crwdne2936753:0 4

crwdns2936753:030crwdne2936753:0 5

crwdns2942667:0crwdne2942667:0 423