crwdns2915892:0crwdne2915892:0
Removal of the hard drive is easy, but just be careful not to knock, jerk or drop it in the process as it's a delicate electromechanical device.
crwdns2942213:0crwdne2942213:0
-
-
Move the battery catch to the "unlocked" position.
-
Pull back the second spring-loaded battery catch until the battery pops up.
-
Remove the battery.
-
-
-
Turn the notebook around to face you.
-
There are two Phillips #00 screws securing the cover panel to the rest of the notebook. Remove these screws.
-
-
-
-
Use a spudger to release the panel from the plastic retaining clips keeping it in place.
-
Remove the panel and set it aside.
-
-
-
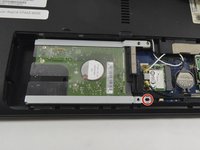
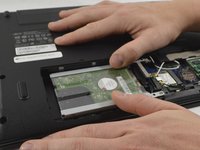
Unscrew the Phillips #00 screw which retains the hard drive in place.
-
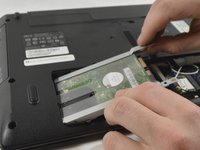
Gently slide the hard drive to the left in order to disengage the SATA connectors.
-
Lift the drive out of the notebook.
-


To reassemble your device, follow these instructions in reverse order.
To reassemble your device, follow these instructions in reverse order.
crwdns2935221:0crwdne2935221:0
crwdns2935229:016crwdne2935229:0
crwdns2947412:06crwdne2947412:0
Great guide except for the missing screw sizes. Does anybody know the screw sizes?
I have this laptop with a bad HDD, it was a Toshiba 640 GB , 5400 RPM drive.
I like to know if this laptop supports 7200 RPM drives
Also, does this laptop support an SSD drive ?
Yes, any 2.5in SATA HDD or SSD can be fitted in place of any other.
I love this guide! It's the best! Thank You!
LOL ... I took out 2 screws...now only 1 goes back???
The other already shows another screw???
Help ..... Cheers from Canada....
Probably the screw you took out in step 4 you put back in the wrong hole. The adjacent hole is for one of the screws in step 2.