crwdns2942213:0crwdne2942213:0
-
-
Remove the 4 rubber supports from the screen. Then remove the screws underneath.
-
-
-
With a spudger, release the clips that hold the plastic frame to the back cover.
-
Be careful while handling the bottom part, specially with the hinges, as there are cables inside.
-
-
-
When all the clips are out, the entire plastic frame should come out easily.
-
-
-
Carefully disconnect the camera cable.
-
-
-
-
Remove the 4 screws located in the sides of the LCD screen.
-
-
-
Remove the other 4 screws that secure the metal LCD frame to the hinges.
-
-
-
Take the LCD screen out of the metal frame and flip it towards the keyboard.
-
-
-
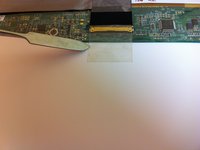
Remove the tape that holds the display cable.
-
-
-
Carefully disconnect the cable with a spuger.
-
-
-
Unstick the cables from the back of the LCD screen.
-
The LCD should be completely free, so just take it out and install a new one.
-


To reassemble your device, follow these instructions in reverse order.
To reassemble your device, follow these instructions in reverse order.
crwdns2935221:0crwdne2935221:0
crwdns2935229:08crwdne2935229:0
crwdns2947412:02crwdne2947412:0
Hi there.. I just bought a display for my aspire 5536 and it seems it has a different fitting for the cable.. in fact I bought an LED display and the original one was an LCD (there is an inverter fitted in the lid under the screen) ok.. my question.. Is that possible under any circumstances to fit this new LED screen in my laptop by changing the video cable with a proper one for this new screen??
Hi, thanks for the info. Can you tell me the part number of the LCD screen? thanks.