crwdns2933423:0crwdne2933423:0

AUX-208P1 Electric Kettle Temperature Controller Replacement

crwdns2942213:0crwdne2942213:0

  1. AUX-208P1 Electric Kettle Temperature Controller Replacement, Temperature Controller: crwdns2935265:01crwdnd2935265:01crwdnd2935265:02crwdne2935265:0 AUX-208P1 Electric Kettle Temperature Controller Replacement, Temperature Controller: crwdns2935265:01crwdnd2935265:02crwdnd2935265:02crwdne2935265:0
    • Clean all the dirt on the bottom of the electric kettle.

  2. AUX-208P1 Electric Kettle Temperature Controller Replacement: crwdns2935265:02crwdnd2935265:01crwdnd2935265:02crwdne2935265:0 AUX-208P1 Electric Kettle Temperature Controller Replacement: crwdns2935265:02crwdnd2935265:02crwdnd2935265:02crwdne2935265:0
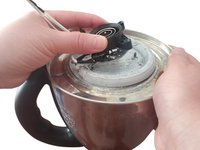
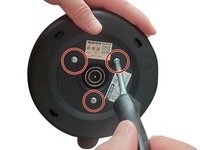
    • Use a Phillips #0 screwdriver to remove the three 19 mm screws at the bottom of the electric kettle.

    • Remove the base of the electric kettle.

    • Remove the LED indicator buckled on the base.

  3. AUX-208P1 Electric Kettle Temperature Controller Replacement: crwdns2935265:03crwdnd2935265:01crwdnd2935265:02crwdne2935265:0 AUX-208P1 Electric Kettle Temperature Controller Replacement: crwdns2935265:03crwdnd2935265:02crwdnd2935265:02crwdne2935265:0
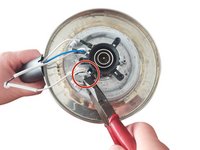
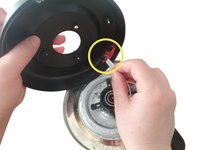
    • Use combination pliers to clamp the connection between the electric kettle line and the old temperature controller to create a gap, and pull it off.

    • Don't use too much force to avoid damage to the line!

  4. AUX-208P1 Electric Kettle Temperature Controller Replacement: crwdns2935265:04crwdnd2935265:01crwdnd2935265:01crwdne2935265:0
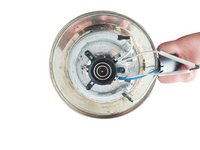
    • Use combination pliers to remove the nuts holding down the old temperature controller.

  5. AUX-208P1 Electric Kettle Temperature Controller Replacement: crwdns2935265:05crwdnd2935265:01crwdnd2935265:02crwdne2935265:0 AUX-208P1 Electric Kettle Temperature Controller Replacement: crwdns2935265:05crwdnd2935265:02crwdnd2935265:02crwdne2935265:0
    • Remove the broken temperature controller.

    • Clean the bottom of the kettle to remove any dust or debris buildup.

  6. AUX-208P1 Electric Kettle Temperature Controller Replacement: crwdns2935265:06crwdnd2935265:01crwdnd2935265:01crwdne2935265:0
    • Align the socket on the bottom of the new temperature controller with the protrusion on the bottom of the electric kettle to assemble.

  7. AUX-208P1 Electric Kettle Temperature Controller Replacement: crwdns2935265:07crwdnd2935265:01crwdnd2935265:01crwdne2935265:0
    • Use combination pliers to reinstall the nuts holding down the temperature controller.

  8. AUX-208P1 Electric Kettle Temperature Controller Replacement: crwdns2935265:08crwdnd2935265:01crwdnd2935265:01crwdne2935265:0
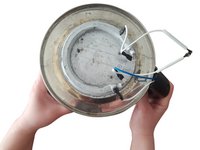
    • Fasten the electric kettle circuit to the contact reed of the new temperature controller.

    • Gently pull the interface to ensure a firm installation.

  9. AUX-208P1 Electric Kettle Temperature Controller Replacement: crwdns2935265:09crwdnd2935265:01crwdnd2935265:02crwdne2935265:0 AUX-208P1 Electric Kettle Temperature Controller Replacement: crwdns2935265:09crwdnd2935265:02crwdnd2935265:02crwdne2935265:0
    • Re-buckle the removed LED indicator back to the base.

    • Buckle the base back to the bottom of the electric kettle.

    • Use a Phillips #0 screwdriver to three 19 mm screws on the bottom of the kettle.

crwdns2915888:0crwdne2915888:0

重新组装设备时,请依次相反的拆卸顺序。

crwdns2935227:0crwdne2935227:0

SHAN HUANG

crwdns2935283:001/13/21crwdne2935283:0

193 crwdns2915208:0crwdne2915208:0

crwdns2935297:02crwdne2935297:0

crwdns2915084:0crwdne2915084:0

York University, Team S1-G30, O'Regan Winter 2021 crwdns2935289:0York University, Team S1-G30, O'Regan Winter 2021crwdne2935289:0

YORK-O'REGAN-W21S1G30

crwdns2934841:01crwdne2934841:0

crwdns2935297:02crwdne2935297:0

crwdns2944067:00crwdne2944067:0

crwdns2917038:0crwdne2917038:0

crwdns2936625:0crwdne2936625:0:

crwdns2936751:024crwdne2936751:0 2

crwdns2936753:07crwdne2936753:0 16

crwdns2936753:030crwdne2936753:0 78

crwdns2942667:0crwdne2942667:0 1,165