crwdns2933423:0crwdne2933423:0

ASUS ZenPad S 8.0 Motherboard Replacement

crwdns2942213:0crwdne2942213:0

  1. ASUS ZenPad S 8.0 Motherboard Replacement, Rear Cover Removal: crwdns2935265:01crwdnd2935265:01crwdnd2935265:03crwdne2935265:0 ASUS ZenPad S 8.0 Motherboard Replacement, Rear Cover Removal: crwdns2935265:01crwdnd2935265:02crwdnd2935265:03crwdne2935265:0 ASUS ZenPad S 8.0 Motherboard Replacement, Rear Cover Removal: crwdns2935265:01crwdnd2935265:03crwdnd2935265:03crwdne2935265:0
    • if present, remove the MicroSD card before disassembly. Failure to remove could lead to damage to the MicroSD card , rear cover, or MicroSD card slot.

    • Use the plastic tool to pry between the silver bezel and the back case

    • Work the tool around the device to free the back case

  2. ASUS ZenPad S 8.0 Motherboard Replacement: crwdns2935265:02crwdnd2935265:01crwdnd2935265:02crwdne2935265:0 ASUS ZenPad S 8.0 Motherboard Replacement: crwdns2935265:02crwdnd2935265:02crwdnd2935265:02crwdne2935265:0
    • Remove the ribbon cables by lifting up the white retaining flap on the ZIF connectors, then pulling the ribbon cable away.

    • Do not kink the ribbon cables as they can break easily

  3. ASUS ZenPad S 8.0 Motherboard Replacement: crwdns2935265:03crwdnd2935265:01crwdnd2935265:03crwdne2935265:0 ASUS ZenPad S 8.0 Motherboard Replacement: crwdns2935265:03crwdnd2935265:02crwdnd2935265:03crwdne2935265:0 ASUS ZenPad S 8.0 Motherboard Replacement: crwdns2935265:03crwdnd2935265:03crwdnd2935265:03crwdne2935265:0
    • Remove the battery connector by prying it up away from the device using 2 plastic pry tools

  4. ASUS ZenPad S 8.0 Motherboard Replacement: crwdns2935265:04crwdnd2935265:01crwdnd2935265:02crwdne2935265:0 ASUS ZenPad S 8.0 Motherboard Replacement: crwdns2935265:04crwdnd2935265:02crwdnd2935265:02crwdne2935265:0
    • Remove all 9 of the 1.5mm #00 Philips screws

    • Gently lift the battery out of the device

    • Use an opening pick or similar tool to separate the adhesive on the bottom and top of the battery.

  5. ASUS ZenPad S 8.0 Motherboard Replacement, Front Facing Camera: crwdns2935265:05crwdnd2935265:01crwdnd2935265:03crwdne2935265:0 ASUS ZenPad S 8.0 Motherboard Replacement, Front Facing Camera: crwdns2935265:05crwdnd2935265:02crwdnd2935265:03crwdne2935265:0 ASUS ZenPad S 8.0 Motherboard Replacement, Front Facing Camera: crwdns2935265:05crwdnd2935265:03crwdnd2935265:03crwdne2935265:0
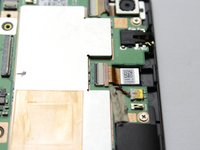
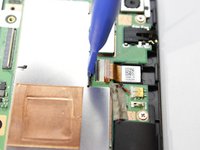
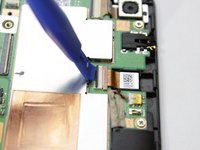
    • Use a plastic opening tool to lift the black retaining flap on the ZIF Connector
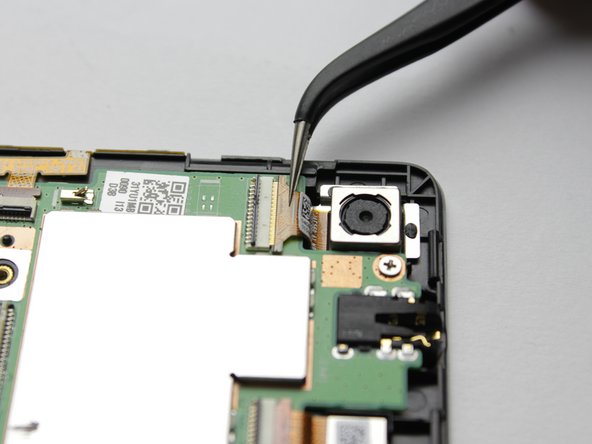
  6. ASUS ZenPad S 8.0 Motherboard Replacement: crwdns2935265:06crwdnd2935265:01crwdnd2935265:01crwdne2935265:0
    crwdns2935267:0crwdne2935267:0
    Tweezers
    $4.99
    crwdns2942207:0crwdne2942207:0
    • Use a tweezers to lift out the camera

    • If you lifted the latch for the ribbon cable then it should come out with little resistance.

  7. ASUS ZenPad S 8.0 Motherboard Replacement, Motherboard: crwdns2935265:07crwdnd2935265:01crwdnd2935265:02crwdne2935265:0 ASUS ZenPad S 8.0 Motherboard Replacement, Motherboard: crwdns2935265:07crwdnd2935265:02crwdnd2935265:02crwdne2935265:0
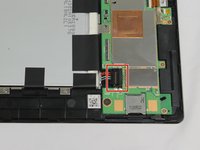
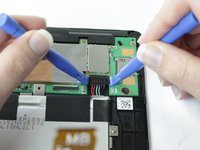
    • Using the plastic prying tool, lift the small retaining flap on the ZIF Connectors holding the ribbon cables to the motherboard

    • The removing of the ribbon cable is done in the same way as the front facing camera.

  8. ASUS ZenPad S 8.0 Motherboard Replacement: crwdns2935265:08crwdnd2935265:01crwdnd2935265:03crwdne2935265:0 ASUS ZenPad S 8.0 Motherboard Replacement: crwdns2935265:08crwdnd2935265:02crwdnd2935265:03crwdne2935265:0 ASUS ZenPad S 8.0 Motherboard Replacement: crwdns2935265:08crwdnd2935265:03crwdnd2935265:03crwdne2935265:0
    crwdns2935267:0crwdne2935267:0
    Tweezers
    $4.99
    crwdns2942207:0crwdne2942207:0
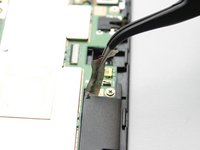
    • Using the tweezers remove the connector gently from the yellow slot

    • Gently peel up the tape until is is completely released from the motherboard

  9. ASUS ZenPad S 8.0 Motherboard Replacement: crwdns2935265:09crwdnd2935265:01crwdnd2935265:02crwdne2935265:0 ASUS ZenPad S 8.0 Motherboard Replacement: crwdns2935265:09crwdnd2935265:02crwdnd2935265:02crwdne2935265:0
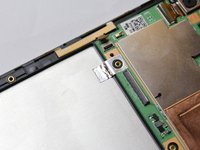
    • Cut the warranty tape connecting the motherboard to the metal plate under the battery

  10. ASUS ZenPad S 8.0 Motherboard Replacement: crwdns2935265:010crwdnd2935265:01crwdnd2935265:01crwdne2935265:0
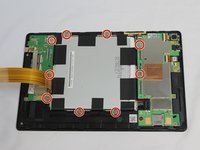
    • Using the #00 Phillips head screwdriver, remove the remaining 1.5mm screws in the motherboard

  11. ASUS ZenPad S 8.0 Motherboard Replacement: crwdns2935265:011crwdnd2935265:01crwdnd2935265:01crwdne2935265:0
    • Gently lift the motherboard from your device

crwdns2915888:0crwdne2915888:0

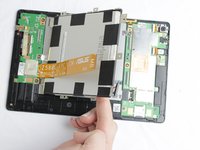
To reassemble your device, follow these instructions in reverse order.

crwdns2935227:0crwdne2935227:0

Jessica Voss

crwdns2935283:010/04/16crwdne2935283:0

319 crwdns2915208:0crwdne2915208:0

crwdns2935295:0crwdne2935295:0

crwdns2915084:0crwdne2915084:0

USF Tampa, Team 2-2, Cagle Fall 2016 crwdns2935289:0USF Tampa, Team 2-2, Cagle Fall 2016crwdne2935289:0

USFT-CAGLE-F16S2G2

crwdns2931471:04crwdne2931471:0

crwdns2935297:05crwdne2935297:0

crwdns2944067:02crwdne2944067:0

Where can I buy a spare motherboard for this device.

Partha Tripathy - crwdns2934203:0crwdne2934203:0

Where are the motherboard sold and how do I purchase micro USB ports

Xibu Zhang - crwdns2934203:0crwdne2934203:0

crwdns2917038:0crwdne2917038:0

crwdns2936625:0crwdne2936625:0:

crwdns2936751:024crwdne2936751:0 1

crwdns2936753:07crwdne2936753:0 1

crwdns2936753:030crwdne2936753:0 8

crwdns2942667:0crwdne2942667:0 2,600