crwdns2915892:0crwdne2915892:0
Before proceeding with this guide, be sure you have all the required tools and the replacement hard drive.
crwdns2942213:0crwdne2942213:0
-
-
Remove the ten 10.7 mm Phillips #0 screws from the back cover of the Asus laptop.
-
-
crwdns2935267:0crwdne2935267:0Heavy-Duty Spudger$4.99
-
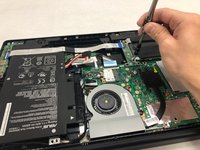
Insert the heavy duty spudger between the back cover and the laptop frame. Pull the black pry tool along the edge of the laptop, unlatching the back cover from the frame.
-
-
-
-
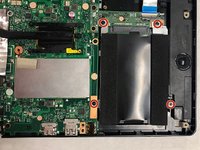
Remove the four 4.7mm Philips #0 screws securing the hard drive.
-
-
-
Remove the hard drive by sliding it out of its socket.
-


To reassemble your device, follow these instructions in reverse order.
crwdns2935221:0crwdne2935221:0
crwdns2935229:05crwdne2935229:0
crwdns2935287:0crwdne2935287:0

IUPUI, Team S2-G3, Harley Fall 2018 crwdns2935289:0IUPUI, Team S2-G3, Harley Fall 2018crwdne2935289:0
IUPUI-HARLEY-F18S2G3
crwdns2931471:03crwdne2931471:0
crwdns2935297:02crwdne2935297:0