crwdns2915892:0crwdne2915892:0
This guide is for replacing the RAM of the ASUS TUF Gaming FX505DY, which is the DDR4 SO-DIMM form factor.
The RAM provides the CPU with memory to complete tasks and processes. Generally speaking, more RAM will result in faster speeds as the CPU will have more space to work, but this is eventually halted by running out of CPU or graphics performance depending on the tasks. RAM is vulnerable to electrical damage, and while it has no moving parts, is also susceptible to drops and impacts.
Faulty RAM will result in the computer returning a fatal error or not booting up at all. In computers with larger amounts of RAM, damaged RAM may only cause an error at higher utilization. In this case, running an intensive software such as a newer videogame or video renderer may reveal the issue. If RAM is damaged or removed while the computer is off, the system may start normally or produce a repeating series of one long and two short beeps. If RAM is damaged or removed while the computer is on, usual symptoms include an immediate crash or significant audio and visual distortion, usually in the form of an uneven or symmetric or static.
Make sure to fully shut down the device and unplug any chargers and peripherals before beginning.
crwdns2942213:0crwdne2942213:0
-
-
Turn off the laptop.
-
Disconnect the charging cable.
-
Flip the laptop so the back is facing up.
-
-
-
Use a Phillips #1 screwdriver to remove the five 6 mm screws that secure the back panel.
-
Use the same screwdriver to remove the six 13 mm screws securing the back panel.
-
-
-
-
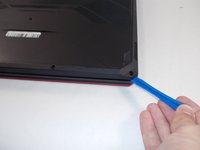
Insert the plastic opening tool at a corner and pry up along the edges, leaving the back side with the hinges for last.
-
-
-
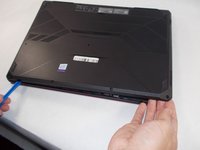
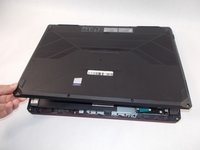
Gently lift up the back panel to release any remaining clips on the side with the hinges and remove the panel.
-
-
-
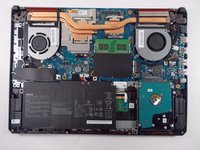
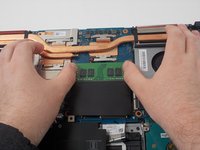
Pull the motherboard clips away from the sides of the RAM chip.
-
-
-
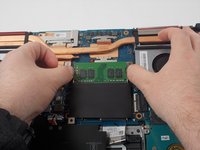
At an angle, gently but firmly pull the RAM chip to remove it from the slot.
-


To reassemble your device, follow these instructions in reverse order.
To reassemble your device, follow these instructions in reverse order.
crwdns2935221:0crwdne2935221:0
crwdns2935227:0crwdne2935227:0

crwdns2915084:0crwdne2915084:0

UMass Dartmouth, Team 2-4, Mellen Spring 2022 crwdns2935289:0UMass Dartmouth, Team 2-4, Mellen Spring 2022crwdne2935289:0
UMASSD-MELLEN-S22S2G4
crwdns2931471:04crwdne2931471:0
crwdns2935297:012crwdne2935297:0