crwdns2933423:0crwdne2933423:0

ASUS TUF Gaming F15 FX506L Battery Disconnect

crwdns2862623:0crwdne2862623:0
crwdns2942641:0crwdne2942641:0

crwdns2942213:0crwdne2942213:0

  1. ASUS TUF Gaming F15 FX506L Battery Disconnect, Unfasten the back cover: crwdns2935265:01crwdnd2935265:01crwdnd2935265:02crwdne2935265:0 ASUS TUF Gaming F15 FX506L Battery Disconnect, Unfasten the back cover: crwdns2935265:01crwdnd2935265:02crwdnd2935265:02crwdne2935265:0
    • For your safety, discharge the battery below 25% and power down your device before disassembly.

    • Use a Phillips screwdriver to remove the 10 screws securing the back cover:

    • Seven 11.6 mm screws

    • Two 14.6 mm screws

    • One 6 mm screw

    • Use a Phillips screwdriver to loosen the captive screw.

    • Loosening this captive screw will pop up and separate the bottom-right corner of the back cover from the chassis.

    • During reassembly, tighten the captive screw before the rest of the screws.

  2. ASUS TUF Gaming F15 FX506L Battery Disconnect, Release the clips: crwdns2935265:02crwdnd2935265:01crwdnd2935265:02crwdne2935265:0 ASUS TUF Gaming F15 FX506L Battery Disconnect, Release the clips: crwdns2935265:02crwdnd2935265:02crwdnd2935265:02crwdne2935265:0
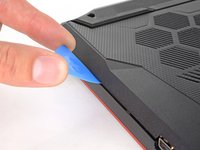
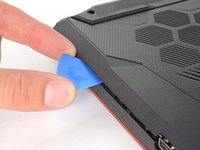
    • Insert an opening pick between the bottom-right corner of the back cover and the chassis, near the captive screw.

    • Pry up to release the clips securing the back cover.

    • You'll hear a click whenever a clip is released.

  3. ASUS TUF Gaming F15 FX506L Battery Disconnect, Release the remaining clips: crwdns2935265:03crwdnd2935265:01crwdnd2935265:03crwdne2935265:0 ASUS TUF Gaming F15 FX506L Battery Disconnect, Release the remaining clips: crwdns2935265:03crwdnd2935265:02crwdnd2935265:03crwdne2935265:0 ASUS TUF Gaming F15 FX506L Battery Disconnect, Release the remaining clips: crwdns2935265:03crwdnd2935265:03crwdnd2935265:03crwdne2935265:0
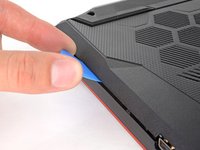
    • Insert your opening pick again between the top-left corner of the back cover and the chassis.

    • Insert the pick at a steep angle. Pry up to release the remaining clips securing the back cover.

  4. ASUS TUF Gaming F15 FX506L Battery Disconnect, Remove the back cover: crwdns2935265:04crwdnd2935265:01crwdnd2935265:03crwdne2935265:0 ASUS TUF Gaming F15 FX506L Battery Disconnect, Remove the back cover: crwdns2935265:04crwdnd2935265:02crwdnd2935265:03crwdne2935265:0 ASUS TUF Gaming F15 FX506L Battery Disconnect, Remove the back cover: crwdns2935265:04crwdnd2935265:03crwdnd2935265:03crwdne2935265:0
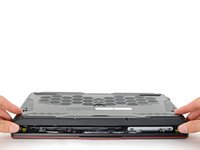
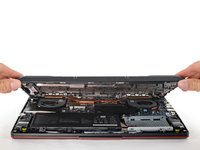
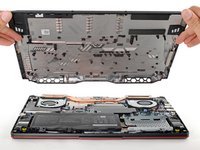
    • Lift the back cover off the chassis and remove it.

    • If your back cover is stuck to the chassis, use an opening pick to release the clips around the back cover's perimeter.

  5. ASUS TUF Gaming F15 FX506L Battery Disconnect, Disconnect the battery: crwdns2935265:05crwdnd2935265:01crwdnd2935265:03crwdne2935265:0 ASUS TUF Gaming F15 FX506L Battery Disconnect, Disconnect the battery: crwdns2935265:05crwdnd2935265:02crwdnd2935265:03crwdne2935265:0 ASUS TUF Gaming F15 FX506L Battery Disconnect, Disconnect the battery: crwdns2935265:05crwdnd2935265:03crwdnd2935265:03crwdne2935265:0
    • Use the point of a spudger to push the sides of the battery connector out of its socket.

    • Push on alternating sides to 'walk' the connector out.

crwdns2915888:0crwdne2915888:0

To reassemble your device, follow these instructions in reverse order.

Clay Eickemeyer

crwdns2935283:009/19/22crwdne2935283:0

83,874 crwdns2915208:0crwdne2915208:0

crwdns2935297:0455crwdne2935297:0

crwdns2947412:00crwdne2947412:0

crwdns2917038:0crwdne2917038:0

crwdns2936625:0crwdne2936625:0:

crwdns2936751:024crwdne2936751:0 2

crwdns2936753:07crwdne2936753:0 4

crwdns2936753:030crwdne2936753:0 4

crwdns2942667:0crwdne2942667:0 37