crwdns2933423:0crwdne2933423:0

ASUS Q302L Fan Replacement

crwdns2942213:0crwdne2942213:0

  1. ASUS Q302L Fan Replacement, Back Case: crwdns2935265:01crwdnd2935265:01crwdnd2935265:01crwdne2935265:0
    • Make sure the laptop is disconnected from a power supply and is TURNED OFF.

    • Use a Phillips #0 screw driver to remove all ten 10 mm screws around the back of the laptop.

  2. ASUS Q302L Fan Replacement: crwdns2935265:02crwdnd2935265:01crwdnd2935265:03crwdne2935265:0 ASUS Q302L Fan Replacement: crwdns2935265:02crwdnd2935265:02crwdnd2935265:03crwdne2935265:0 ASUS Q302L Fan Replacement: crwdns2935265:02crwdnd2935265:03crwdnd2935265:03crwdne2935265:0
    • Wedge a plastic opening tool under the rear case near the hinge.

    • Pry around the outer edge to release the plastic clips holding the rear case to the laptop.

  3. ASUS Q302L Fan Replacement: crwdns2935265:03crwdnd2935265:01crwdnd2935265:01crwdne2935265:0
    • Once the cover is free from all the clips, remove the cover from the laptop.

  4. ASUS Q302L Fan Replacement, Fan: crwdns2935265:04crwdnd2935265:01crwdnd2935265:02crwdne2935265:0 ASUS Q302L Fan Replacement, Fan: crwdns2935265:04crwdnd2935265:02crwdnd2935265:02crwdne2935265:0
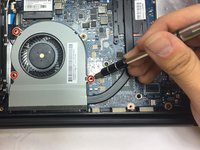
    • Use a Phillips #00 screwdriver to remove all three 4mm screws around the fan.

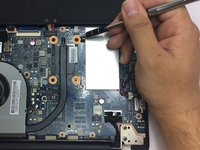
    • Using the same screw driver, remove the four 4mm screws from the part of the fan that is above the processor.

  5. ASUS Q302L Fan Replacement: crwdns2935265:05crwdnd2935265:01crwdnd2935265:03crwdne2935265:0 ASUS Q302L Fan Replacement: crwdns2935265:05crwdnd2935265:02crwdnd2935265:03crwdne2935265:0 ASUS Q302L Fan Replacement: crwdns2935265:05crwdnd2935265:03crwdnd2935265:03crwdne2935265:0
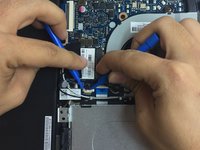
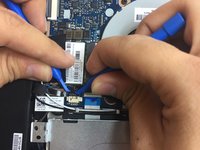
    • Gently wedge two plastic prying tools on both sides of the black part of the connector.

    • Carefully pull out the connector from its socket.

  6. ASUS Q302L Fan Replacement: crwdns2935265:06crwdnd2935265:01crwdnd2935265:02crwdne2935265:0 ASUS Q302L Fan Replacement: crwdns2935265:06crwdnd2935265:02crwdnd2935265:02crwdne2935265:0
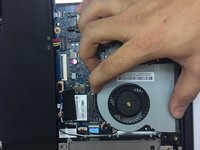
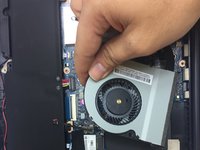
    • Once all screws and the connector are removed, you can safely pull the fan out of its place.

crwdns2915888:0crwdne2915888:0

To reassemble your device, follow these instructions in reverse order.

Kerolus Gerges

crwdns2935283:003/02/17crwdne2935283:0

219 crwdns2915208:0crwdne2915208:0

crwdns2935297:02crwdne2935297:0

crwdns2915084:0crwdne2915084:0

USF Tampa, Team S13-G4, Cagle Spring 2017 crwdns2935289:0USF Tampa, Team S13-G4, Cagle Spring 2017crwdne2935289:0

USFT-CAGLE-S17S13G4

crwdns2931471:03crwdne2931471:0

crwdns2935297:09crwdne2935297:0

crwdns2944067:00crwdne2944067:0

crwdns2917038:0crwdne2917038:0

crwdns2936625:0crwdne2936625:0:

crwdns2936751:024crwdne2936751:0 1

crwdns2936753:07crwdne2936753:0 6

crwdns2936753:030crwdne2936753:0 11

crwdns2942667:0crwdne2942667:0 765