crwdns2915892:0crwdne2915892:0
This guide provides instructions for the replacement of the Asus GL752VW-DH74 battery.
crwdns2942213:0crwdne2942213:0
-
-
Begin by putting the needle into the hole in the disk tray.
-
-
-
Use the spudger to help ease out the disk drive.
-
-
-
-
Remove the 3 small screws located underneath the disk drive.
-
-
-
Unscrew the nine remaining 8 mm Phillips-head screws on the back of the device.
-
-
-
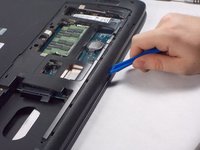
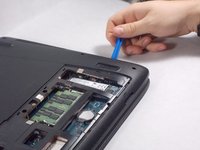
Use the opening tool to pry the back of the laptop case from the top
-
-
-
Disconnect the 3 cables connecting the motherboard to the keyboard.
-
-
-
Unscrew the two 8mm screws attached to the battery
-
-
-
Disconnect the bundled cable connector and remove the battery.
-


To reassemble your device, follow these instructions in reverse order.
crwdns2935221:0crwdne2935221:0
crwdns2935229:022crwdne2935229:0
crwdns2935287:0crwdne2935287:0

UMass Dartmouth, Team S1-G3, Isaacson Fall 2017 crwdns2935289:0UMass Dartmouth, Team S1-G3, Isaacson Fall 2017crwdne2935289:0
UMASSD-ISAACSON-F17S1G3
crwdns2931471:03crwdne2931471:0
crwdns2935297:05crwdne2935297:0
crwdns2947412:05crwdne2947412:0
Step3 Remove Screw next to the serial label in order to remove the disk tray.
Step 5 Hard Drive screws case screws have to also be removed in addition to the screw below the internal clock battery
Great Guide Thank you !!! - Battery Model for GL 752VW-dh51 A41N1501
Despite the few missing “unscrew” steps, it REALLY helped me. It took quite a bit longer than 20 min as I did not want to wreck something, but overall I could not have changed my battery without this guide. THANK YOU!
Thank you for your help, I now know how to change the battery, I tried disconnecting and reconnecting it see if I would get any power at all but zip, I will look on Ebay to try and buy a battery for it but I hope it’s that as it was working fine then said battery had no charge when I always made sure it never ran out so not sure what the problem was, at first I thought it was the chord but wasn’t that as I changed it.
I have added comments to steps 5, 6, and 7. The biggest piece of advice is just to make sure you have all 20 screws removed before trying to remove the keyboard (the guide does NOT mention all 20 of these screws). This might be more than necessary but I felt safer removing them than risking snapping one of the plastic clips that holds the keyboard in place.
Dont forget to put the three screws back in the frame prior to putting the optical drive back in and dont forget to put the battery screws back in, other than that a great guide.