crwdns2933423:0crwdne2933423:0

ASUS D550MA-DS01 Fan Replacement

crwdns2942213:0crwdne2942213:0

  1. ASUS D550MA-DS01 Fan Replacement, Keyboard Module: crwdns2935265:01crwdnd2935265:01crwdnd2935265:02crwdne2935265:0 ASUS D550MA-DS01 Fan Replacement, Keyboard Module: crwdns2935265:01crwdnd2935265:02crwdnd2935265:02crwdne2935265:0
    • Before you begin, be sure to turn off your laptop and unplug it from the outlet.

    • Use a Philips #1 screwdriver to remove the nine screws from the back cover.

  2. ASUS D550MA-DS01 Fan Replacement: crwdns2935265:02crwdnd2935265:01crwdnd2935265:01crwdne2935265:0
    • Turn the laptop over and open the display.

    • Insert the flat edge of the spudger into the crease of the keyboard cover.

    • While the spudger is in the crease, carefully pry open the casing by sliding the spudger along the edge.

    • Do not use excessive force to pry open the lid. You should hear each plastic clip snap open as you run the spudger along the edge.

  3. ASUS D550MA-DS01 Fan Replacement: crwdns2935265:03crwdnd2935265:01crwdnd2935265:02crwdne2935265:0 ASUS D550MA-DS01 Fan Replacement: crwdns2935265:03crwdnd2935265:02crwdnd2935265:02crwdne2935265:0
    • Make sure that the entire cover has been released from the plastic clips.

    • Slowly lift the cover open from the front of the laptop, but do not completely remove it.

    • Note the locations of the three white and blue data cables connecting to the keyboard to the computer's main board.

  4. ASUS D550MA-DS01 Fan Replacement: crwdns2935265:04crwdnd2935265:01crwdnd2935265:01crwdne2935265:0
    • If you are only replacing the battery, you can skip this step and the next. Shift the keyboard module away from the display and set it such that the fragile flex cables are not strained.

    • Disconnect the three data cables from the motherboard.

    • To unlock a ZIF connector, use the tip of a spudger or your fingernail to flip up the small, hinged locking flap. Carefully slide the unlocked cable out of the socket.

  5. ASUS D550MA-DS01 Fan Replacement: crwdns2935265:05crwdnd2935265:01crwdnd2935265:01crwdne2935265:0
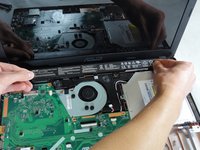
    • Remove the fully disconnected keyboard module from the laptop.

  6. ASUS D550MA-DS01 Fan Replacement, Battery: crwdns2935265:06crwdnd2935265:01crwdnd2935265:02crwdne2935265:0 ASUS D550MA-DS01 Fan Replacement, Battery: crwdns2935265:06crwdnd2935265:02crwdnd2935265:02crwdne2935265:0
    • Do not use any metal tool to pry any type of battery. Doing so can puncture or short the battery, resulting in damage or injury.

    • Remove the two screws securing the battery to the laptop case with a Phillips #1 screwdriver.

  7. ASUS D550MA-DS01 Fan Replacement: crwdns2935265:07crwdnd2935265:01crwdnd2935265:02crwdne2935265:0 ASUS D550MA-DS01 Fan Replacement: crwdns2935265:07crwdnd2935265:02crwdnd2935265:02crwdne2935265:0
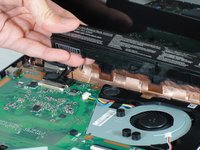
    • Lift the battery out and remove it:

    • The battery is connected to the motherboard on the left side.

    • Use your fingertips to evenly grip the battery on the left and right sides of the battery.

    • Pull straight up to lift the battery out of its place.

    • Do not use excessive force or attempt to pry the battery with any tools. Doing so will result in damage to the laptop.

  8. ASUS D550MA-DS01 Fan Replacement, Hard Drive: crwdns2935265:08crwdnd2935265:01crwdnd2935265:02crwdne2935265:0 ASUS D550MA-DS01 Fan Replacement, Hard Drive: crwdns2935265:08crwdnd2935265:02crwdnd2935265:02crwdne2935265:0
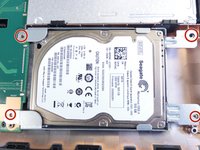
    • Remove the four screws that hold the hard drive in place with the Philips #1 screwdriver.

    • There are two screws connected to the motherboard and two screws connected directly to the case.

  9. ASUS D550MA-DS01 Fan Replacement: crwdns2935265:09crwdnd2935265:01crwdnd2935265:01crwdne2935265:0
    • Remove the hard drive by sliding it to the right to disconnect it from the motherboard and lifting out.

    • Be sure to fully disconnect the hard drive from the motherboard to ensure that you do not damage the connectors.

    • If necessary, unscrew the old hard drive from the holster and screw the new one into the holster.

  10. ASUS D550MA-DS01 Fan Replacement, DVD Drive: crwdns2935265:010crwdnd2935265:01crwdnd2935265:02crwdne2935265:0 ASUS D550MA-DS01 Fan Replacement, DVD Drive: crwdns2935265:010crwdnd2935265:02crwdnd2935265:02crwdne2935265:0
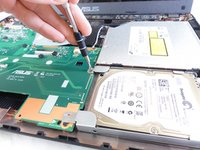
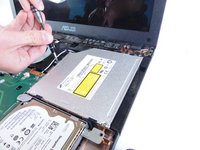
    • Remove the single screw that is holding the drive in place using the Phillips #1 Screwdriver.

  11. ASUS D550MA-DS01 Fan Replacement: crwdns2935265:011crwdnd2935265:01crwdnd2935265:01crwdne2935265:0
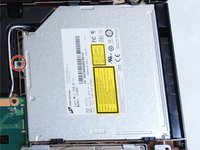
    • Slide the drive out to the right of the laptop to disconnect from the motherboard.

    • Lifting the drive straight out without sliding to the right will damage the motherboard.

  12. ASUS D550MA-DS01 Fan Replacement, Motherboard: crwdns2935265:012crwdnd2935265:01crwdnd2935265:02crwdne2935265:0 ASUS D550MA-DS01 Fan Replacement, Motherboard: crwdns2935265:012crwdnd2935265:02crwdnd2935265:02crwdne2935265:0
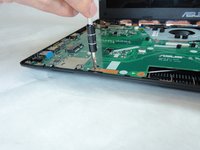
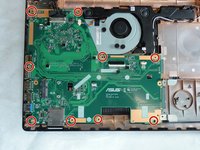
    • Remove the 9 screws from the motherboard using the Philips #1 screwdriver.

    • While unscrewing the screws, it may be helpful to use the tweezers to keep control of the screws.

  13. ASUS D550MA-DS01 Fan Replacement: crwdns2935265:013crwdnd2935265:01crwdnd2935265:03crwdne2935265:0 ASUS D550MA-DS01 Fan Replacement: crwdns2935265:013crwdnd2935265:02crwdnd2935265:03crwdne2935265:0 ASUS D550MA-DS01 Fan Replacement: crwdns2935265:013crwdnd2935265:03crwdnd2935265:03crwdne2935265:0
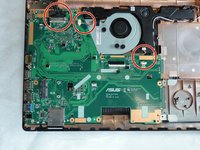
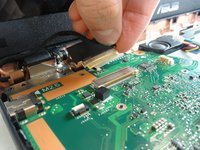
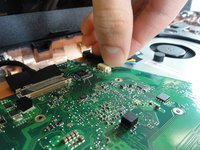
    • Disconnect the three cables attached to the motherboard.

    • Do not pull the cables by their wires. This can lead to damage to the cables.

    • The large, black cable is connected to the screen. Carefully wiggle the cable out by gripping the black tape with your fingers.

    • There may be clear tape holding the screen connector in place.

    • The cable for the fan and speaker use similar connectors. Use the black spudger or carefully grip the sides of each connector with your fingers to slowly pull them out.

  14. ASUS D550MA-DS01 Fan Replacement: crwdns2935265:014crwdnd2935265:01crwdnd2935265:01crwdne2935265:0
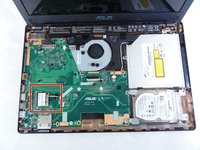
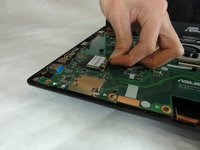
    • Pull the motherboard to the right to clear the peripheral connections of the laptop casing.

    • Lift the motherboard out of the laptop.

  15. ASUS D550MA-DS01 Fan Replacement, Wireless Network Card: crwdns2935265:015crwdnd2935265:01crwdnd2935265:03crwdne2935265:0 ASUS D550MA-DS01 Fan Replacement, Wireless Network Card: crwdns2935265:015crwdnd2935265:02crwdnd2935265:03crwdne2935265:0 ASUS D550MA-DS01 Fan Replacement, Wireless Network Card: crwdns2935265:015crwdnd2935265:03crwdnd2935265:03crwdne2935265:0
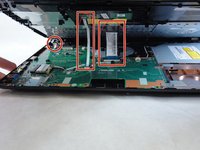
    • Locate the Network Interface Card (NIC) on the motherboard.

    • Note the orientation of the white and black wires on your NIC. The may connection differ from the picture.

    • Gently disconnect the white and black wires by pulling it off of the NIC card. These wires should come off easy.

    • If you are following these steps for the prerequisite to remove the motherboard, you do not need to completely remove the NIC. Just remove the wires. The proceeding step can be skipped.

  16. ASUS D550MA-DS01 Fan Replacement: crwdns2935265:016crwdnd2935265:01crwdnd2935265:02crwdne2935265:0 ASUS D550MA-DS01 Fan Replacement: crwdns2935265:016crwdnd2935265:02crwdnd2935265:02crwdne2935265:0
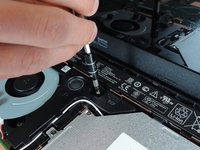
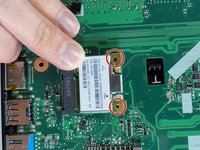
    • Remove the screws that are holding down the wireless network card with the Phillips #1 screwdriver.

    • After removing the screws, the NIC will lift up in a spring action.

  17. ASUS D550MA-DS01 Fan Replacement: crwdns2935265:017crwdnd2935265:01crwdnd2935265:01crwdne2935265:0
    • Gently pull out the NIC.

    • Do not use excessive force or wiggle the card out. The NIC should slide out easily.

  18. ASUS D550MA-DS01 Fan Replacement, Fan: crwdns2935265:018crwdnd2935265:01crwdnd2935265:02crwdne2935265:0 ASUS D550MA-DS01 Fan Replacement, Fan: crwdns2935265:018crwdnd2935265:02crwdnd2935265:02crwdne2935265:0
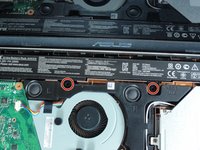
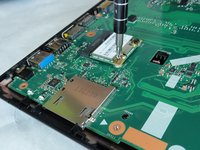
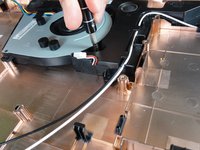
    • Remove the two screws shown with the Philips #1 screwdriver.

  19. ASUS D550MA-DS01 Fan Replacement: crwdns2935265:019crwdnd2935265:01crwdnd2935265:01crwdne2935265:0
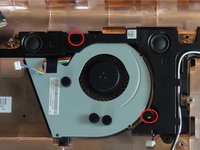
    • Carefully slide out fan.

    • The fan is difficult to maneuver out. Carefully wiggle the fan towards you before attempting to lift it out.

    • If you attempt to lift the fan before freeing it from the speaker housing, it will get stuck. In this case, push the fan back into its place and try again.

crwdns2915888:0crwdne2915888:0

To reassemble your device, follow these instructions in reverse order.

Calvin Wieczorek

crwdns2935283:009/16/15crwdne2935283:0

409 crwdns2915208:0crwdne2915208:0

crwdns2935297:03crwdne2935297:0

crwdns2915084:0crwdne2915084:0

IUPUI, Team 1-2, Baechle Fall 2015 crwdns2935289:0IUPUI, Team 1-2, Baechle Fall 2015crwdne2935289:0

IUPUI-BAECHLE-F15S1G2

crwdns2931471:03crwdne2931471:0

crwdns2935297:08crwdne2935297:0

crwdns2944067:00crwdne2944067:0

crwdns2917038:0crwdne2917038:0

crwdns2936625:0crwdne2936625:0:

crwdns2936751:024crwdne2936751:0 0

crwdns2936753:07crwdne2936753:0 0

crwdns2936753:030crwdne2936753:0 2

crwdns2942667:0crwdne2942667:0 515