crwdns2933423:0crwdne2933423:0

APEX TM785CH Front Camera Replacement

crwdns2942213:0crwdne2942213:0

  1. APEX TM785CH Front Camera Replacement, Back Casing: crwdns2935265:01crwdnd2935265:01crwdnd2935265:02crwdne2935265:0 APEX TM785CH Front Camera Replacement, Back Casing: crwdns2935265:01crwdnd2935265:02crwdnd2935265:02crwdne2935265:0
    • Start by bending the tablet back at the top white-colored portion to expose an opening between the back cover and the tablet body.

    • Wedge a plastic opening tool into the opening and push it down to force the back cover off.

    • Move along the top edge of the tablet and repeat the step above.

    • Pull the back cover away from the tablet body to completely remove it.

  2. APEX TM785CH Front Camera Replacement, Front Camera: crwdns2935265:02crwdnd2935265:01crwdnd2935265:02crwdne2935265:0 APEX TM785CH Front Camera Replacement, Front Camera: crwdns2935265:02crwdnd2935265:02crwdnd2935265:02crwdne2935265:0
    • To get to the front camera, you will first need to remove the top panel.

    • Unscrew two 2.25 mm Phillips screws with a #00 screwdriver from the top plastic panel to remove it.

  3. APEX TM785CH Front Camera Replacement: crwdns2935265:03crwdnd2935265:01crwdnd2935265:01crwdne2935265:0
    • Once unscrewed, use a spudger to pop the panel off by wedging it underneath the panel.

  4. APEX TM785CH Front Camera Replacement: crwdns2935265:04crwdnd2935265:01crwdnd2935265:03crwdne2935265:0 APEX TM785CH Front Camera Replacement: crwdns2935265:04crwdnd2935265:02crwdnd2935265:03crwdne2935265:0 APEX TM785CH Front Camera Replacement: crwdns2935265:04crwdnd2935265:03crwdnd2935265:03crwdne2935265:0
    crwdns2935267:0crwdne2935267:0
    Tweezers
    $4.99
    crwdns2942207:0crwdne2942207:0
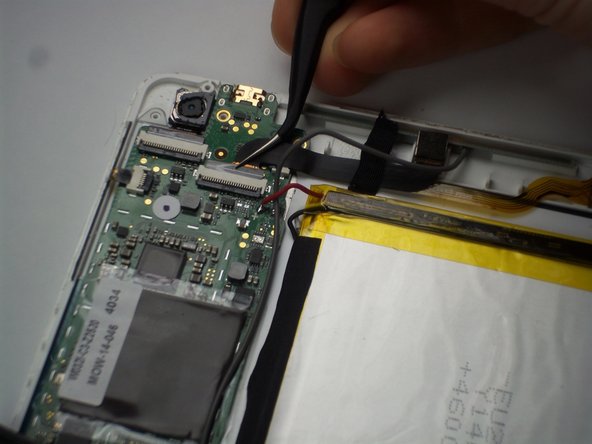
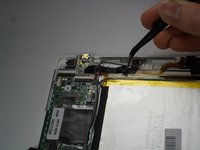
    • First, use plastic coated tweezers to pull up the black release tab.

    • Pull on the black connector with tweezers as close as possible to the white connector base, making sure not to pull on the connector base.

    • It is important to be careful not to damage the black connector tape or the white base.

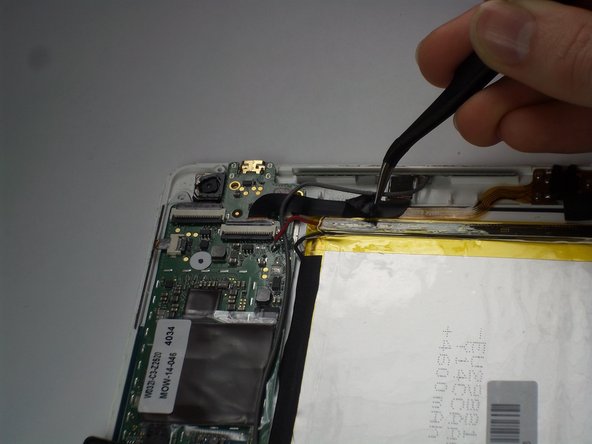
    • Next, use the tweezers to peel off the tape holding down the connector to the front camera.

    • The front camera can now be removed from its socket.

crwdns2915888:0crwdne2915888:0

To reassemble your device, follow these instructions in reverse order.

Brian Graschel

crwdns2935283:003/23/15crwdne2935283:0

823 crwdns2915208:0crwdne2915208:0

crwdns2935297:06crwdne2935297:0

crwdns2915084:0crwdne2915084:0

Baylor, Team 4-1, Williams Spring 2015 crwdns2935289:0Baylor, Team 4-1, Williams Spring 2015crwdne2935289:0

BU-WILLIAMS-S15S4G1

crwdns2931471:03crwdne2931471:0

crwdns2935297:012crwdne2935297:0

crwdns2944067:00crwdne2944067:0

crwdns2917038:0crwdne2917038:0

crwdns2936625:0crwdne2936625:0:

crwdns2936751:024crwdne2936751:0 2

crwdns2936753:07crwdne2936753:0 2

crwdns2936753:030crwdne2936753:0 10

crwdns2942667:0crwdne2942667:0 232