crwdns2915892:0crwdne2915892:0
Replace the battery for the AKG bluetooth headphones. Same procedure for AKG C50BT.
-
-
X-Acto Knife
-
Tweezer
-
Philips Screwdriver
-
Double-sided Tape
-
AOLIKES 3.7V Rechargeable Lithium Polymer Replacement Battery 1500mAh or equivalent
-
-
-
Remove the left (L) ear pad by rotating it counter clockwise and it will be removed
Not so easy. Earpad spins but does'n’t come off — yet.
Never mind… earpad is held on with elastic band only- got it. It doesn’t unscrew as I assumed
-
-
-
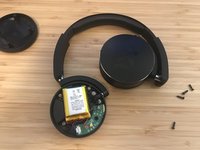
Remove the four screws using a Philips screwdriver
-
-
-
-
Turn it upside down and remove the AKG cover. This will expose the battery
-
-
-
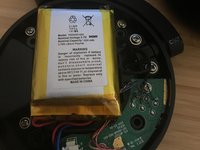
Confirm the replacement battery has the wires in the correct orientation (Red / Black / Traveller). If not, pry the connector and remove pin and replace in correct position
Hello,
My current headphones are AKG C50BT with a wire diagram as Red, Black, Blue, the replacement battery shows, Red, White, Black.
TECHTEK battery on Amazon+ compatible with [AKG] Y50BT replaces P083040-Q02
Will this battery be ok to install in the headphones
I'm not sure if this P083040-Q02 will replace it. In terms of wiring, you'll need to swap white & black. It'll be Red / Black / White.
It doesn't matter what color the traveler is.
Kevin -
Hello Again Kevin,
Does it matter what colour the Traveller wire is.
Thanks
James
I think the word "optional" should be removed here. Just looking at a set that had the battery replaced by a friend following this guide and he clearly took optional to mean he could skip this step. His "traveller" wire was in the middle.
-
-
-
Remove pin connector by prying back the connector. Tip - use a tweezer
-
Connect the replacement battery to ensure it works
-
-
-
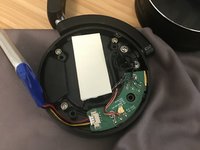
The battery is adhered with double sided tape. Carefully remove the battery by using a tool to pry out the tape, i.e. X-Acto knife
-
Remove the residue by using rubbing alcohol
-
-
-
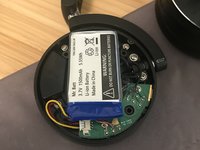
Insert double-sided tape
-
Place the battery in an orientation that does not block the screw holes for the cover
-


To reassemble your device, follow these instructions in reverse order.
To reassemble your device, follow these instructions in reverse order.
crwdns2935221:0crwdne2935221:0
crwdns2935229:08crwdne2935229:0
crwdns2947412:010crwdne2947412:0
Very clear directions with excellent photo accompaniment. Battery shown is not the 1500 mAh recommended by manufacturer.
Is ist possible to get a Link for the korrekt Battery
Foto and Instruktion very good!!
I have linked it in the instructions but here it is, https://www.amazon.ca/gp/product/B07K1J4.... The key is to find a battery that fits the headset.
Remember to reorient the wires, Step 5. For this battery, I had to swap the yellow and black wires.
Kevin -
Great, thanks Kevin!
For the other not so terribly handy fortune-hunters out there, here's another instruction to Step 5:
To remove the 2 wires from the connector in order to swap them, with a thin/sharp cutter/knife/needle you can carefully move up a little the plastic parts of the connector that cover and block the ends of the wires, and then pull out the wires, then push the plastic parts back down, and then push the wires back in correctly.
Bought a replacement battery. Didn't work so replaced my old battery which, surprisingly, charged up (for a couple of months) and then died. Went back to the replacement, realised the wires were not in correct places. Read this, swapped two over and now working fine.
Thank you so much!
Will not charge and had battery dead for 3 yrs, before disposing the set, I decided to open it and short circuit the battery, surprisingly, charged to 100% and now I using them again with my desktop. When battery replacement comes, there are better choices in ebay with more mAh and way cheaper, sure thing, re-wire the connector ahead of time.
Here is a link to the recommended battery at US Amazon (currently at $7.99) https://www.amazon.com/dp/B07K1J433J
Here is a link to a video on how to rewire / swap the wires. Be very careful to keep the wires separate from each other while doing this! https://www.youtube.com/watch?v=0G7iIwfu...
@km4n is there any trick to removing the AKG face plate in step 4? I'm attempting this on a slightly different model, the N60nc wireless, and to me this does not seem able to come apart. Only the back cover, close to the ear, seems able to be removed.
Never mind - I was able to get it removed!