crwdns2933423:0crwdne2933423:0

AEG Electrolux FM72 Disassembly for cleaning

crwdns2942213:0crwdne2942213:0

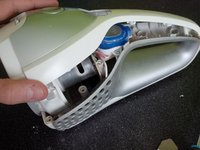
  1. AEG Electrolux FM72 Disassembly for cleaning, Opening the Device: crwdns2935265:01crwdnd2935265:01crwdnd2935265:03crwdne2935265:0 AEG Electrolux FM72 Disassembly for cleaning, Opening the Device: crwdns2935265:01crwdnd2935265:02crwdnd2935265:03crwdne2935265:0 AEG Electrolux FM72 Disassembly for cleaning, Opening the Device: crwdns2935265:01crwdnd2935265:03crwdnd2935265:03crwdne2935265:0
    • Open the lid by pressing the grey button and lifting it away.

    • Clean each of the plastic parts with soap and water, and then leave them out to dry.

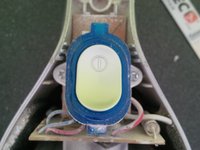
  2. AEG Electrolux FM72 Disassembly for cleaning, Opening the Electronic Case: crwdns2935265:02crwdnd2935265:01crwdnd2935265:03crwdne2935265:0 AEG Electrolux FM72 Disassembly for cleaning, Opening the Electronic Case: crwdns2935265:02crwdnd2935265:02crwdnd2935265:03crwdne2935265:0 AEG Electrolux FM72 Disassembly for cleaning, Opening the Electronic Case: crwdns2935265:02crwdnd2935265:03crwdnd2935265:03crwdne2935265:0
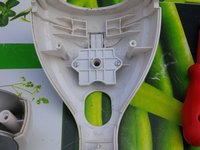
    • Follow these steps to open the electronic casing.

    • Remove the four screws as shown in picture two.

    • A long Phillips screwdriver is needed for step two.

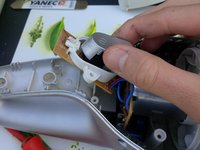
    • Remove the fifth screw at the bottom as shown in picture three.

  3. AEG Electrolux FM72 Disassembly for cleaning: crwdns2935265:03crwdnd2935265:01crwdnd2935265:03crwdne2935265:0 AEG Electrolux FM72 Disassembly for cleaning: crwdns2935265:03crwdnd2935265:02crwdnd2935265:03crwdne2935265:0 AEG Electrolux FM72 Disassembly for cleaning: crwdns2935265:03crwdnd2935265:03crwdnd2935265:03crwdne2935265:0
    • Gently pry the device open, using an iSesamo opener.

    • Now the I/O button can be removed.

    • Completely replacing this entire part requires desoldering wire connections.

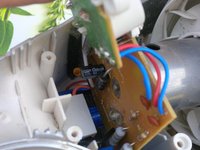
  4. AEG Electrolux FM72 Disassembly for cleaning, cleaning electronics: crwdns2935265:04crwdnd2935265:01crwdnd2935265:02crwdne2935265:0 AEG Electrolux FM72 Disassembly for cleaning, cleaning electronics: crwdns2935265:04crwdnd2935265:02crwdnd2935265:02crwdne2935265:0
    • Now the electronic components can be cleaned using an air compressor.

    • In picture one, you can see the PCBs. Under the PCB, you'll see blue batteries. These are 2 x 3 AA rechargeable batteries .

    • If the dust bag needs to be replaced, remove its securing screws.

crwdns2915888:0crwdne2915888:0

To reassemble your device, follow these instructions in reverse order.

crwdns2935229:03crwdne2935229:0

Kevin D

crwdns2935283:005/02/14crwdne2935283:0

7,298 crwdns2915208:0crwdne2915208:0

crwdns2935297:021crwdne2935297:0

crwdns2944067:03crwdne2944067:0

Hello

How can i repair the electric wire on this device please ?

Heloise - crwdns2934203:0crwdne2934203:0

Hallo

Which electric wire do you mean? Can you send in a picture? Does it need soldering?

Kind regards

Kevin

Kevin D - crwdns2934203:0crwdne2934203:0

How can I disassemble the motor parts for cleaning?

wongkapo0611 - crwdns2934203:0crwdne2934203:0

crwdns2917038:0crwdne2917038:0

crwdns2936625:0crwdne2936625:0:

crwdns2936751:024crwdne2936751:0 0

crwdns2936753:07crwdne2936753:0 5

crwdns2936753:030crwdne2936753:0 43

crwdns2942667:0crwdne2942667:0 6,533