crwdns2933423:0crwdne2933423:0

ACER Aspire E1-572-6870 RAM Replacement

crwdns2942213:0crwdne2942213:0

  1. ACER Aspire E1-572-6870 RAM Replacement, Battery: crwdns2935265:01crwdnd2935265:01crwdnd2935265:01crwdne2935265:0
    • Before you begin, be sure to turn off your laptop and unplug it from the outlet.

    • Flip your laptop over so the back panel is facing upwards.

    • Locate the lock switch below the battery.

  2. ACER Aspire E1-572-6870 RAM Replacement: crwdns2935265:02crwdnd2935265:01crwdnd2935265:03crwdne2935265:0 ACER Aspire E1-572-6870 RAM Replacement: crwdns2935265:02crwdnd2935265:02crwdnd2935265:03crwdne2935265:0 ACER Aspire E1-572-6870 RAM Replacement: crwdns2935265:02crwdnd2935265:03crwdnd2935265:03crwdne2935265:0
    • Slide the lock switch to the right using your finger or a spudger.

    • At the same time, grasp the battery with your other hand and slide it out of the laptop.

    • Remove the battery.

    • To reinsert or replace the battery, simply line up the tabs on the battery with the laptop and slide it straight back in. There is no need to move the lock switch.

  3. ACER Aspire E1-572-6870 RAM Replacement, RAM: crwdns2935265:03crwdnd2935265:01crwdnd2935265:01crwdne2935265:0
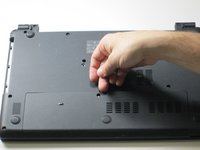
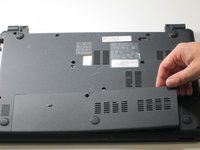
    • Unscrew the one 2.5 x 8mm Phillips #0 screw from the bottom panel as designated in the image.

  4. ACER Aspire E1-572-6870 RAM Replacement: crwdns2935265:04crwdnd2935265:01crwdnd2935265:03crwdne2935265:0 ACER Aspire E1-572-6870 RAM Replacement: crwdns2935265:04crwdnd2935265:02crwdnd2935265:03crwdne2935265:0 ACER Aspire E1-572-6870 RAM Replacement: crwdns2935265:04crwdnd2935265:03crwdnd2935265:03crwdne2935265:0
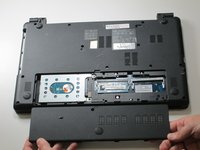
    • Remove the back panel by carefully disengaging it around the edges and then pull upwards.

  5. ACER Aspire E1-572-6870 RAM Replacement: crwdns2935265:05crwdnd2935265:01crwdnd2935265:03crwdne2935265:0 ACER Aspire E1-572-6870 RAM Replacement: crwdns2935265:05crwdnd2935265:02crwdnd2935265:03crwdne2935265:0 ACER Aspire E1-572-6870 RAM Replacement: crwdns2935265:05crwdnd2935265:03crwdnd2935265:03crwdne2935265:0
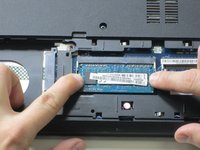
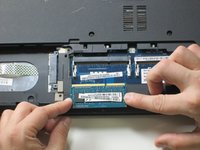
    • Disengage the metal tabs located on either side of the RAM stick by pulling the tabs outward.

    • Carefully remove the RAM so you don't damage the connectors.

crwdns2915888:0crwdne2915888:0

To reassemble your device, follow these instructions in reverse order.

crwdns2935227:0crwdne2935227:0

Cody Lim

crwdns2935283:001/25/17crwdne2935283:0

1.404 crwdns2915208:0crwdne2915208:0

crwdns2935297:07crwdne2935297:0

crwdns2915084:0crwdne2915084:0

Cal Poly, Team 9-6, Banghart Winter 2017 crwdns2935289:0Cal Poly, Team 9-6, Banghart Winter 2017crwdne2935289:0

CPSU-BANGHART-W17S9G6

crwdns2931471:03crwdne2931471:0

crwdns2935297:07crwdne2935297:0

crwdns2944067:00crwdne2944067:0

crwdns2917038:0crwdne2917038:0

crwdns2936625:0crwdne2936625:0:

crwdns2936751:024crwdne2936751:0 0

crwdns2936753:07crwdne2936753:0 8

crwdns2936753:030crwdne2936753:0 14

crwdns2942667:0crwdne2942667:0 973