crwdns2915892:0crwdne2915892:0
This device is relatively simple and the problems are easy to identify. Nevertheless, take the time to read the manual to practice a repair under good conditions. Next, read the two tutorials on the functions and how they work. You will maximize your chances of success.
Experience shows that the three main problems are related to heat resistance, the bipolar switch contacts, and the electronic circuit. We will go into detail about the first two, but we will not tackle the third seeing as no toaster has the same electronics. In the final case, you will need to inspect and test the components one by one, desoldering them as needed. Note that it is difficult, almost impossible to procure the schematics for these devices.
The problems may be of another nature. Here are a few possibilities:
Electric problems:
** Verify the continuity of the cable, wire to wire, between the main socket and the switch, then from the inter towards the resistors, electronic circuit, and electromagnet.
- Verify the value of the electromagnetic coil with an ohmmeter. The coil may be cut (rare). Take this opportunity to clean the top of the electromagnetic coil on which is stuck to the movable part of the lever. Crumbs often fall there and this can cause dysfunction (the lever has trouble staying down).
- TIP: To help troubleshoot, plug in the toaster, press and hold the lever down (without adding any bread) for about fifteen seconds. Check to see if the resistor glows red inside. If it does, the resistor is good. If it doesn't, it's the problem. We'll tell you how to repair it later.
Mechanical problems: the mechanism lifting and dropping the pans could be stuck. In that case, use flat pliers to re-establish proper operation by straightening the elements of the mechanism.
-
-
A toaster is a device or instrument used to hold slices of certain foods in front of a heat source for a specified period or not.
-
-
-
Mark 1: Slots for inserting the slices of bread into the mobile basket. Usually in numbers of one or two up to 4.
-
Mark 2: Lever for lowering the baskets and switching on the toaster
-
Mark 3: Time delay setting button
-
Mark 4: Defrost button
-
Mark 5: Power on indicator
-
Mark 6: Quick stop and eject button
-
Mark 7: Crumb tray
-
The functions of the toaster presented are: - toast two slices of bread on both sides - adjust the cooking time using a graduated knob (timer adjustment) - interrupt cooking using a pusher ( button) - defrost slices of bread (push button) - collect the crumbs in a container
-
-
-
When lever 1 moves down, it lowers the basket containing the bread as well as a cam labelled 2. When this cam arrives at the end of the rail, it gets in position in between the two copper plates of the bipolar switch labelled 3.
-
These two copper plates are used to power on the toaster.
-
If the toaster is plugged in, the lever is held down by an electro-magnet 4. Time setting of the magnet is chosen using the button placed on top of the toaster actuating the electronic timer 5
-
To toast bread, the device has a network of heating elements 6 placed on both sides of the basket on insulating plates 7. The elements are powered when the lever is held down.
-
-
-
-
When the lever is lowered, the contact pads of the bipolar switch 3 are closed. This allows the network of heating elements6, the electronic card 5 and the electromagnet 4 to be turned on.
-
When the electromagnet is powered, it keeps the lever lowered. This process is controlled by the timer on the electronic card.
-
When the time is up or the "stop" button is pressed, the timer releases the electro-magnet, which lets the lever rise with the tension of the spring and brings up the basket with the toasts inside. The toaster's circuit is then off.
-
-
-
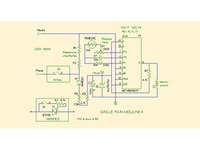
This is an example of an electronic diagram of a toaster timer. The manufacturers use various assemblies often based on a frequency oscillator and a timer (The MC14541BCP, datasheet provided here). The setting of the time is done with a potentiometer (P1 here).
-
-
-
A common failure is a broken heating element. If the toaster does not heat up, or if the lever does not stay down (1), check the continuity of the resistance circuit with a multimeter.
-
To test the elements, connect the multimeter to the input terminal and then find the output terminal (in this case they are the white wires) and measure the resistance. It should be a resistance of less than 100 ohms (2).
-
If the element is broken, we need to find where the break is. We follow the length of the wire, which is wound around isolating plates made of mica. There are four in this toaster. The heating elements are connected in series at the back of the device by exposed wires. We can use these to make measurements.
-
-
-
When the damage has been located, the repair can be carried out. The heat resistor is made with an alloy of nickel and chrome, and nichrome (*1) that's impossible to weld with ease. It is therefore necessary to create a connection either with a piece of wire as a strap, or with a crimping sleeve (*2)
-
Warning: The disassembly to access the insulating plates is a delicate process. We must focus on solutions that allow repair without having to disassemble. See video (*2)
-
(*2) watch the video https://youtu.be/YXq3go-NgYE from 10 minutes)
-
-
-
Since the power of the device is between 600 and 1200W, the bipolar switch (marker 2) must support a current between 2.5 and 5A (1), which is important given its small size. When contacts deteriorate, their resistance will increase and the heat will dissipate in the switch and eventually burn them.
-
If the contacts have been fried, the repair will involve cleaning them with a small fine file by squeezing the file between the contacts with a clamp if necessary. Make sure that the cam (1) closes the two contacts well by pushing downright on the slats.
-
(1) Knowing that the power of toasters is generally between 600 and 1200w, P=U*I > I=1200/220 = 5,5A > I=600/220=2,7A
-


There you are! After having studied the previous two guides on toasters, the functionalities, and the different sub-assemblies that compose it, we have reviewed the main causes for toaster breakdowns.
We hope this empowers you to know more about your device and have the capacity to repair it yourself.
If you enjoyed this guide (or not!), don't hesitate to leave us feedback. And if you are in our area (Atelier Soudé, come visit us. We organize workshops for co-repair, popularization sessions, and more...
crwdns2935221:0crwdne2935221:0
crwdns2935229:016crwdne2935229:0
crwdns2934873:0crwdne2934873:0
100%


crwdns2934885:0crwdne2934885:0 crwdns2934875:0crwdne2934875:0
crwdns2934877:0crwdne2934877:0 ›

crwdns2947412:014crwdne2947412:0
Il faut que j’aille sur ifixit pour trouver un tuto de l’atelier soudé…. Les Lyonnais sont donc partout ?!? Merci pour l’explication. Je vais tenter de trouver du fil Ni-Cr pour réparer ce grille-pain trouvé dans le local poubelle de mon immeuble. Si je galère je passerai à une permanence à Lyon.
AlexFixeurs - crwdns2934203:0crwdne2934203:0 crwdns2950251:0crwdne2950251:0
yes merci ! grace à vous j’ai réussi à trouver la rupture de la résistance et à la réparer ! bon j’ai mis un peu de temps à comprendre comment y accéder par contre… mais avec la vidéo top! j’ai fait 2 petits trous dans la plaque et j’ai relié les 2 bouts de “fils” coupés avec la partie métallique d’une gaine à sertir et mon grille pain remarche!!! longue vie à mes tartines grillées du matin !
Héloïse DANO - crwdns2934203:0crwdne2934203:0 crwdns2950251:0crwdne2950251:0
Merci! Dans mon cas, c'était des salissures sur la partie supérieure de l'électro-aimant. Après nettoyage, ça remarche. Sans vous, je jetais mon grille-pain.
Philippe V - crwdns2934203:0crwdne2934203:0 crwdns2950251:0crwdne2950251:0
Ou trouver les clés spéciales pour démonter les pieds merci
josselyne.becede - crwdns2934203:0crwdne2934203:0 crwdns2950251:0crwdne2950251:0
Bonjour, pour ma part j'ai pas trouvé de clé spéciale du coup j'ai percé les vis spéciales et j'ai mis des vis à bois à la place ;-)