crwdns2933423:0crwdne2933423:0

2013-2018 Jeep Wrangler Sun Visor Replacement

crwdns2942213:0crwdne2942213:0

  1. 2013-2018 Jeep Wrangler Sun Visor Replacement, Sun Visor: crwdns2935265:01crwdnd2935265:01crwdnd2935265:01crwdne2935265:0
    • Lower the old sun visor to the lowest position.

  2. 2013-2018 Jeep Wrangler Sun Visor Replacement: crwdns2935265:02crwdnd2935265:01crwdnd2935265:02crwdne2935265:0 2013-2018 Jeep Wrangler Sun Visor Replacement: crwdns2935265:02crwdnd2935265:02crwdnd2935265:02crwdne2935265:0
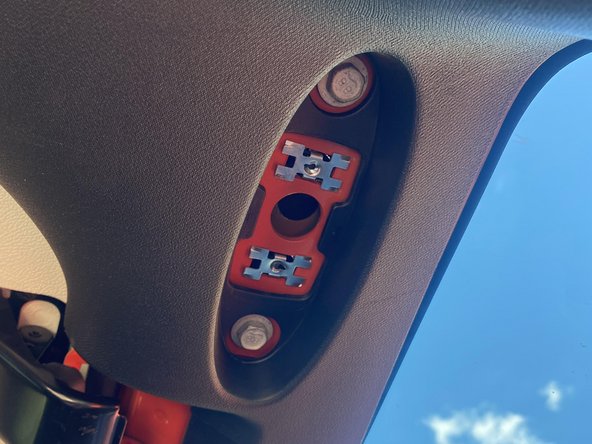
    • Locate the screw that secures the sun visor to the mounting bracket.

    • This screw is sometimes covered by a small plastic bracket.

    • Remove the plastic cover using a flathead screwdriver or trim-removing tool

  3. 2013-2018 Jeep Wrangler Sun Visor Replacement: crwdns2935265:03crwdnd2935265:01crwdnd2935265:02crwdne2935265:0 2013-2018 Jeep Wrangler Sun Visor Replacement: crwdns2935265:03crwdnd2935265:02crwdnd2935265:02crwdne2935265:0
    • Use a Torx T20 or T25 to remove the 12 mm screw that attaches the sun visor to the bracket.

  4. 2013-2018 Jeep Wrangler Sun Visor Replacement: crwdns2935265:04crwdnd2935265:01crwdnd2935265:02crwdne2935265:0 2013-2018 Jeep Wrangler Sun Visor Replacement: crwdns2935265:04crwdnd2935265:02crwdnd2935265:02crwdne2935265:0
    • Slide the old sun visor off the mounting bracket.

    • Keep the old sun visor and any hardware in case it's needed for the replacement.

  5. 2013-2018 Jeep Wrangler Sun Visor Replacement: crwdns2935265:05crwdnd2935265:01crwdnd2935265:02crwdne2935265:0 2013-2018 Jeep Wrangler Sun Visor Replacement: crwdns2935265:05crwdnd2935265:02crwdnd2935265:02crwdne2935265:0
    • Slide the new sun visor onto the mounting bracket, aligning the holes for the screws.

  6. 2013-2018 Jeep Wrangler Sun Visor Replacement: crwdns2935265:06crwdnd2935265:01crwdnd2935265:03crwdne2935265:0 2013-2018 Jeep Wrangler Sun Visor Replacement: crwdns2935265:06crwdnd2935265:02crwdnd2935265:03crwdne2935265:0 2013-2018 Jeep Wrangler Sun Visor Replacement: crwdns2935265:06crwdnd2935265:03crwdnd2935265:03crwdne2935265:0
    • Insert the screw into the mounting bracket and tighten it with the Torx T25 screwdriver.

    • Make sure it's snug but not too tight.

    • Tightening the screw too tight might damage the plastic.

    • If your sun visor had a plastic cover concealing the screw, put it back in place.

    • Test the new sun visor by moving it into different positions to make sure it functions correctly.

crwdns2915888:0crwdne2915888:0

To reassemble your device, follow these instructions in reverse order.

Piper Klein

crwdns2935283:009/27/23crwdne2935283:0

133 crwdns2915208:0crwdne2915208:0

crwdns2935295:0crwdne2935295:0

crwdns2947412:00crwdne2947412:0

crwdns2917038:0crwdne2917038:0

crwdns2936625:0crwdne2936625:0:

crwdns2936751:024crwdne2936751:0 0

crwdns2936753:07crwdne2936753:0 11

crwdns2936753:030crwdne2936753:0 49

crwdns2942667:0crwdne2942667:0 779