crwdns2915892:0crwdne2915892:0
The steps in this guide are used to replace the brake rotors on all Focus models in the 2005-2007 generation, except for the ST model, which has slightly different brakes. Caution should be exercised when working with brake and suspension components, and proper safety goggles should be worn at all times.
Whenever working on your car's brakes and suspension, work on one side at a time. Keep the other side completely assembled so that you can reference it at any time.
This guide includes steps to replace the brake pads, in addition to the rotors. It is strongly suggested that brake rotors are not replaced by themselves. Never drive a car if the brakes on one side only are changed, because the car will "pull" to one side.
crwdns2942213:0crwdne2942213:0
-
-
Put the car in park (automatic) or neutral (manual).
-
Apply the parking brake.
-
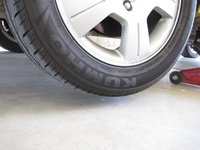
Place chocks behind the rear wheels.
-
-
-
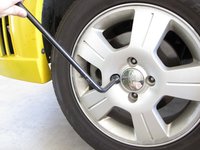
Use a 19 mm lug wrench to loosen each lug nut a half turn.
-
-
-
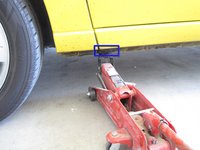
Use a hydraulic jack on the car's frame to jack the car.
-
A small notch shows where to place the jack.
-
It is only necessary to jack the car until the wheel no longer touches the ground.
-
-
-
Place a jack stand on the frame and remove the jack.
-
-
-
Use a lug wrench to completely remove the four lug nuts.
-
Remove the wheel.
-
-
-
The brake fluid reservoir is located towards the back of the engine compartment.
-
Unscrew the cap and remove it.
-
-
-
Use a turkey baster to remove 2-3 ounces of brake fluid from the reservoir.
-
-
-
Use a flat head screwdriver or brake spoon to remove the outer pad retaining clip.
-
-
-
Use a flat head screwdriver to remove the black plastic guide bolt dust caps.
-
-
-
Use a 7 mm Allen wrench to remove the two caliper guide bolts.
-
-
-
-
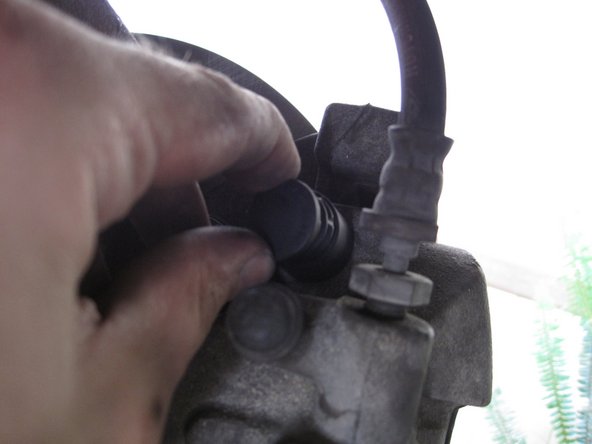
Remove the clip that holds the brake line to the strut with a pair of vise grips.
-
Pull the brake line towards you and out of the bracket.
-
-
-
Pull the caliper off of the rotor.
-
Place the caliper on top of a box or bucket so the brake line doesn't stretch or kink.
-
-
-
Pull the outer brake pad from the mounting bracket.
-
-
-
Remove the inner brake pad from the caliper.
-
-
-
Use a flat head screwdriver to push the bushing through its hole in the caliper.
-
Remove the bushing from the caliper.
-
-
-
Remove the two 15 mm mounting bracket bolts.
-
Lift the mounting bracket off the rotor.
-
-
-
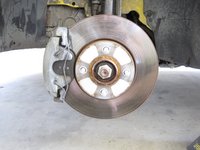
Remove the brake rotor by pulling it straight off the lugs.
-
-
-
Install the new rotor over the wheel lugs.
-
-
-
Reinstall the mounting bracket.
-
Grease the mounting bracket bolts and install them.
-
-
-
Clean the rotor, caliper, and all other hardware with an aerosol brake cleaner.
-
-
-
Coat the steel backing plates of the new brake pads with an anti-squeal coating.
-
-
-
Place the new outer pad on the mounting bracket.
-
-
-
Insert the new bushing from the inside of the caliper.
-
Use a flat head screwdriver to help feed the bushing through its hole.
-
-
-
Compress the caliper piston with a C-clamp.
-
Install the new inner pad by pressing it into the caliper and making sure the clips are secure.
-
-
-
Place the caliper back on the rotor.
-
-
-
Grease the two guide bolts and reinstall them.
-
Reinstall the guide bolt dust caps.
-
-
-
Place the brake line back in the bracket on the strut.
-
Secure the brake line with the retaining clip. Use the blunt end of a wrench to knock it completely into place.
-
-
-
Reinstall the retainer clip by first inserting the ends into the two holes in the caliper, then use pliers to stretch the ends onto the mounting bracket.
-
-
-
Put the wheel back on the car and hand tighten the lug nuts.
-
Lower the car and completely tighten the lug nuts
-
-
-
Place the cap back on the brake fluid reservoir.
-
Turn the key to the "on" position. Press the brake pedal a few times. It should go to the floor once, and then become firm.
-
Fill the brake fluid reservoir with new fluid, if needed.
-


crwdns2935221:0crwdne2935221:0
crwdns2935229:014crwdne2935229:0

crwdns2947412:09crwdne2947412:0
the information was good, pictures are good as well makes things easier and quicker to do the job
The time indicated is way off. 4 hours to replace disk brakes??? He must have gotten tired and gone for a 3 hour nap. I regularly do a set of front disks in an hour or less.
1) Removing a few ounces of brake fluid is something I have never done - and I have never seen any mechanic do it.
2) Spraying the caliper guide bolts with penetrating oil will help free the bolts.
3) The article doesn't mention that the caliper piston will have to be compressed to fit over a new rotor. Use a large C-clamp for this task.
4) Turning a rotor is a bad idea. You end up with a thin rotor that will warp easily. A new rotor is cheaper than the cost for turning one.
Stan, Your comments weren't necessary and they were rude. The intention of this blog is to educate not brag. Sounds like you are discouraging helpful blogs like this one because "you know it all". You used the word regular in your comment. This blog clearly isn't for experts. Chill!, and watch what happens with this generous man's excellent tutorial. The pictures are outstanding. David, you ought to be a technical writer. One like the one who probably wrote Stan's training manuals or Chiltons.
Way to go,rene8491!!! Agree with you on all your points. And David, awesome job. I could do this myself just by following your tutorial. Thank you!
That retaining clip was a bear!! Thanks for the info. I found this very helpful. However, please wear shoes if you do this!!
Thanks - John