crwdns2915892:0crwdne2915892:0
Replacing the heat sink requires removal of the logic board and application of new thermal paste.
crwdns2942213:0crwdne2942213:0
-
-
Remove the following ten screws securing the lower case to the upper case:
-
Three 13.5 mm (14.1 mm) Phillips screws.
-
Seven 3 mm Phillips screws.
-
-
-
Using both hands, lift the lower case near the vent to pop it off two clips securing it to the upper case.
-
Remove the lower case and set it aside.
-
-
-
Use the edge of a spudger to pry the battery connector upwards from its socket on the logic board.
-
-
-
Bend the battery cable slightly away from its socket on the logic board so it does not accidentally connect itself while you work.
-
-
-
Remove the three 3.4 mm T6 Torx screws securing the left fan to the logic board.
-
-
-
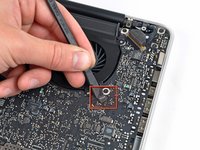
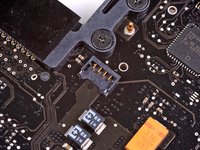
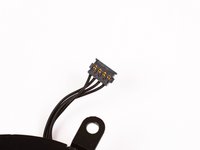
Use the flat end of a spudger to disconnect the left fan connector from the logic board.
-
-
-
Lift the left fan out of the upper case.
-
-
-
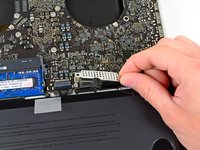
Use the flat end of a spudger to lift the right fan connector out of its socket on the logic board.
-
-
-
-
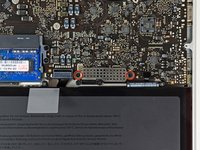
Remove the three 3.4 mm (3.1 mm) T6 Torx screws securing the right fan to the logic board.
-
Lift the right fan out of its opening in the logic board.
-
-
-
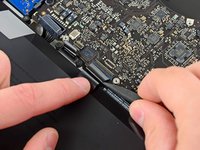
Pull the camera cable out of its socket on the logic board.
-
-
-
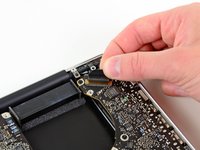
Use the flat end of a spudger to pry the AirPort/Bluetooth connector up from its socket on the logic board.
-
-
-
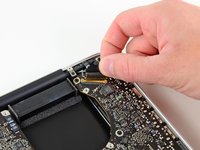
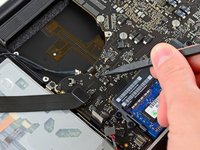
Use the flat end of a spudger to lift the optical drive connector out of its socket on the logic board.
-
-
-
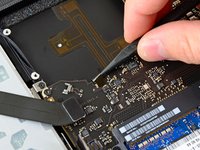
Disconnect the hard drive/IR sensor cable from its socket on the logic board by lifting up from beneath its connector.
-
-
-
Use the flat end of a spudger to lift the subwoofer/right speaker connector out of its socket on the logic board.
-
-
-
Remove the two 1.5 mm ( 1.2 mm ) Phillips screws securing the keyboard/trackpad cable cover to the logic board.
-
Lift the cover off the logic board and set it aside.
-
-
-
Use the flat end of a spudger to pry the trackpad connector up and out of its socket on the logic board.
-
-
-
Use your fingernail to flip up the retaining flap on the keyboard ribbon cable ZIF socket.
-
Use the tip of a spudger to pull the keyboard ribbon cable out of its socket.
-
-
-
Use the flat end of a spudger to lift the battery indicator connector up and out of its socket on the logic board.
-
-
-
Grab the plastic pull tab secured to the display data cable lock and rotate it toward the DC-In side of the computer.
-
Pull the display data cable straight out of its socket on the logic board.
-
-
-
Use the tip of a spudger to flip up the retaining flap on the keyboard backlight ribbon cable ZIF socket.
-
Pull the keyboard backlight ribbon cable out of its socket.
-
-
-
Remove the following nine screws:
-
Seven 3.4 mm ( 3.1 mm) T6 Torx screws on the logic board
-
Two 8 mm T6 Torx screws on the DC-In board
-
-
-
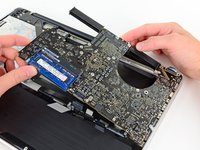
Carefully lift the logic board assembly from its left side and work it out of the upper case, minding the optical drive cable and the I/O ports that may get caught during removal.
-
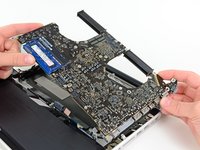
If necessary, use the flat end of a spudger to separate the microphone from the upper case.
-
Pull the I/O port side of the logic board away from the side of the upper case and remove the logic board assembly.
-
-
-
Remove the six #1 Phillips screws securing the heat sink to the logic board.
-
-
-
Remove the heat sink from the logic board.
-


To reassemble your device, follow these instructions in reverse order.
To reassemble your device, follow these instructions in reverse order.
crwdns2935221:0crwdne2935221:0
crwdns2935229:063crwdne2935229:0

crwdns2947412:013crwdne2947412:0
Has anyone replaced the paste on the 2 smaller square heat sinks that are over the IO controller and thunderbolt chips?
In case anyone is wondering, you can find k5-pro on Amazon if you need to replace the thick gunk on the other 2 big chips (IO controller and thunderbolt I think). Didn't realize until I was putting the plates back on that there is quite a gap between the chip and the heat sink. Took me days of asking on forums to find out about the K5 stuff. :D
I removed and super clean on my MacBook Pro 15" Unibody Early 2011 I use Arctic MX-4 on both side. Test running with my Apple 27 inch screen it shut down again overheat even both fans are running, I removed bottom cover and small support to let cool air. Start again same problems I disconnect cable thunderbolt from 27” screen bottom not cover now no problem running on 15 “ screen but still felt it less heat then was too hot. Do you think that Heat Sink need Replacement could be the problem ?
Thanks, John
@alpinejwh The heat sink has no moving parts and usually won’t need servicing/replacement as long as the vents are clean and clear of obstruction. If anything, my guess would be an error in the procedure. I’d probably go back and re-check everything and reapply the thermal paste. Make sure you’re following the application instructions for your particular processor type. Make sure the heat sink screws are correctly tightened and none of the springs are missing. Good luck!
This procedure totally worked for me. I did not replace the heat sink just the paste. The machine works well but I realize this problem could crop up again from what I am reading about these particular MacBooks. Thanks Walter!